Build configuration overview
Netlify lets you link a GitHub, GitLab, Bitbucket, or Azure DevOps repository to a site for continuous deployment. Each time you push to your Git provider, Netlify runs a build with your tool of choice and deploys the result to our powerful CDN.
Build settings
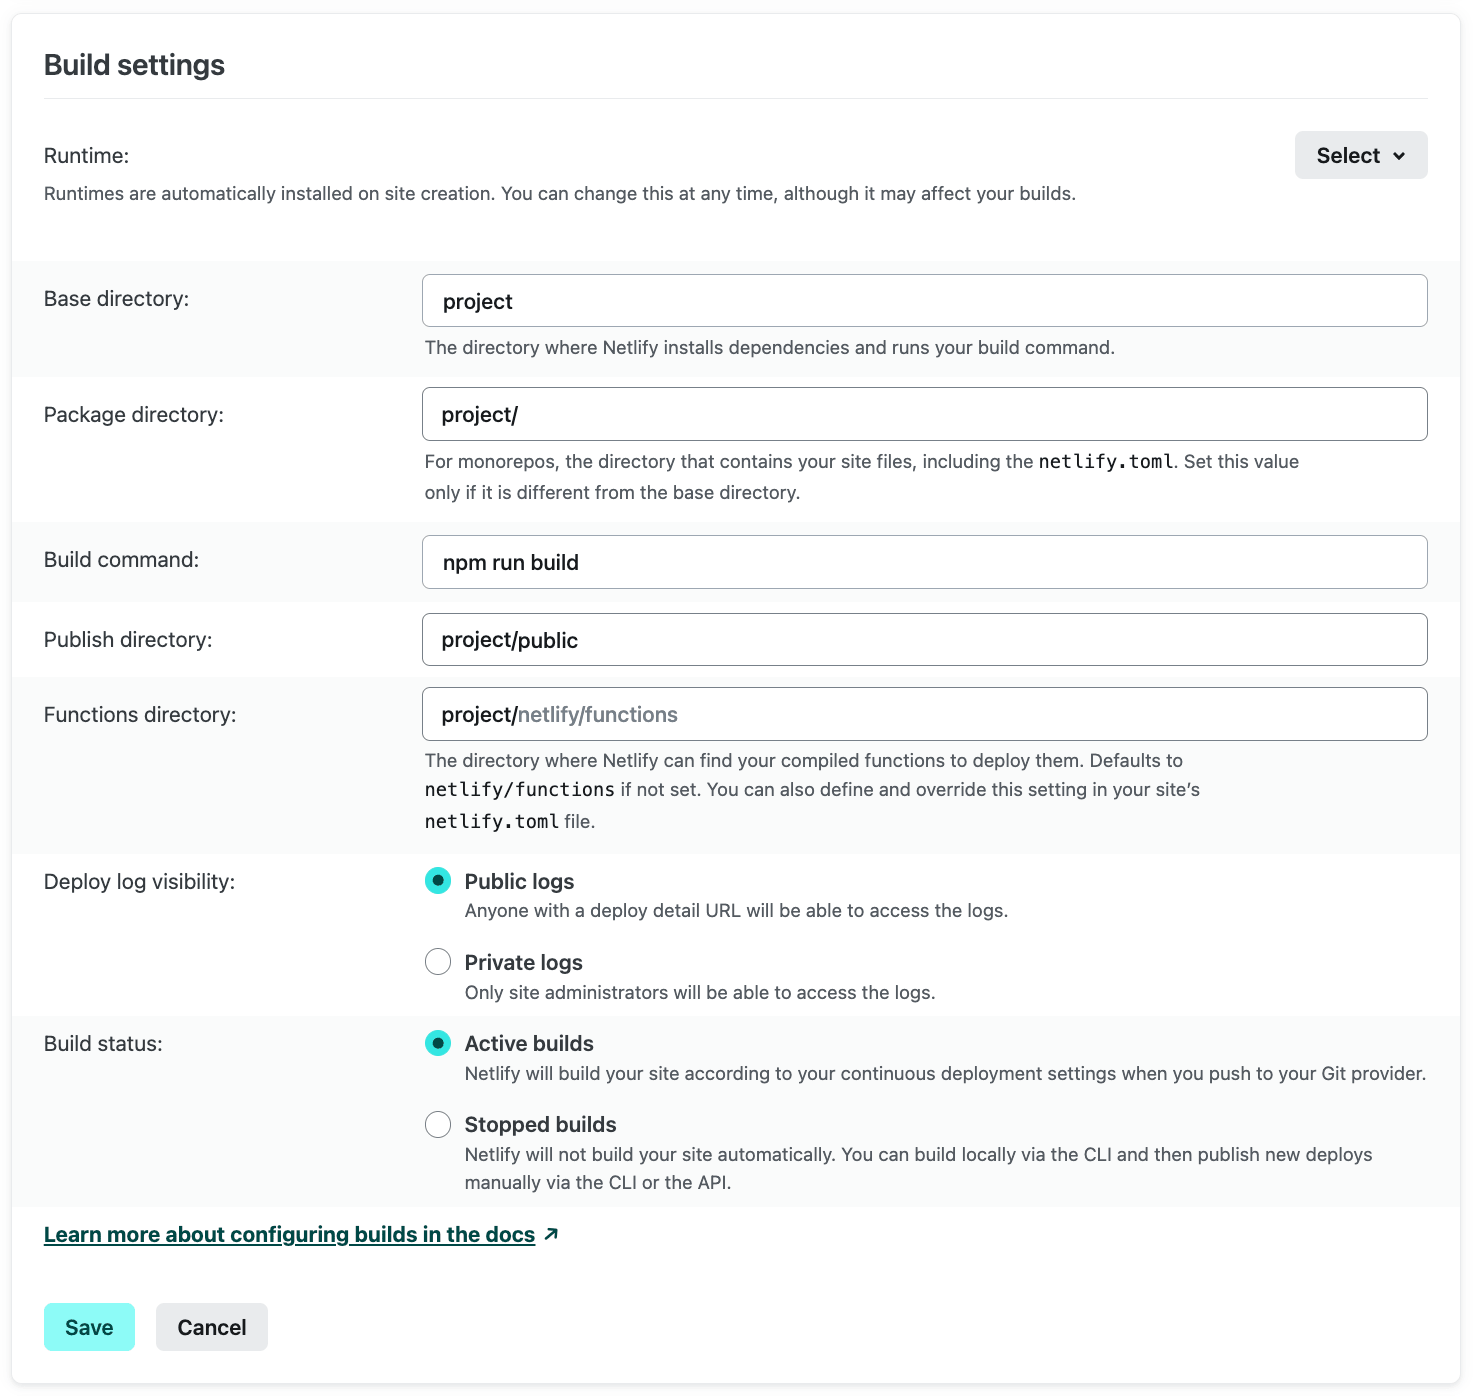
Section titled “Build settings”With continuous deployment configured, you can specify how Netlify will build your site. You can specify these settings when you first add your site from an existing repository and anytime afterwards by going to Project configuration Build & deploy Continuous deployment Build settings.
For basic project configurations, you may need to set the build command and publish directory. For more advanced configurations, such as sites that build from a subdirectory of a repository or a monorepo, you may also need to set the base directory and package directory.
If Netlify automatically detects that your site is a monorepo or uses a framework that Netlify is able to identify, Netlify will automatically fill in some of these configuration fields for you when you first create your site. You can update the fields afterwards as needed. Learn more about commonly used build settings for frameworks and how to configure sites from monorepos.
For public repositories, you can also toggle your deploy log visibility. With continuous deployment, builds are active by default. You can stop or activate builds at will for more control of your workflow.
You can also specify some of these build settings and others in a configuration file, which allows you to change your settings depending on the deploy context. For an example, refer to this sample netlify.toml file that illustrates how to configure some of the available build settings. The configuration file settings override build settings specified in the UI.
Definitions
Section titled “Definitions”The following definitions highlight terms related to build configuration. For definitions regarding branches and site deploys, visit the site deploys overview.
-
Base directory: directory where Netlify checks for dependency management files such as
package.jsonor.nvmrc, installs dependencies, and runs your build command. The build system will use this directory to perform caching during the build process. If not set, the base directory defaults to the root of the repository. -
Site files: source files in your repository that represent the code for your site and any related configurations. Also known as your site’s package.
-
Package directory: typically used for monorepos, the directory that contains your site files, including the
netlify.toml. Set this only if the location is different from the base directory. Learn more about how Netlify searches for your configuration files in monorepos. - Visit the frameworks doc to learn about typical build commands for popular tools.
Build command: the command to run to build your site if you are using a static site generator or other build tool. For example,
npm run build. The build command runs in the Bash shell, allowing you to add Bash-compatible syntax to the command. - Visit the frameworks doc to learn about typical publish directories for popular tools.
Publish directory: directory that contains the deploy-ready HTML files and assets generated by the build. The directory is relative to the base directory, which is root by default (
/). -
Functions directory: directory that contains function files and optional subdirectories for organizing function files. Netlify will access the functions directory during every build, preparing and deploying each supported code file as a function. Default is
netlify/functions. The functions directory is relative to the base directory. -
Netlify configuration file: optional configuration file (
netlify.toml) that specifies how Netlify builds and deploys your site — including redirects, branch and context-specific settings, and more. Learn more about file-based configuration. - Deploy log visibility: privacy level for the deploy logs for a site linked to a public repo. The default setting Public logs makes deploy logs available to anyone with a deploy detail URL. You can limit deploy log access to site members by selecting Private logs.
- Active builds: used to indicate when builds are active. Netlify builds your site according to your continuous deployment settings when you push to your Git provider.
- Stopped builds: used to indicate when builds are stopped. Netlify will never build your site. You can build your site locally instead using Netlify CLI and then publish new deploys manually with the CLI or the API.
Set the build command
Section titled “Set the build command”You can manually set the build command in the following ways:
- in the Netlify UI, when you select Add new project. For an existing site, you can update the setting at Project configuration Build & deploy Continuous deployment Build settings.
- in a Netlify configuration file. Use the
commandproperty under[build]settings. Learn more about file-based configuration. - using Netlify CLI when setting up continuous deployment for a site.
To find the typical build command for your framework, refer to the frameworks doc.
Set the publish directory
Section titled “Set the publish directory”You can manually set the publish directory in the following ways:
- in the Netlify UI, when you select Add new project. For an existing project, you can update the setting at Project configuration Build & deploy Continuous deployment Build settings.
- in a Netlify configuration file. Use the
publishproperty under[build]settings. Learn more about file-based configuration. - using Netlify CLI when setting up continuous deployment for a site.
To find the typical publish directory for your framework, refer to the frameworks doc.
Set the base directory
Section titled “Set the base directory”If not explicitly set, the base directory defaults to the root of the repository. If you want to install dependencies and build your site in a subdirectory rather than root, you can specify this by setting a base directory.
You can set a base directory in the following ways:
- in the Netlify UI, when you select Add new project. For an existing site, you can update the setting at Project configuration Build & deploy Continuous deployment Build settings.
- in a Netlify configuration file stored at the root of your repository. Use the
baseproperty under[build]settings, and Netlify will use that value to set the base directory when you first set up the site. - if you’re creating a Deploy to Netlify button for other people to easily clone and deploy your site, use the
basequery parameter to set the base directory for that button. You can create different buttons for each site in your monorepo by setting a differentbasevalue for each button.
A base directory specified in a root-level netlify.toml overrides the UI setting.
Set the package directory
Section titled “Set the package directory”If you use a monorepo and store your site files in a different directory from your base directory, you can specify the location using the Package directory field in the Netlify UI.
This is helpful if you want to install dependencies and run builds in the root but want to store your site’s source files, including the corresponding netlify.toml, in separate project directories. If you don’t set this value, Netlify will search for the netlify.toml in the base and root directories.
In addition, if you don’t set an explicit publish directory, Netlify uses the package directory to search for the directory that contains the output of your build (for example, a dist folder) and any related _headers and _redirects files within that directory.
To set the package directory for a site:
- Navigate to Project configuration Build & deploy Continuous deployment Build settings.
- Select Configure.
- Enter the Package directory. For example,
/packages/website. - Select Save.
Recommendations for specific setups
Section titled “Recommendations for specific setups”Consider the following suggestions based on your project configuration.
- If your repository contains only the site you want to deploy, stored in the repository root, Netlify will automatically detect the build settings for you. In most cases, you can proceed with these default settings. But, if you do need to manually configure any settings, these would likely be the build command and the publish directory.
- If your site is a monorepo, Netlify will automatically detect each site directory in your repository and configure the build settings automatically based on the site you select. But, you also have the option to manually configure the build settings. For monorepos, this will include setting the package directory. Refer to our documentation on the recommended monorepo setup to learn more.
- If you have a larger repository that includes more than just your site files, you may need to deploy a self-contained site or monorepo workspace from a specific subdirectory. For example, a documentation site from the
/docssubdirectory of your Python library. Or, a monorepo workspace set up in a/frontendsubdirectory. To work from a specific subdirectory, update the base directory. The publish directory is relative to the base directory by default.
For larger repositories and monorepos, note that you can customize the default ignore builds behavior to determine whether or not your site builds as changes are made.
Build image selection
Section titled “Build image selection”When a build is triggered on Netlify, our build system starts a Docker container running a build image. The build image is a snapshot of an operating system that has various software tools and other settings preinstalled and configured.
Although all new Netlify sites use a default build image, you may be able to select from multiple images with different operating system and software versions. You might choose a different build image to meet a software requirement for your build tool, to try out experimental pre-release build features, or to keep up-to-date with the included operating system environment. Build image selection also enables Netlify to release breaking changes into the build image while allowing you to accommodate those changes with time to upgrade.
We recommend upgrading to the most recent build image regularly to take advantage of the latest features and security enhancements.
To change the build image for a site, go to Project configuration Build & deploy Continuous deployment Build image selection, and select the build image you would like to use. Our build system will use this image for all production deploys, branch deploys, and Deploy Previews.
Build image defaults and project dependencies
Section titled “Build image defaults and project dependencies”Each build image has a set of software with pre-defined default versions. You can customize these defaults.
During your project’s first build, we pin a version of Node, Ruby, Go, and Yarn that matches the default version installed on the build image. These pinned versions are stored in your project’s repository object, associating those pinned versions with your project’s Git repository. This ensures your project’s software versions will not be affected if the build image’s defaults change.
More build configuration resources
Section titled “More build configuration resources”- Common framework configurations
- Monorepos
- JavaScript SPAs
- Ignore builds
- Manage build dependencies
- Build environment variables
- File-based configuration
- Example
netlify.tomlfile - On-demand Builders
- Build hooks
- Stop or activate builds
- Build troubleshooting tips
- Available software at build time
- Private Connectivity
- Compiled build and deploy resources - start here!
Did you find this doc useful?
Your feedback helps us improve our docs.