Get started with Netlify
Deploy a demo project on Netlify to make it available on the web. Get to know some key features including Deploy Previews, rollbacks, Netlify Functions, environment variables, redirects, and Netlify Forms.
For the complete Netlify documentation index, see llms.txt. Markdown versions of this page are available by appending .md to the URL. Get help with common issues and learn best practices for requesting more support.
| I need help with . . . | Go to . . . |
|---|---|
| Changing my project name on Netlify | Changing project name |
| Getting my site to run locally | Check out your framework docs or Netlify's Local development guide or Framework setup guides |
| Missing files | Deploy File Explorer |
404 Page not found | Support Guide: Page not found |
build failed with non-zero exit code | Support Guide:Build troubleshooting tips |
| Understanding my build log | Support Guide: Build log overview |
| DNS | Domains troubleshooting |
| Forms | Forms troubleshooting |
| Billing | Billing FAQs for legacy plans Billing FAQs for credit-based plans Or you can reach out directly to Support |
| Logging in | Support Guide: Troubleshooting logging in |
Error linking repo when creating a new site: Looks like something went wrong! | Support Guide: Error linking repo when creating a new site |
If you have a Credit-based plan or certain kinds of Enterprise plans, you can use Agent Runners to start fixing your failed deploys.
When a deploy fails, you can use Agent Runners to start fixing the issue directly from your failed deploy details page.
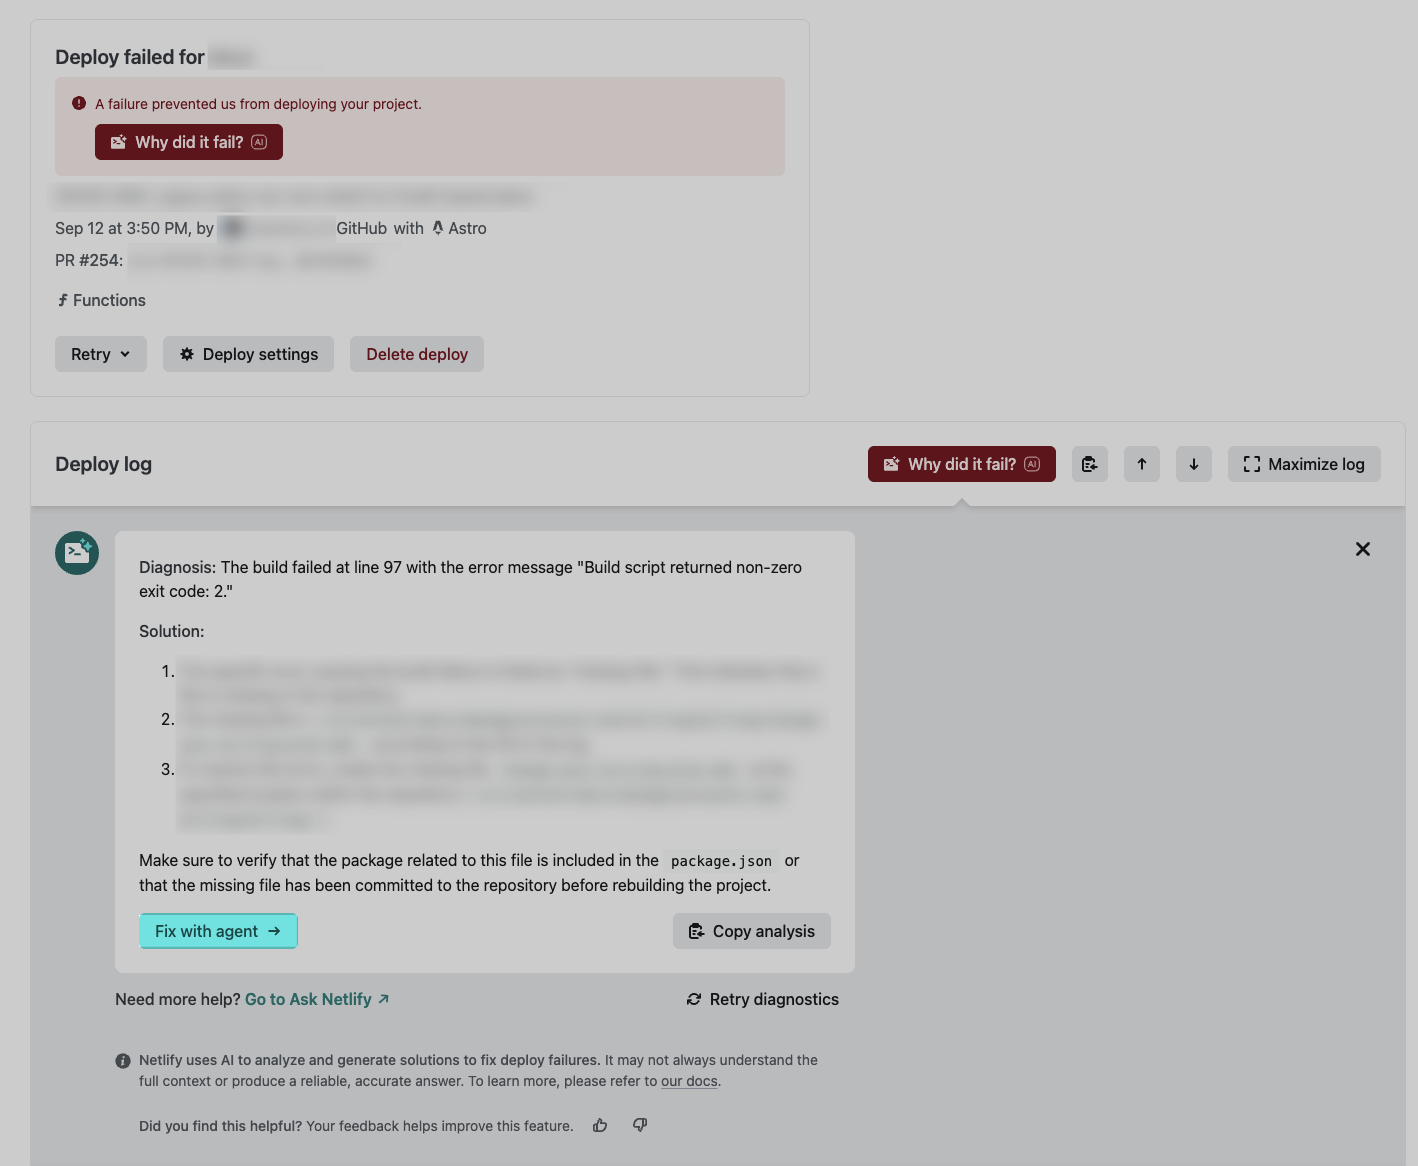
Learn more about using Agent Runners.
To check for missing file, use Netlify's Deploy File Explorer.
Using Netlify's Deploy File Explorer, you can:
Page not foundLooks like you’ve followed a broken link or entered a URL that doesn’t exist on this site.If this is your site, and you weren’t expecting a 404 for this path, please visit Netlify’s “page not found” support guide for troubleshooting tips.If your site unexpectedly serves a 404 page error, there can be several reasons why. For instance, if your geographic area or IP address is blocked from a site, then you will only see a Netlify-branded 404 page.
For more possibilities and troubleshooting help, check out our verified Support Forums guide on unexpected 404 page errors.
Learn best practices for avoiding build failures, how to avoid build failures, and the top causes of build failures from our verified Netlify Support Guide.
To change your project name, go to Project configuration General Project details Project information and choose Manage project name and cover image.
To help you fix failed deploys, Netlify offers AI capabilities that diagnose and suggest solutions for deploy failures and build errors so you can get back to shipping code.
Learn more about Netlify’s AI capabilities to give solutions for failed deploys.

Providing specific, detailed information in your initial request may help reduce back-and-forth so we can resolve your issue together, faster. This section provides tips to help you prepare to send a request through the support form at netlify.com/support.
You can find this information under Project configuration General Project details Project information Project name. Other places in the Netlify UI may list your project by its custom domain if you’ve configured one, so be sure to send us the Project name from this location.
Project name is also known as the site name.
If your request pertains to multiple projects, please share all relevant project names.
If your request isn’t about a specific project, please enter n/a for the project name. Questions that aren’t about a specific project are often about a user account or team account. If that’s the case, please provide the email address for your user or account slug for your team as described below.
If you have multiple email addresses, be sure to use the one that’s associated with the user, project, or team that you need help with. This ensures your request will be prioritized as entitled by your subscription.
If your question pertains to a team rather than a project or user, please provide the team’s account slug in the body of your request. You can find this information under Team settings > General > Team details > Team information > Slug.
You can’t send screenshots through the support form, but you can add them after you’ve submitted your request. After you submit the form, you’ll get an email confirming that our help desk has received your request. You can send relevant screenshots in response to the email.
Get started with Netlify
Deploy a demo project on Netlify to make it available on the web. Get to know some key features including Deploy Previews, rollbacks, Netlify Functions, environment variables, redirects, and Netlify Forms.
Your feedback helps us improve our docs.