Testing Snippets
Builds
Section titled “Builds”You can manually set the publish directory in the following ways:
- in the Netlify UI, when you select Add new project. For an existing project, you can update the setting at Project configuration Build & deploy Continuous deployment Build settings.
- in a Netlify configuration file. Use the
publishproperty under[build]settings. Learn more about file-based configuration. - using Netlify CLI when setting up continuous deployment for a site.
To find the typical publish directory for your framework, refer to the frameworks doc.
You can set a base directory in the following ways:
- in the Netlify UI, when you select Add new project. For an existing site, you can update the setting at Project configuration Build & deploy Continuous deployment Build settings.
- in a Netlify configuration file stored at the root of your repository. Use the
baseproperty under[build]settings, and Netlify will use that value to set the base directory when you first set up the site. - if you’re creating a Deploy to Netlify button for other people to easily clone and deploy your site, use the
basequery parameter to set the base directory for that button. You can create different buttons for each site in your monorepo by setting a differentbasevalue for each button.
A base directory specified in a root-level netlify.toml overrides the UI setting.
You can manually set the build command in the following ways:
- in the Netlify UI, when you select Add new project. For an existing site, you can update the setting at Project configuration Build & deploy Continuous deployment Build settings.
- in a Netlify configuration file. Use the
commandproperty under[build]settings. Learn more about file-based configuration. - using Netlify CLI when setting up continuous deployment for a site.
To find the typical build command for your framework, refer to the frameworks doc.
If you use a monorepo and store your site files in a different directory from your base directory, you can specify the location using the Package directory field in the Netlify UI.
This is helpful if you want to install dependencies and run builds in the root but want to store your site’s source files, including the corresponding netlify.toml, in separate project directories. If you don’t set this value, Netlify will search for the netlify.toml in the base and root directories.
In addition, if you don’t set an explicit publish directory, Netlify uses the package directory to search for the directory that contains the output of your build (for example, a dist folder) and any related _headers and _redirects files within that directory.
To set the package directory for a site:
- Navigate to Project configuration Build & deploy Continuous deployment Build settings.
- Select Configure.
- Enter the Package directory. For example,
/packages/website. - Select Save.
Package directory: typically used for monorepos, the directory that contains your site files, including the netlify.toml. Set this only if the location is different from the base directory. Learn more about how Netlify searches for your configuration files in monorepos.
Publish directory: directory that contains the deploy-ready HTML files and assets generated by the build. The directory is relative to the base directory, which is root by default (/).
Site files: source files in your repository that represent the code for your site and any related configurations. Also known as your site’s package.
Build command: the command to run to build your site if you are using a static site generator or other build tool. For example, npm run build. The build command runs in the Bash shell, allowing you to add Bash-compatible syntax to the command.
Netlify configuration file: optional configuration file (netlify.toml) that specifies how Netlify builds and deploys your site — including redirects, branch and context-specific settings, and more. Learn more about file-based configuration.
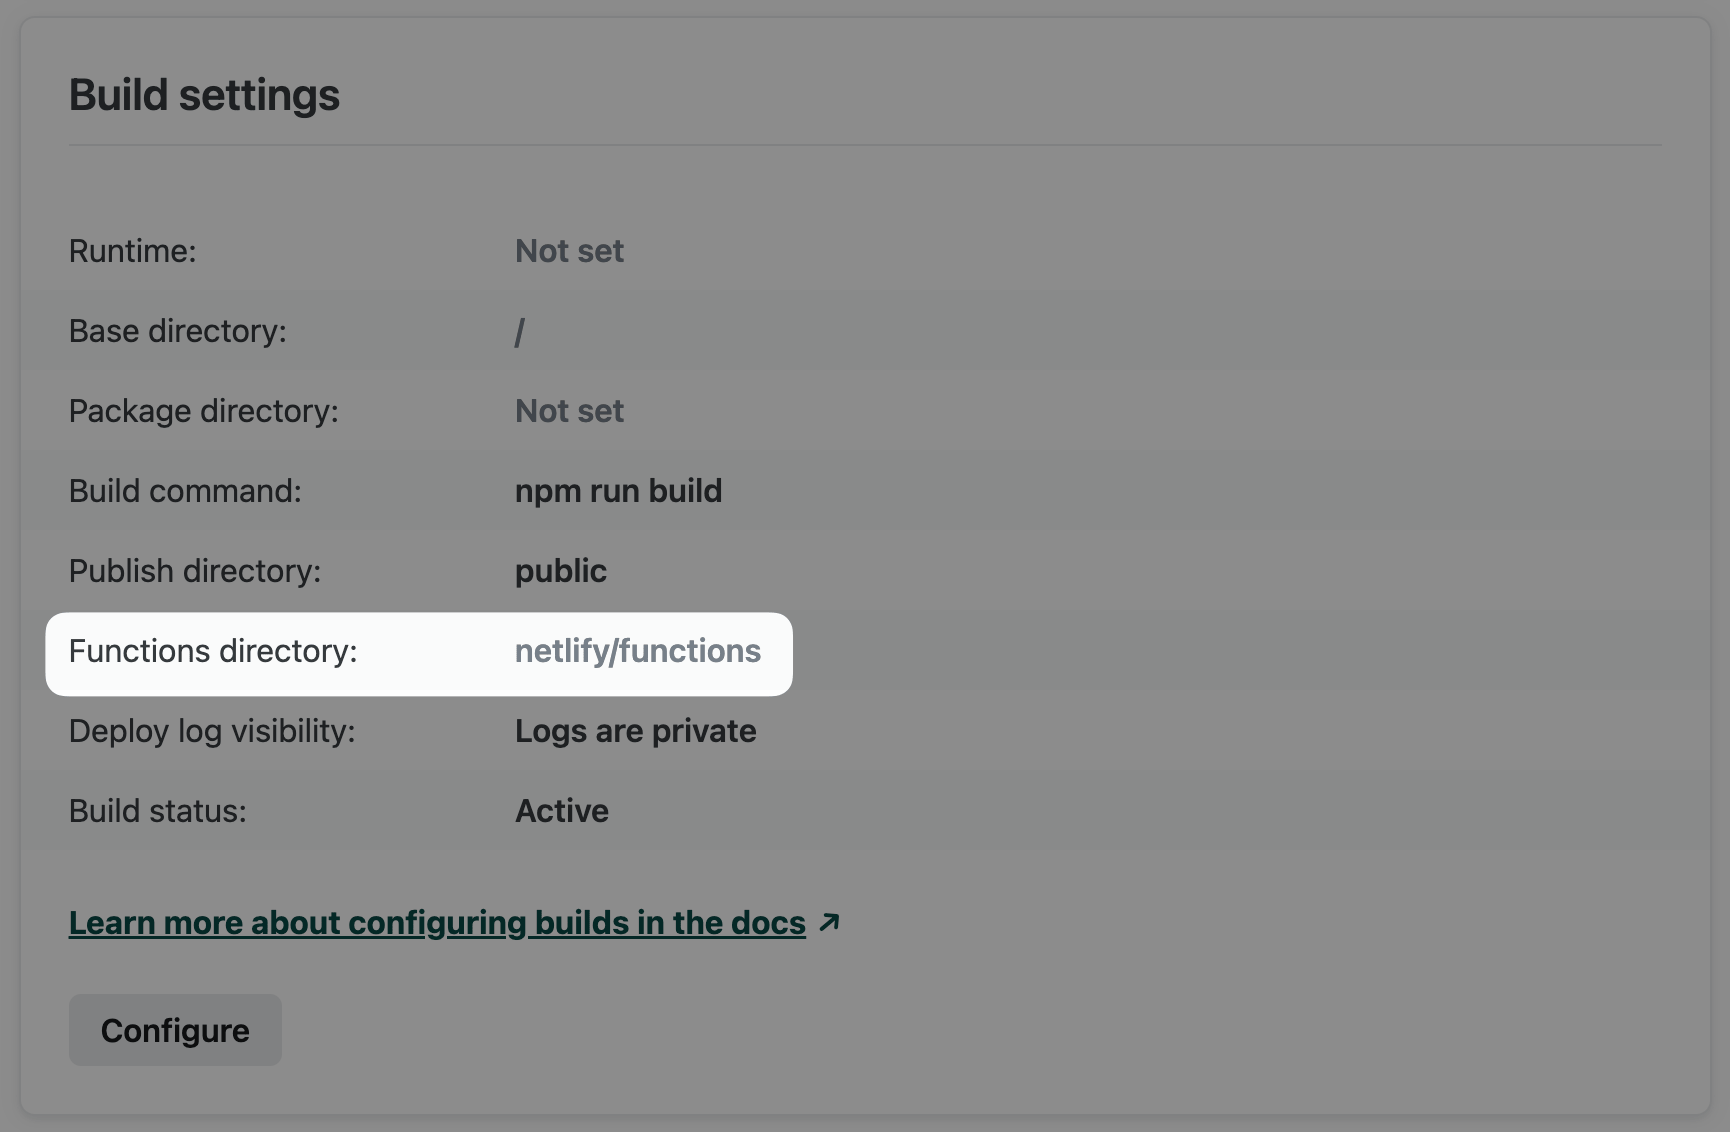
Functions directory: directory that contains function files and optional subdirectories for organizing function files. Netlify will access the functions directory during every build, preparing and deploying each supported code file as a function. Default is netlify/functions. The functions directory is relative to the base directory.
Base directory: directory where Netlify checks for dependency management files such as package.json or .nvmrc, installs dependencies, and runs your build command. The build system will use this directory to perform caching during the build process. If not set, the base directory defaults to the root of the repository.
Connect
Section titled “Connect”To enable Connect, contact our sales team to request a demo.
Once enabled, the Connect page will be unlocked in the Netlify UI for your team.
To use WordPress with Netlify Connect, complete the following steps:
- Prepare your WordPress instance.
- Add your WordPress instance to your data layer.
Prepare your WordPress instance
Take the following steps on your WordPress instance before you add it to your data layer:
-
Install and activate the
Netlify ConnectWordPress plugin:- Download the
Netlify ConnectWordPress plugin. - In your WordPress admin dashboard, navigate to Plugins and then select Add New Plugin.
- Select Upload Plugin and follow the prompts to upload the
netlify-connect-wp-plugin.zipfile that you downloaded in step 1. - Select Install now.
- Download the
-
In your WordPress admin dashboard, navigate to and create an application password. You’ll need to enter this as your token when you set up your WordPress data source in the Netlify UI, and Netlify will use this token to access your data.
-
To enable automatic syncing to Netlify, add your data layer Webhook URL in your WordPress plugin settings for Connect:
-
In your WordPress admin dashboard, navigate to .
-
Add the following webhook to the Data layer Webhook URL field. Make sure to replace the placeholder
YOUR-DATA-LAYER-IDwith your data layer ID.https://webhook.netlify-connect.com/hooks/data_layer/data_source/publish/YOUR-DATA-LAYER-IDNote that you also have the ability to create a custom authenticated webhook and use that instead of the default webhook. Learn more about managing webhooks.
-
Select Save Changes to finish.
-
Add your WordPress instance
Once you have prepared your WordPress instance, take the following steps in the Netlify UI to add it to your data layer:
-
Select Add a data source.
-
Select
WordPressas the Data source type.If you haven’t already installed the extension for this data source, follow the install extension prompt to open the WordPress extension details page in a new tab. As a Team Owner, select Install to install and make the extension available to all data layers on your team.
After you install the extension, close the tab and return to the Add a data source flow in Connect to continue with the next steps.
-
Enter a Name for this data source.
-
Add a Type prefix for this data source. The prefix must start with an uppercase letter and can only consist of alphanumeric characters and underscores.
Connect will add the prefix to all data types synced from this data source in the GraphQL schema, which you will use when you query the GraphQL API. For example,
Postwith the prefixMarketingbecomesMarketingPostin the schema. -
Enter the User (the username for which you created the application password).
-
Enter the Token (the application password you created in WordPress).
-
Enter the full API Host URL for your WordPress instance (for example,
https://example.comwithout a trailing slash). -
Select Save to add this data source.
When you add a new data source, Netlify automatically connects to it and starts syncing data to your data layer.
Optional configuration
If you need to customize your setup further, you can configure the following optional settings during the setup process:
- Instance ID unique value to use for this data source. Netlify uses this value to support cross-references and linking between data sources.
- Per page: specify the number of nodes to fetch per page when syncing data from WordPress. The default is
100. - Request concurrency: set the number of concurrent requests to make during node sourcing. You can lower this if your WordPress server experiences issues during data sourcing. The default is
15. - Types to exclude globally: specify the slugs of post types, taxonomies, or other content types to exclude from sourcing, listed as comma-separated values.
Connect supports Drupal versions 9 and 10.
To use Drupal with Connect, complete the following steps:
- Prepare your Drupal instance.
- Add your Drupal instance to your data layer.
Prepare your Drupal instance
Take the following steps on your Drupal instance before you add it to your data layer:
-
Install Gatsby Integration module version 2. During the installation flow, follow the prompts to enable the JSON:API Extras module.
-
In the JSON:API Extras module, enable
Include count in collection queries. This setting helps improve performance during data syncs. -
Navigate to and enable:
GatsbyGatsby JSON:API Extras
-
Install JSON:API Schema module.
-
To enable automatic syncing to Netlify, add your data layer webhook to the Gatsby Integration module.
-
Navigate to .
-
Add the following webhook to the Build Webhook URLs field. Make sure to replace the placeholder with your data layer ID.
https://webhook.netlify-connect.com/hooks/data_layer/data_source/publish/YOUR-DATA-LAYER-IDNote that you also have the ability to create a custom authenticated webhook and use that instead of the default webhook. Learn more about managing webhooks.
-
Under Entity types to send to Gatsby Preview and Build Server, select the types you wish to sync. At minimum, you should select the
Contenttype. -
Select Save configuration to finish.
-
-
Navigate to to add the following permissions for data syncing:
- Add
Sync Gatsby Fastbuild log entitiespermissions. If your Drupal instance does not use authentication, then selectAnonymous user. Otherwise, select the appropriate Drupal role. - Add
View Gatsby log entity entitiespermissions. If your Drupal instance does not use authentication, then selectAnonymous user. Otherwise, select the appropriate Drupal role.
- Add
Add your Drupal instance
Once you have prepared your Drupal instance, take the following steps in the Netlify UI to add it to your data layer:
-
Select Add a data source.
-
Select
Drupalas the Data source type.If you haven’t already installed the extension for this data source, follow the install extension prompt to open the Drupal extension details page in a new tab. As a Team Owner, select Install to install and make the extension available to all data layers on your team.
After you install the extension, close the tab and return to the Add a data source flow in Connect to continue with the next steps.
-
Enter a Name for this data source.
-
Add a Type prefix for this data source. The prefix must start with an uppercase letter, and can only consist of alphanumeric characters and underscores.
The prefix will be added to all data types synced from this data source in the GraphQL schema and you will use it when you query the GraphQL API. For example,
DrupalPostwith the prefixMarketingbecomesMarketingDrupalPostin the schema. -
(Optional) Enter a unique Instance ID value to use for this data source. Netlify uses this value to support cross-references and linking between data sources.
-
Enter the Site URL for your Drupal site, including the trailing slash.
-
(Optional) Enter the JSON API Path Prefix to use as the relative path to the
JSON:APIroot. The default isjsonapi. -
(Optional) If your Drupal instance has basic authentication enabled, enter the HTTP Basic Auth username and HTTP Basic Auth password.
-
(Optional) Enter any Disabled types that you would like to exclude from the GraphQL API.
-
(Optional) Enter the number of Concurrent API requests a user can make to the Drupal API. The default is
20. -
(Optional) Enter a Request timeout value. This is the time in milliseconds before requests to Drupal will time out. The default is
30000. -
(Optional) Enter the Default language of your Drupal site. This will determine what language content to sync from Drupal. The default is to sync the English language content.
-
(Optional) Enter the Enabled languages for your Drupal site. This will allow you to sync different translations from Drupal, depending on what languages your site has enabled.
-
(Optional) Select Filter by language to filter the data you sync from Drupal based on the current language.
-
(Optional) Enter the Translatable entities to specify what entities to sync translations for. For example,
node--page, node--article. -
(Optional) Enter the Non-translatable entities from your Drupal site. These entities will use the default language of your site. For example,
taxonomy_term--tags, taxonomy_term--categories. -
(Optional) Enter the Request Headers used for Drupal API to apply specific headers for the API.
-
(Optional) Enter the Filters used for Drupal API to specify what content to sync. This will allow you to control the data you receive from Drupal. For example,
{"recipe": "filter[tags.name][value]=British"}. -
Select Save to add this data source.
When you add a new data source, Netlify automatically connects to it and starts syncing data to your data layer.
To use a custom data source with Netlify Connect, complete the following steps:
- Install the data integration.
- Prepare your data source instance.
- Add your custom data source to your data layer.
Install the data integration
Before you can add a custom data source to your data layer, you must install the data integration for that type of source on your team.
- As a Team Owner, navigate to the Extensions page for your team in the Netlify UI.
- Find the data integration for the custom data source type that you wish to use and select it in the search results.
- If it’s not already installed, on the details page, select Install.
If you can’t find the data integration, speak with the integration developer to ensure they have followed all of the steps to publish an extension.
Prepare your data source instance
To enable automatic syncing to Netlify, you need to manually add a webhook to your custom data source instance. The exact instructions vary for each system but you need to do the following:
-
Log in to your data source and navigate to the webhook settings.
-
Follow the prompts to create a new webhook and add the following to the URL field. Make sure to replace the placeholder with your data layer ID.
https://webhook.netlify-connect.com/hooks/data_layer/data_source/publish/YOUR-DATA-LAYER-IDNote that you also have the ability to create a custom authenticated webhook and use that instead of the default webhook. Learn more about managing webhooks.
-
If the options are available, select the data types and events that should trigger the webhook. We suggest including any create, edit, and delete events for all content types that you wish to store in your data layer.
If you have the option to add a header to the webhook, add a
x-connect-data-sourceheader to the request with the data integration’s slug as the header’s value. This ensures that the webhook only triggers a sync for this specific data source, instead of all data sources on your data layer. -
Save and enable the webhook.
You may need to complete other configuration steps on your data source instance. Please refer to the documentation provided by the integration developer.
Add your custom data source
Once you have installed the data integration for your team and prepared your data source instance, take the following steps in the Netlify UI to add the custom data source to your data layer:
-
If you are not already on the data layer settings page, on your team’s Connect page, select the data layer from the Data layers list, and then select Data layer settings.
-
On the data layer settings page, select Data sources.
-
Select Add a data source.
-
Select the data integration that you installed as the Data source type.
-
Enter a Name for this data source.
-
Add a Type prefix for this data source. The prefix must start with an uppercase letter, and can only consist of alphanumeric characters and underscores.
The prefix will be added to all data types synced from this data source in the GraphQL schema and you will use it when you query the GraphQL API. For example,
Postwith the prefixMarketingbecomesMarketingPostin the schema. -
(Optional) Enter a unique Instance ID value to use for this data source. Netlify uses this value to support cross-references and linking between data sources.
-
Fill in the remaining configuration fields with the values for your data source instance. For example, you may need to provide the API key for your CMS instance.
-
Select Save to add this data source.
When you add a new data source, Netlify automatically connects to it and starts syncing data to your data layer.
To use Salesforce Commerce Cloud (SFCC), complete the following steps:
- Set up an API Client in Account Manager.
- Add your SFCC instance and API information to your data layer.
Set up an API Client in Account Manager
Netlify Connect utilizes the Salesforce Admin API to sync product data. To enable this, you need to set up an API Client with the correct scopes in Account Manager on Salesforce.
Create an API Client in Account Manager by following the instructions provided by Salesforce. While you set up the API client, note the following:
- Take note of the password you set for the API Client. This will be used as the Client Secret later.
- The API Client will require the following scopes:
sfcc.productsandsfcc.catalogs. - When you finish creating the client, find it in the table of API clients and take note of the value in the API Client ID column of the table, as described in Salesforce’s instructions. For example,
1d763261-6522-4913-9d52-5d947d3b94c4.
Add your SFCC instance
Once you have set up an API client, take the following steps in the Netlify UI to add it to your data layer:
-
Select Add a data source.
-
Select
Salesforce Commerce Cloudas the Data source type.If you haven’t already installed the extension for this data source, follow the install extension prompt to open the Salesforce Commerce Cloud extension details page in a new tab. As a Team Owner, select Install to install and make the extension available to all data layers on your team.
After you install the extension, close the tab and return to the Add a data source flow in Connect to continue with the next steps.
-
Enter a Name for this data source.
-
(Optional) Enter a unique Instance ID value to use for this data source. Netlify uses this value to support cross-references and linking between data sources.
-
Enter a Type prefix for this data source. The prefix must start with an uppercase letter, and can only consist of alphanumeric characters and underscores.
The prefix will be added to all data types synced from this data source in the GraphQL schema and you will use it when you query the GraphQL API. For example,
SfccProductwith the prefixMarketingbecomesMarketingSfccProductin the schema. -
Enter the Client ID for the API Client you created in Account Manager.
-
Enter the password for the API Client as the Client Secret.
-
Enter the Organization ID for your B2C Commerce instance. For example,
f_ecom_zzte_053. -
Enter the Short Code that is assigned to your realm. The short code applies to your entire realm, across all instances. For example,
kv7kzm78. -
Enter the Site ID for the site that you want to access data for (sometimes called a “channel”). For example,
RefArchorSiteGenesis. -
Enter a comma-separated list of Locales to sync data for. For example,
default, en-US, fr-FR, zh-CN, ja-JP, it-IT, en-GB. -
Enter the Request Concurrency to set the maximum number of concurrent requests to make to the B2C Commerce API.
-
Select Save to add this data source.
When you add a new data source, Netlify automatically connects to it and starts syncing data to your data layer.
To use Shopify with Connect, complete the following steps:
- Prepare your Shopify store.
- Add your Shopify store to your data layer.
Prepare your Shopify store
To add a Shopify store to your data layer in Netlify Connect, first you need to set up a custom Shopify app that we can use to access Shopify’s Admin API and sync data. You will need the Admin API access token to set up your Shopify data source in Netlify Connect.
-
Log in to your Shopify store as the store owner and search for
Apps and sales channels. -
Enable custom app development. To do this, select Develop apps, then Allow custom app development. After reading the warning and information provided, select Allow custom app development.
-
Create a custom app. From the
App developmentsection, select Create an app. Enter an app name and developer, then select Create app. -
Set admin API scopes for the app. On the custom app page, select Configure Admin API scopes. Enable the
read_products,read_product_listings, andread_filesscopes, and then select Save.You can use this data integration to proxy directly to the Shopify GraphQL API as well. To allow additional CRUD operations through the proxy, enable the admin API scopes for these operations, such as
write_products.
-
Install the app and get the API access token. Select the API credentials tab and select Install app under Access tokens. Follow the prompts to install the app on your Shopify store.
Next, under the Admin API access token section, select Reveal token once to access the token. Store the token in a safe place as you will need it to set up the data source connection.

To enable automatic syncing to Netlify, you also need to add your data layer webhook to Shopify. This ensures that Shopify will notify Netlify when data updates.
-
In Shopify, navigate to , and under Webhooks, select Create webhook.
-
Select each Event that should trigger a sync to Netlify.
-
Select
JSONas the format. -
Add the following webhook to the URL field. Make sure to replace the placeholder with your data layer ID.
https://webhook.netlify-connect.com/hooks/data_layer/data_source/publish/YOUR-DATA-LAYER-IDNote that you also have the ability to create a custom authenticated webhook and use that instead of the default webhook. Learn more about managing webhooks.
-
Select Add webhook to finish.
Add your Shopify store
Once you have created a custom Shopify app, take the following steps in the Netlify UI to add your Shopify store to your data layer:
-
Select Add a data source.
-
Select
Shopifyas the Data source type.If you haven’t already installed the extension for this data source, follow the install extension prompt to open the Shopify extension details page in a new tab. As a Team Owner, select Install to install and make the extension available to all data layers on your team.
After you install the extension, close the tab and return to the Add a data source flow in Connect to continue with the next steps.
-
Enter a Name for this data source.
-
Add a Type prefix for this data source. The prefix must start with an uppercase letter, and can only consist of alphanumeric characters and underscores.
The prefix will be added to all data types synced from this data source in the GraphQL schema and you will use it when you query the GraphQL API. For example,
ShopifyProductwith the prefixMarketingbecomesMarketingShopifyProductin the schema. -
(Optional) Enter a unique Instance ID value to use for this data source. Netlify uses this value to support cross-references and linking between data sources.
-
Enter the Admin API access token. This is the access token for the custom Shopify app you created in the prepare your store step. The token starts with
shpat_. -
Enter the Store Name for your Shopify store. You can find store name in the Shopify URL. For example,
STORENAME.myshopify.com. -
Select Save to add this data source.
When you add a new data source, Netlify automatically connects to it and starts syncing data to your data layer.
To use Contentful with Netlify Connect, complete the following steps:
- Prepare your Contentful instance.
- Add your Contentful instance to your data layer.
Prepare your Contentful instance
Take the following steps on your Contentful space before you add it to your data layer:
-
In the Contentful web app, navigate to , and select Add API key to create an API key and generate access tokens for the space you want to sync. Netlify will need one of these tokens to access your data.
-
In the Contentful web app, navigate to , and select Create personal access token to generate a Content Management API access token. Copy this token and store it in a safe place. Netlify will need this token to automatically set up a webhook in your Contentful space that will notify Connect whenever data changes in your CMS.
-
To enable automatic syncing to Netlify, add your data layer webhook to your Contentful instance:
-
In your Contentful account, navigate to , and select Add webhook.
-
Add the following webhook to the URL field. Make sure to replace the placeholder with your data layer ID.
https://webhook.netlify-connect.com/hooks/data_layer/data_source/publish/YOUR-DATA-LAYER-IDNote that you also have the ability to create a custom authenticated webhook and use that instead of the default webhook. Learn more about managing webhooks.
-
Under Triggers, select the content types that you wish to sync and the events that should trigger a sync. For more information on how to configure webhooks, refer to the Contentful docs.
-
Select Save to finish.
If you decide to configure the webhook using the Contentful API instead, add a
x-connect-data-sourceheader to the request withcontentfulas the header’s value. This ensures that the webhook only triggers a sync for this specific data source, instead of all data sources on your data layer. -
Add your Contentful instance
Once you have prepared your Contentful instance, take the following steps in the Netlify UI to add it to your data layer:
-
Select Add a data source.
-
Select
Contentfulas the Data source type.If you haven’t already installed the extension for this data source, follow the install extension prompt to open the Contentful extension details page in a new tab. As a Team Owner, select Install to install and make the extension available to all data layers on your team.
After you install the extension, close the tab and return to the Add a data source flow in Connect to continue with the next steps.
-
Enter a Name for this data source.
-
Enter a Prefix for this data source. The prefix must start with an uppercase letter, and can only consist of alphanumeric characters and underscores.
The prefix will be added to all data types synced from this data source in the GraphQL schema and you will use it when you query the GraphQL API. For example,
ContentfulPostwith the prefixMarketingbecomesMarketingContentfulPostin the schema. -
(Optional) Enter a unique Instance ID value to use for this data source. Netlify uses this value to support cross-references and linking between data sources.
-
Enter the Access token for your Contentful instance. To sync published content, enter the
Content Delivery API access token. To sync preview content instead, enter theContent Preview API access token. -
Enter the Space ID for your Contentful instance.
-
Enter the Content Management API access token for your Contentful instance. Netlify will use this token to automatically set up a webhook in your Contentful space that will notify Connect whenever data changes in your CMS.
-
(Optional) Select the Host URL for your Contentful instance. The default is
cdn.contentful.com. To use the Contentful Preview API, selectpreview.contentful.com. -
(Optional) Enter the Contentful Environment to sync data from. The default is
master. -
(Optional) Enter a Page limit to specify the number of entries to fetch per page when syncing data from Contentful. The default is
100. -
(Optional) Select Enable Contentful Tags if your Contentful instance uses the Contentful Tags feature. Note that if you enable this option, you cannot use the content type name
tagsat this time. -
(Optional) Fill in the Locales field to limit the locales Netlify will sync. By default, Netlify will sync all locales. Make sure these locales are enabled on Contentful. Netlify will use the default locale set in Contentful as the default locale for your source.
-
Select Save to add this data source.
When you add a new data source, Netlify automatically connects to it and starts syncing data to your data layer.
To use Contentstack with Connect, complete the following steps:
- Prepare your Contentstack instance.
- Add your Contentstack instance to your data layer.
Prepare your Contentstack instance
Take the following steps on your Contentstack instance before you add it to your data layer:
-
In your Contentstack account, navigate to for your stack, and generate a delivery token for the environment you want to sync. You’ll need to enter this token when you set up your Contentstack data source in the Netlify UI, and Netlify will use this token to access your data.
-
To enable automatic syncing to Netlify, add your data layer webhook to your Contentstack instance:
-
In your Contentstack account, navigate to for your stack, and select New Webhook.
-
Add the following webhook to the URL To Notify field. Make sure to replace the placeholder with your data layer ID.
https://webhook.netlify-connect.com/hooks/data_layer/data_source/publish/YOUR-DATA-LAYER-IDNote that you also have the ability to create a custom authenticated webhook and use that instead of the default webhook. Learn more about managing webhooks.
-
Under Trigger Conditions, add a Condition for each content type and event that you wish to sync. At minimum, you should configure the webhook to trigger when the
Entrytype isCreated,Updated, andDeleted. For more information on how to configure webhook conditions, refer to the Contentstack docs. -
Select Save to finish.
-
Add your Contentstack instance
Once you have prepared your Contentstack instance, take the following steps in the Netlify UI to add it to your data layer:
-
Select Add a data source.
-
Select
Contentstackas the Data source type.If you haven’t already installed the extension for this data source, follow the install extension prompt to open the Contentstack extension details page in a new tab. As a Team Owner, select Install to install and make the extension available to all data layers on your team.
After you install the extension, close the tab and return to the Add a data source flow in Connect to continue with the next steps.
-
Enter a Name for this data source.
-
Enter a Type prefix for this data source. The prefix must start with an uppercase letter, and can only consist of alphanumeric characters and underscores.
The prefix will be added to all data types synced from this data source in the GraphQL schema and you will use it when you query the GraphQL API. For example,
ContentstackPostwith the prefixMarketingbecomesMarketingContentstackPostin the schema. -
(Optional) Enter a unique Instance ID value to use for this data source. Netlify uses this value to support cross-references and linking between data sources.
-
Enter the API key for your stack.
-
Enter the read-only Delivery token for your stack environment.
-
Enter the stack Environment to sync data from. For example, the
productionenvironment. -
(Optional) Enter the Region to sync data from. Valid options are
na-aws,eu-aws,na-azure, andeu-azure. The default isna-aws. -
(Optional) Specify the Locales to sync entries from. For example,
en-us, fr-ch. -
(Optional) When entries aren’t available for the specified locale, you can sync them in the fallback language instead. Select Include Fallback Locale to enable this. The default is
false. -
(Optional) Enter a Limit to specify the number of entries or assets to sync per page. The default is
50. -
(Optional) Enter the Content Types to sync from Contentstack. For example,
author, book. -
(Optional) Enter the Content Types to exclude from Contentstack syncs.
-
Select Save to add this data source.
When you add a new data source, Netlify automatically connects to it and starts syncing data to your data layer.
To use commercetools, complete the following steps:
- Set up an API client in Account Manager.
- Add your commercetools instance and API information to your data layer.
Set up an API client in your commercetools project
To enable syncing data from commercetools, you need to create an API Client with the correct scopes in the commercetools Merchant Center:
- In the Merchant Center for your commercetools project, navigate to .
- Select Create New API Client.
- Enter a name for the client.
- Under Scopes, select the
Admin clienttemplate. - Select Create API client to finish.
Copy and save the client_id, secret, and scope values in a safe place because you will need them to set up the data source connection.
Add your commercetools instance
Once you have set up an API client, take the following steps in the Netlify UI to add it to your data layer:
-
Select Add a data source.
-
Select
commercetoolsas the Data source type.If you haven’t already installed the extension for this data source, follow the install extension prompt to open the commercetools extension details page in a new tab. As a Team Owner, select Install to install and make the extension available to all data layers on your team.
After you install the extension, close the tab and return to the Add a data source flow in Connect to continue with the next steps.
-
Enter a Name for this data source.
-
Enter a Type prefix for this data source. The prefix must start with an uppercase letter, and can only consist of alphanumeric characters and underscores.
When you query data, the data types synced from this data source should be nested under this prefix in the GraphQL schema. For example, if your prefix is
StoreCA, your query fororderswould be formatted as:query {StoreCA {orders {...}}} -
Enter the Secret for the API client you created in commercetools Merchant Center.
-
Enter the Client ID for the API client. The Merchant Center displays this value as the
client_id. -
Enter the Region for your project. For example,
us-east-2.aws. -
Enter the Scope for the API client.
-
Enter the Project key for your project.
-
Select Save to add this data source.
When you add a new data source, Netlify automatically connects to it and starts syncing data to your data layer.
Functions
Section titled “Functions”requestId
A string containing the Netlify request ID.
For example, 01FDWR77JMF2DA1CHF5YA6H07C.
server
An object containing server metadata with the following property:
region: the region code where the deployment is running; for example,us-east-1.
site
An object containing Netlify site metadata with the following properties:
id: unique ID for the site; for example,1d01c0c0-4554-4747-93b8-34ce3448ab95.name: name of the site, its Netlify subdomain; for example,petsof.url: URL representing the main address to your site. It can be either a Netlify subdomain or your own custom domain if you set one; for example,https://petsof.netlify.apporhttps://www.petsofnetlify.com.
This global object exposes the following properties:
Netlify.context
The Netlify-specific context object.
This property is available within the scope of the function handler. If accessed from outside the handler, it returns null.
Netlify.env
An object providing access to environment variables with the following properties:
delete(name): in the context of the invocation, deletes an environment variable with a given name.get(name): returns the string value of an environment variable with a given name; if the environment variable is not defined,undefinedis returned.has(name): returns a boolean value containingtrueif an environment variable with a given name exists, andfalseotherwise.set(name, value): in the context of the invocation, sets an environment variable with a given name and value.toObject(): returns a plain object containing all the environment variables and their values.
AWS_LAMBDA_JS_RUNTIME: value that sets the Node.js runtime version for Netlify Functions. This environment variable must be set using the Netlify UI, CLI, or API, and not with a Netlify configuration file (netlify.toml).
The Context object exposes the following properties:
account
An object containing Netlify team account information. The id property in the object holds the unique ID of the team that the site and function belong to.
cookies
A simplified interface for reading and storing cookies:
-
cookies.get(name): reads a cookie with a given name from the incoming request. -
cookies.set(options): sets a cookie on the outgoing response, using the same format as theoptionsvalue in theCookieStore.setweb standard. -
cookies.delete(name)orcookies.delete(options): adds an instruction to the outgoing response for the client to delete a cookie. Following theCookieStore.deleteweb standard, accepts a string representing the name of the cookie, or an options object.
deploy
An object containing Netlify deploy information with the following property:
context: the context of the deploy that the function belongs to.id: unique ID of the deploy that the function belongs to.published: a boolean that indicates whether or not the function belongs to the current published deploy.
geo
An object containing geolocation data for the client with the following properties:
city: name of the city.country:code: ISO 3166 code for the country.name: name of the country.
latitude: latitude of the location.longitude: longitude of the location.subdivision:code: ISO 3166 code for the country subdivision.name: name of the country subdivision.
timezone: timezone of the location.postalCode: postal (zip) code of the location. We support all regional formats, so the format will vary.
ip
A string containing the client IP address.
Scheduled functions use the “cron expression” format used by tools like crontab and are executed according to the UTC timezone.
For example, the cron expression 0 0 * * * will run a scheduled function every day at midnight UTC. We also support the extensions in the RFC, except for the @reboot and @annually specifications.
With extensions, the expression 0 0 * * * can be written as @daily.
Netlify will access the functions directory during every build, preparing and deploying each supported code file as a function. The default directory is YOUR_BASE_DIRECTORY/netlify/functions. You can customize the directory using the Netlify UI or file-based configuration.
- In the Netlify UI, go to Project configuration Build & deploy Continuous deployment Build settings and select Configure. In the Functions directory field, enter a path to the directory in your repository where you want to store your functions.
- Alternatively, add the following to
netlify.tomlfor file-based configuration.
[functions] directory = "my_functions"Settings in netlify.toml override settings in the Netlify UI.
For both methods, the path is an absolute path relative to the site’s base directory in your repository. To help keep your site secure, make sure your functions directory is outside of your publish directory so that your source files aren’t deployed as part of your site.
For granular control over which files are bundled in your executable function artifacts, use the netlify.toml properties external_node_modules and included_files. Visit the file-based configuration doc for details.
[functions]
  # Flags "package-1" as an external node module for all functions.  external_node_modules = ["package-1"]
  # Includes all Markdown files inside the "files/" directory.  included_files = ["files/*.md"]
Bundle
Node.js version for runtime
For all Node.js functions deployed on or after May 15, 2023, the default functions runtime is based on the Node.js version used for the build. The Node.js version used for the build must be a valid AWS Lambda runtime for Node.js that isn’t set to be deprecated in the next two months.
If the build uses a version of Node.js that does not meet these conditions, then the functions runtime uses a fallback default version of Node.js 22.
You can override the default to any valid AWS Lambda runtime for Node.js that isn’t set to be deprecated in the next two months. Do so by completing the following steps.
-
In the Netlify UI, set the environment variable
AWS_LAMBDA_JS_RUNTIMEto the desired version. For example, to use Node.js 20 for all future functions deployed, set the variable value tonodejs20.x. -
Redeploy your site to apply the new runtime version.
Note that this environment variable must be set using the Netlify UI, CLI, or API, and not with a Netlify configuration file (netlify.toml).
Region
Netlify offers several AWS regions for deploying your serverless functions. You may want to customize the region for the following reasons:
- Optimize performance. Deploying serverless functions close to their data sources, such as a database or another backend service, can greatly reduce roundtrip time for data retrieval resulting in faster response times for your users.
- Ensure compliance. In some cases, data protection laws and industry-specific regulations may require that sensitive data processing happens within specific regions.
- Use Private Connectivity. Static IP addresses for Private Connectivity are available in only some regions.
By default, Netlify deploys functions for new sites to us-east-2 (Ohio). This is a common choice for many database providers, so this optimizes performance for most cases.
You can change the region through the Netlify UI to one of the following regions.
- ap-northeast-1 - Asia Pacific (Tokyo)
- ap-southeast-1 - Asia Pacific (Singapore)
- ap-southeast-2 - Asia Pacific (Sydney)
- ca-central-1 - Canada (Central)
- eu-central-1 - EU (Frankfurt)
- eu-west-2 - EU (London)
- sa-east-1 - South America (São Paulo)
- us-east-1 - US East (N. Virginia)
- us-east-2 - US East (Ohio)
- us-west-1 - US West (N. California)
- us-west-2 - US West (Oregon)
In addition to the above self-serve regions, the following regions are available through support-assisted configuration.
- eu-west-3 - EU (Paris)
- eu-south-1 - EU (Milan)
If you want your site to use one of the above regions, please contact support.
To configure your functions region through the Netlify UI:
- Go to Project configuration Build & deploy Continuous deployment Functions region.
- Select Configure.
- Use the menu to select a new region.
- Confirm with Save.
- Redeploy your site to apply the new region configuration.
Old deploys will continue to use the region configuration from when they were deployed.
External build
For even more control over the handling of your function source files and dependencies, you can bundle ZIP archives outside of Netlify.
If you put your bundled ZIP archives in your functions directory before you push changes to your Git provider, Netlify will deploy these executable artifacts without modification.
Custom build
If you want more control over the handling of your function source files, you can use your site’s build command to customize the build process.
Netlify runs your build command before accessing your functions directory to prepare and deploy your functions. This means you can use your build command to override any part of the default preparation process up until the point Netlify deploys executable artifacts.
Here are some examples of customizations you could make to the process:
- Invoke scripts through a file called by your build command. For example:
npm run test:functions && npm run buildWhere test:functions is a unit testing script configured in package.json. For more information, visit our Forums for a verified Support Guide on testing your Netlify builds.
If you want your custom build to bypass Netlify’s automated function and dependency preparation entirely, your build process needs to result in Node.js ZIP archives in your functions directory. Netlify will deploy these without modification.
To customize the build process, do one of the following:
- Include customizations directly in your build command. For example:
- Bundle your functions with tools not available through Netlify such as Webpack or Rollup.
- Run unit tests to validate your functions before they’re deployed.
Continuous deployment with Git
Manual deploys with CLI
Netlify CLI can upload files directly from your local project directory to your site on Netlify.
Common use cases for this workflow:
- updating a site while builds are stopped
- deploying to Netlify at the end of external CI tool tasks
Prepare your function dependencies before you deploy with the CLI.
- Install your dependencies. This enables Netlify CLI to automatically zip dependencies with your functions for deployment.
- Follow the instructions on the CLI page to deploy your site including your functions.
Automatic build
Netlify can automatically detect and build your functions from their source files. This is the most common workflow.
File digest deploys with API
Netlify API can upload functions when you use the file digest method for manual deploys.
Common use cases for this workflow:
- updating a site while builds are stopped
- automating workflows that connect with other systems
Prepare your functions before you deploy with the API.
- Zip each function with its dependencies.
- Follow the instructions on the API page to deploy your site including executable artifacts for Netlify Functions.
By default, the geo location used is the location of your local environment. To override this to a default mock location of San Francisco, CA, USA, use the --geo=mock flag. To mock a specific country, use --geo=mock --country= with a two-letter country code. For more information about the --geo flag, visit the CLI docs.
For TypeScript, you can import the types for the Context and Config objects from @netlify/edge-functions. The types for the Request and Response objects are in the global scope.
To streamline writing and testing your functions on Netlify, run a local development environment with Netlify Dev. This feature of Netlify CLI includes tools for local function development through a simulated Netlify production environment. The netlify dev command starts a framework server if a framework is detected and handles redirects, proxy rules, environment variables, and Netlify Functions.
To simulate Netlify Functions in a standalone server without the full overhead of Netlify Dev, serve functions locally with the netlify functions:serve CLI command (currently in beta). Then to debug functions, inspect the functions server process.
Synchronous function format
Synchronous functions can return a response object that includes the following information:
{ "isBase64Encoded": true|false, "statusCode": httpStatusCode, "headers": { "headerName": "headerValue", ... }, "multiValueHeaders": { "headerName": ["headerValue", "headerValue2", ...], ... }, "body": "..."}- Because
asyncfunction code returns apromise, we recommend returning a response with at least an HTTP status code instead of allowing the function to time out. Usingasyncin your function code doesn’t automatically designate a function as a background function.
- This function deploys to an endpoint at
/.netlify/functions/hellorelative to the base URL of your site. - A successful invocation returns the
200status code and the string, “Hello, World”.
Netlify Functions can stream data to clients as it becomes available, rather than returning a buffered payload at the end of the computation. This lets developers and frameworks create faster experiences by using streaming and partial hydration to get content and interactions in front of people as quickly as possible.
To stream a function’s response:
- wrap your
handlerexport with thestreamdecorator - return a
ReadableStreamas thebody
Here’s a simplified example that you can use to test that your function response streams to the client:
Keep the following limitations in mind when working with streaming functions:
- 10 second execution limit. If the limit is reached, the response stops streaming.
- 20 MB response size limit. Responses larger than 20 MB cannot be streamed.
- Background Functions can’t stream responses.
- On-demand Builders can’t stream responses.
- Scheduled Functions can’t stream responses.
Netlify provides the event and context parameters when the function is invoked.
-
The
eventobject received by thehandleris similar to the following:{"path": "Path parameter (original URL encoding)","httpMethod": "Incoming request’s method name","headers": {Incoming request headers},"queryStringParameters": {Query string parameters},"body": "A JSON string of the request payload","isBase64Encoded": "A boolean flag to indicate if the applicable request payload is Base64-encoded"}If you need to parse a
multipart/form-data-encodedevent.body, we recommend using busboy. To learn more, visit our blog article on processing multipart form data with Netlify Functions. -
The
contextobject received by thehandlerincludes information about the context in which the function was called, like certain Identity user information, for example.
To optimize build performance, specify function dependencies in the top-level package.json file in the site’s base directory. Here’s an example of a recommended layout:
For an extended example that demonstrates a more likely response streaming use case, consider this function:
When invoked this function sends a prompt to OpenAI and streams the response back to the client like a chatbot.
These formats would deploy a synchronous function that can be called on the following endpoint: /.netlify/functions/hello. The endpoint is relative to the base URL of your site. Here are some example full endpoint URLs: yoursitename.netlify.app/.netlify/functions/hello for a site using the default Netlify subdomain or www.yourcustomdomain.com/.netlify/functions/hello for a site using a custom domain.
Push your function source files to your Git provider for continuous deployment where Netlify’s build system automatically detects, builds, and deploys your functions. For more control over the process, learn about other workflows for deploying your functions including custom builds with continuous deployment and manual deploys with the Netlify CLI or API.
Monitor function logs and metrics in the Netlify UI to observe and help troubleshoot your deployed functions.
Netlify function logs are found in the Netlify UI. You can also stream Netlify function logs to the console with the Netlify CLI.
Learn how to use Netlify Blobs with lambda-compatible functions.
Name your function
You can store your function file directly under the functions directory or in a subdirectory dedicated to the function. The function’s endpoint name is case-sensitive and determined by its filename or the name of its dedicated parent directory.
For example, to create a function with an endpoint name of hello, save the function file in one of the following ways:
Netlify Functions have access to environment variables in the runtime environment. If you have the option to set specific scopes for your environment variables, the scope must include Functions to be available to functions during runtime.
You can also leverage build environment variables to configure how Netlify builds your functions. For example, you can use an environment variable to set the Node.js version.
Learn more about how to set and use environment variables with functions.
To create a background function, append the function name with -background. For example, to create a background function with an endpoint name of hello-background, save the function file in one of these ways:
These formats would deploy a background function that can be called on the following endpoint: /.netlify/functions/hello-background. The endpoint is relative to the base URL of your site. Here are some example full endpoint URLs: yoursitename.netlify.app/.netlify/functions/hello-background for a site using the default Netlify subdomain or www.yourcustomdomain.com/.netlify/functions/hello-background for a site using a custom domain.
Code your function
Create function file
The default functions directory is YOUR_BASE_DIRECTORY/netlify/functions. You can optionally configure a custom functions directory.
Manage dependencies
Background function format
- This function deploys to an endpoint at
/.netlify/functions/count-backgroundrelative to the base URL of your site. - When invoked, the function returns an initial
202success response. - When successfully executed, the function logs numbers 1 through 60.
Background function syntax is similar to synchronous function syntax with a couple of key differences:
- You will generally pass the function result to a destination other than the originating client.
- Background functions don’t support response streaming because they don’t return responses.
- This background function deploys to an endpoint at
/.netlify/functions/send-pdf-backgroundrelative to the base URL of your site. - When invoked, the function returns an initial
202success response. - When successfully executed, a PDF report is generated and emailed as an attachment.
Primitives
Section titled “Primitives”Stale while revalidate is a caching pattern that allows the cache to keep serving a stale object out of the cache while the object is revalidated in the background. This can be impactful for implementing API caching or patterns like incremental static regeneration (ISR).
As an example use case, imagine you have a slow API endpoint that takes 5 seconds to respond. You can wrap it in a function that adds the following cache header:
Netlify-CDN-Cache-Control: public, max-age=60, stale-while-revalidate=120Here’s what this header does:
publicinstructs Netlify’s edge to cache the first response.max-age=60instructs the cache to continue serving the cached response for 60 seconds after the initial request. After 60 seconds, the cache is considered stale.stale-while-revalidate=120instructs the cache how long it can serve stale content. If a request arrives within this specified duration after the content expired, the stale content is served while the cache revalidates the content in the background.
If there’s a steady stream of requests, visitors will get recently refreshed results from the API without having to wait 5 seconds for the API response.
Here’s a timeline to illustrate how this works:
- An initial request generates a response that gets cached (consider this to be t = 0).
- A new request is made 30 seconds later (t = 30). The cache is still fresh, so the edge serves the cached response.
- Another request is made 100 seconds later (t = 130). The cache is now stale, but the time is within the 120 additional seconds allotted to serve stale content. So, the edge serves the stale cached response while the cache revalidates the content in the background. Time is reset (t = 0) when the revalidated response is cached.
- Another new request is made 4 minutes later (t = 240). The cache is stale again and the time is outside the allotment for serving stale content (which ended at t = 60 + 120 = 180). The edge waits for a new response to be generated before serving and caching it. Time is reset (t = 0) when the new response is cached.
If you want to invalidate cached objects while their cache control headers indicate they’re still fresh, you can purge the cache by site or cache tag. These granular options for refreshing your cache without redeploying your entire site optimize developer productivity for your team and site performance for your customers. On-demand invalidation across the entire network takes just a few seconds, even if you’re purging a tag associated with thousands of cached objects.
Scheduled Functions is a feature of Netlify Functions that enables you to run functions on a regular and consistent schedule, much like a cron job. Scheduled functions can do almost anything that serverless functions do today, though some tasks are better suited to scheduled functions than others.
For example, you may want to:
- Invoke a set of APIs to collate data for a report at the end of every week
- Backup data from one data store to another at the end of every night
- Build and/or deploy all your static content every hour instead of for every authored or merged pull request
- Or anything else you can imagine you might want to invoke on a regular basis!
Edge Functions connect the Netlify platform and workflow with an open runtime standard at the network edge. This enables you to build fast, personalized web experiences with an ecosystem of development tools.
Using TypeScript and JavaScript, you can modify network requests to localize content, serve relevant ads, authenticate users, personalize content, redirect visitors, and much more. Edge Functions also support a new generation of edge-first web frameworks allowing your entire app to run at the edge, dramatically increasing performance in many cases.
All this dynamic processing happens in a secure runtime based on Deno directly from the worldwide network edge location closest to each user for fast response times. Plus, you have the option to cache edge function responses for even faster response times. With Netlify, your edge functions are version-controlled, built, and deployed along with the rest of your Netlify site. This eliminates overhead and brings the power of Deploy Previews and rollbacks to your edge functions.
With Netlify Functions, your serverless functions are version-controlled, built, and deployed along with the rest of your Netlify site, and we will automatically handle service discovery through our built-in API gateway. This eliminates overhead and brings the power of Deploy Previews and rollbacks to your functions.
With Netlify Image CDN, you can transform images on demand without impacting build times. Netlify Image CDN also handles content negotiation to use the most efficient image format for the requesting client. Optimizing the size and format of your images improves both the runtime performance and reliability of your site. Transformations are integrated natively into the CDN so that repeated requests leverage layers of caching for improved performance.
Netlify’s Background Functions provide an option for serverless functions that run for up to 15 minutes and don’t need to complete before a visitor can take next steps on your site. For tasks like batch processing, scraping, and slower API workflow execution, they may be a better fit than synchronous functions.
With Netlify Blobs, you can store and retrieve blobs and unstructured data. You can also use this feature as a simple key/value store or basic database.
Netlify Blobs is a highly-available data store optimized for frequent reads and infrequent writes.
For maximum flexibility, it offers a configurable consistency model. If multiple write calls to the same key are issued, the last write wins.
We automatically handle provisioning, configuration, and access control for you. This integrated zero-configuration solution helps you focus on building business value in your project rather than toil on setting up and scaling a separate blob storage solution.
Notices
Section titled “Notices”Did you find this doc useful?
Your feedback helps us improve our docs.