Directory Sync
# Overview
Securely manage user provisioning at scale through your identity provider with SCIM Directory Sync. SCIM Directory Sync allows organization Owners to manage Netlify access for users across multiple Netlify teams using the SCIM (System for Cross-domain Identity Management) protocol.
SCIM Directory Sync requires that you set up Organization SSO and use a supported identity provider.
As an Organization Owner, you can assign a Netlify user role and team to a directory group that is synced from your identity provider. You can additionally specify site access for users with a Developer or Reviewer role.
Once you enable SCIM provisioning by activating Directory Sync, users are automatically provisioned based on how you assigned your directory groups to Netlify teams and user roles.
# Team member roles for provisoned users
Organization Owners can assign an entire directory group to a single Netlify role:
- Team Owner
- Developer
- Billing Admin
- Reviewer
Git Contributors can’t be provisioned through Directory Sync.
Once a user is provisioned by Directory Sync, only Organization Owners can change their role. Organization Owners can change a Netlify role for all users within a directory group. Team Owners will not be able to change a provisioned user’s Netlify role through the
.If an Organization Owner assigns a user two or more roles in a single team, then the user is granted the highest access level in that team. The same provisioned user can have different user roles in different teams.
# Site access for provisioned users
Organization Owners can give Developers or Reviewers the following default site access options:
- all sites on the team (including future sites)
- only specific sites in the team
Only Organization Owners can remove site access they granted through Directory Sync. Team Owners can never remove site access granted for a provisioned user as long as Directory Sync is active.
If an Organization Owner chooses to limit site access for Developers or Reviewers, then Team Owners can help manage site access for provisioned users in these roles in the following scenarios:
- new sites are added to a team and provisioned users don’t have access to the new sites yet
- an Organization Owner decides to select Only specific sites in [the team] but does not add any specific sites through the Directory Sync group mapping. For an example, check out the example in step 4 of Map directory groups to Netlify roles and teams.
Learn more about managing site access after users are provisioned.
# Prepare for Directory Sync
Before you can configure Directory Sync, you must set up Organization single sign-on (SSO), which applies SSO through your identity provider for all teams in your organization.
You will also need to set up groups in your identity provider for the Netlify app if you haven’t already done so.
Have Team SSO set up?
If you previously set up Team SSO for a specific team that is now a part of your organization, you will need to set up Organization SSO for all teams in the organization following different setup instructions. Your Organization SSO configuration replaces Team SSO.
These guidelines will help you efficiently set up Directory Sync for your organization.
To set up Directory Sync, you must have the Organization Owner role so you can access your Netlify organization’s settings.
Decide if you need others to help set up Directory Sync and check if they already have the Organization Owner role. For example, you may want to add a new Organization Owner for an existing IT administrator who configures apps in your identity provider.
If you need more than one Organization Owner, reach out to your account manager or Enterprise Support to request this.
Optionally, to simplify the setup process, we recommend you plan how you will map your identity provider groups to a Netlify team and role.
For example, you may want a new directory group to assign Contractors a Developer role for a specific site in team A. Likewise, you may want to assign the Contractor group in your identity provider to a Netlify Reviewer role for all sites in team B.
You may discover you need more identity provider groups or Netlify teams and can adjust these before enabling SCIM provisioning.
Consider the following as you create your plan:
- If a user is assigned more than one role in a team, they are granted the highest access level in the team.
- You can customize site access for Developers and Reviewers. Learn more about your site access options.
If your Directory Sync setup plan requires a new Netlify team, you can create new Netlify teams for your organization.
Let your users know if they need to log in differently to access Netlify and plan when you will enable SCIM provisioning by activating Directory Sync for your organization.
Note that you can continue to make changes before they take effect as long as Directory Sync has the Inactive status.
Next, you can start configuring Directory Sync for your organization.
# Set up Directory Sync
After you set up Organization SSO, you can start configuring Directory Sync.
# 1. Configure directory groups in your identity provider
To get started, you need to set up directory groups in your identity provider.
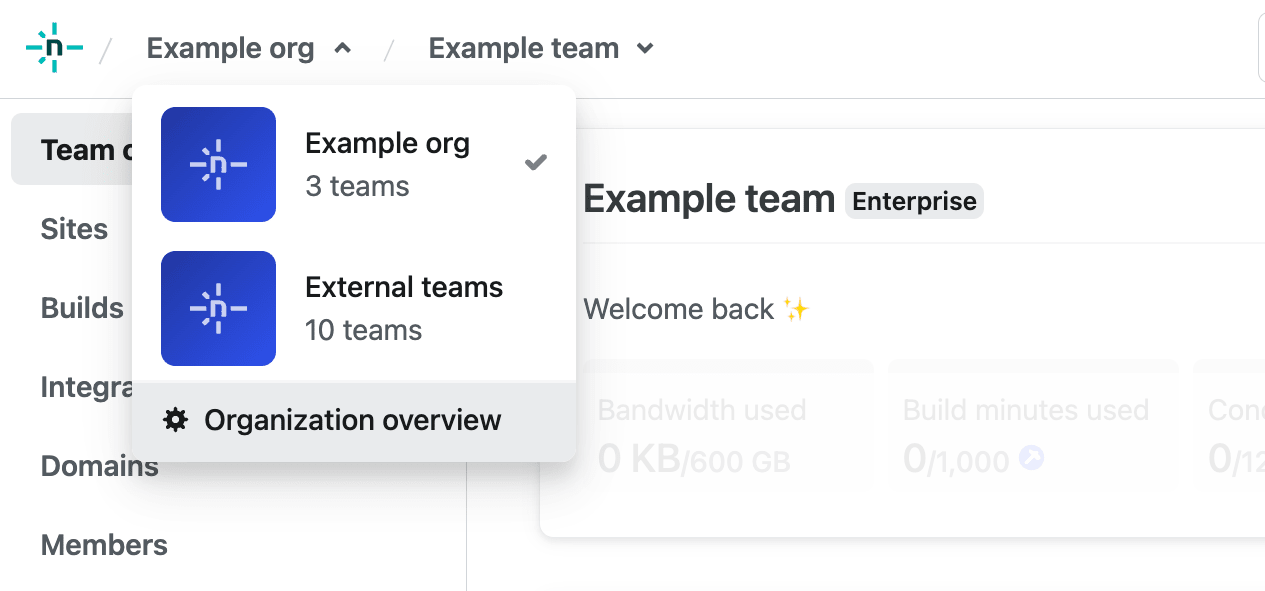
In the navigation of the Netlify UI, select the organization name and then select Organization overview.
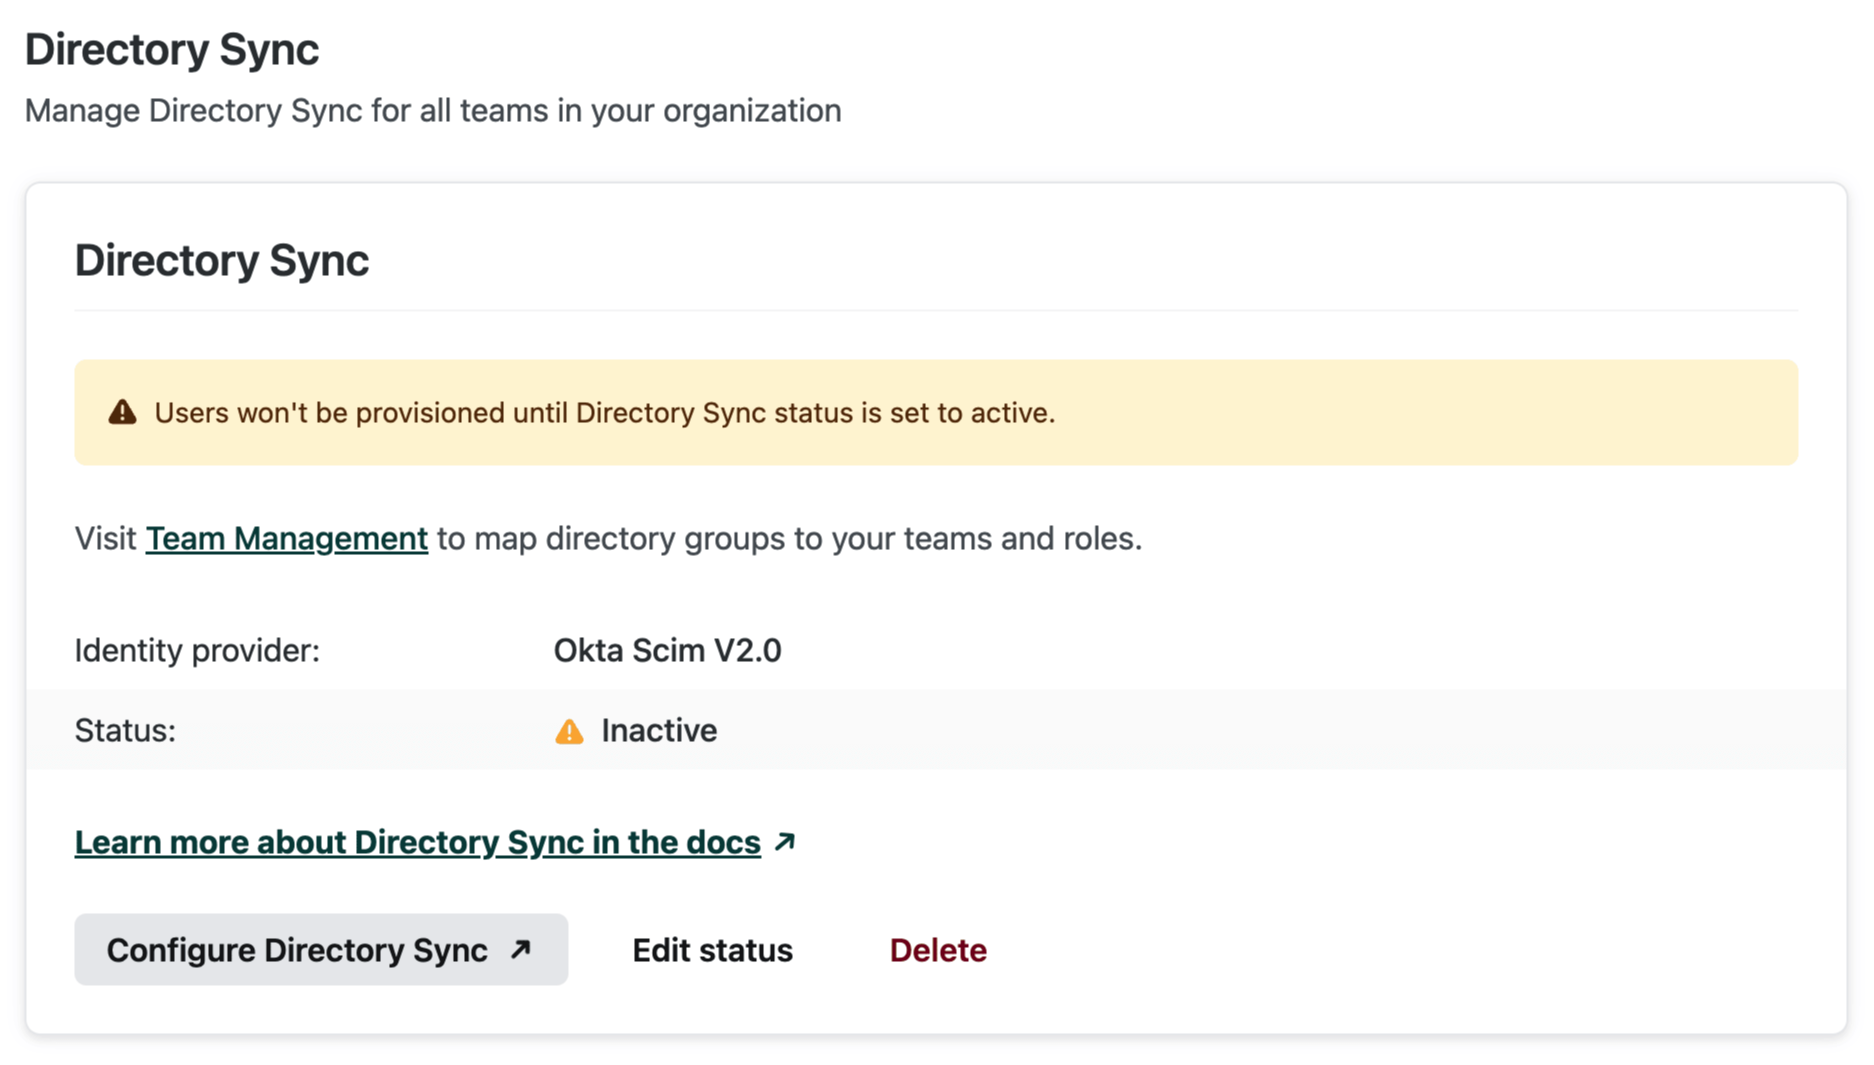
Go to Access & security > Directory Sync.
Select Configure Directory Sync. If the button is disabled, you need to first set up SSO for your organization.
Select the identity provider you used to set up Organization SSO.
Follow the guided Directory Sync setup steps for your identity provider. Use the existing Netlify app you created as part of Organization SSO.
Now your identity provider’s directory groups are connected to Netlify and you are ready to assign your directory groups to Netlify roles and teams in the Netlify UI.
Note that users are not provisioned with SCIM Directory Sync until an Organization Owner sets SCIM Directory Sync from Inactive to Active. This allows you to assign a Netlify team, role, and site access for a directory group, confirm your setup, and inform users before you enable SCIM provisioning.
# 2. Map directory groups to Netlify roles and teams
When you map directory groups to Netlify teams and roles, you can also configure site access for Developers or Reviewers.
To map your directory groups to Netlify roles and teams:
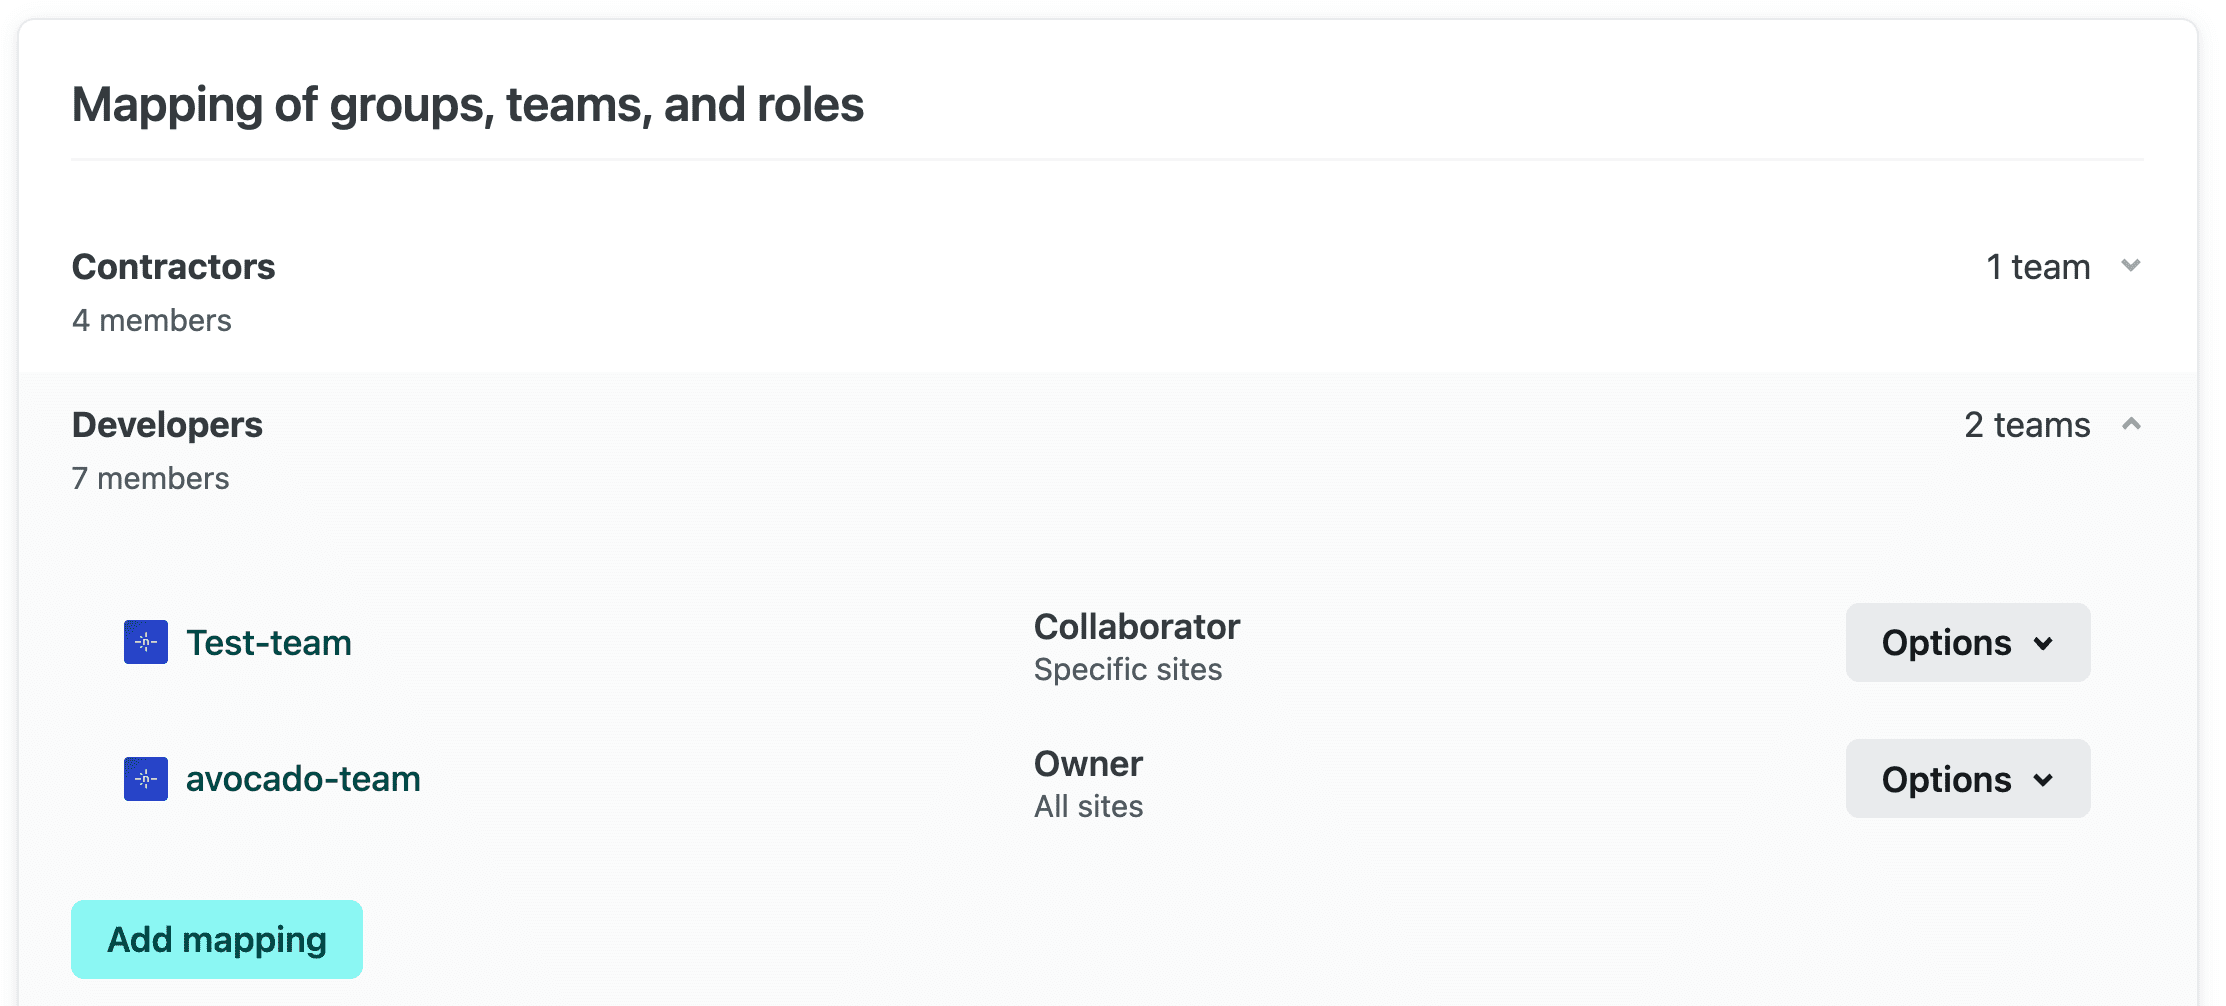
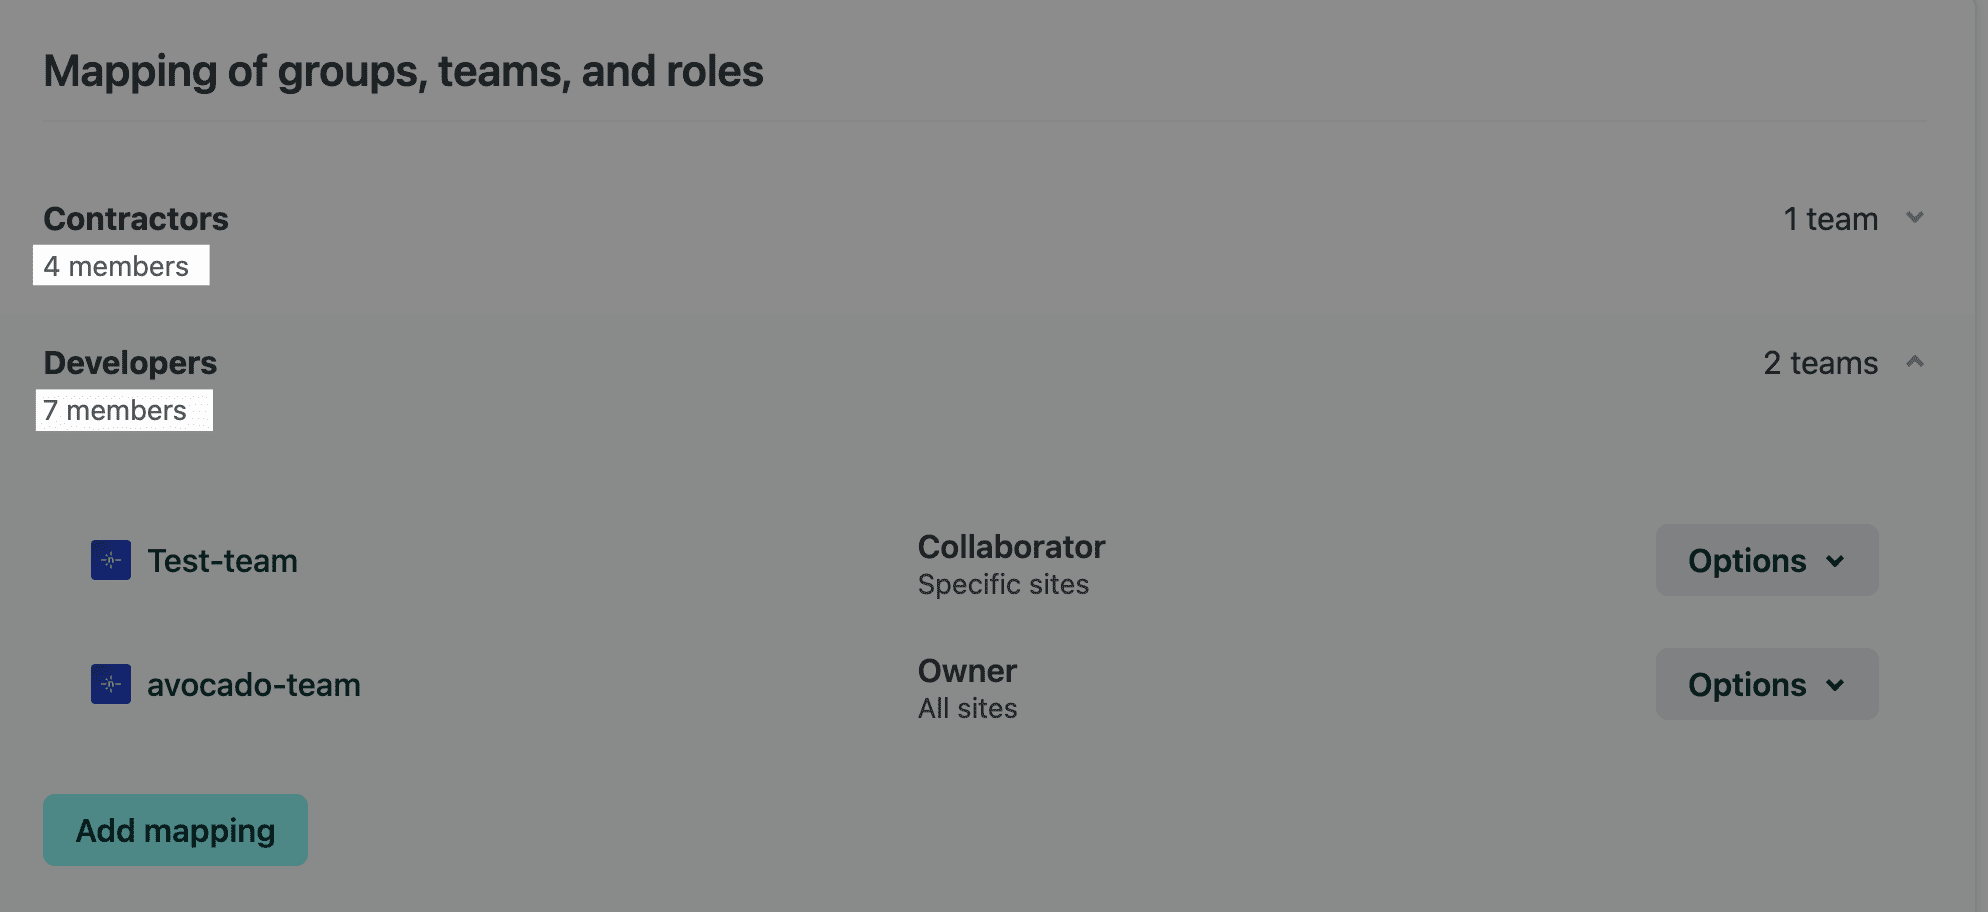
Go to Organization overview > Team management > Directory group mapping. If you successfully set up your directory groups in your identity provider, you’ll find your groups listed.
Select a group, then select Add mapping.
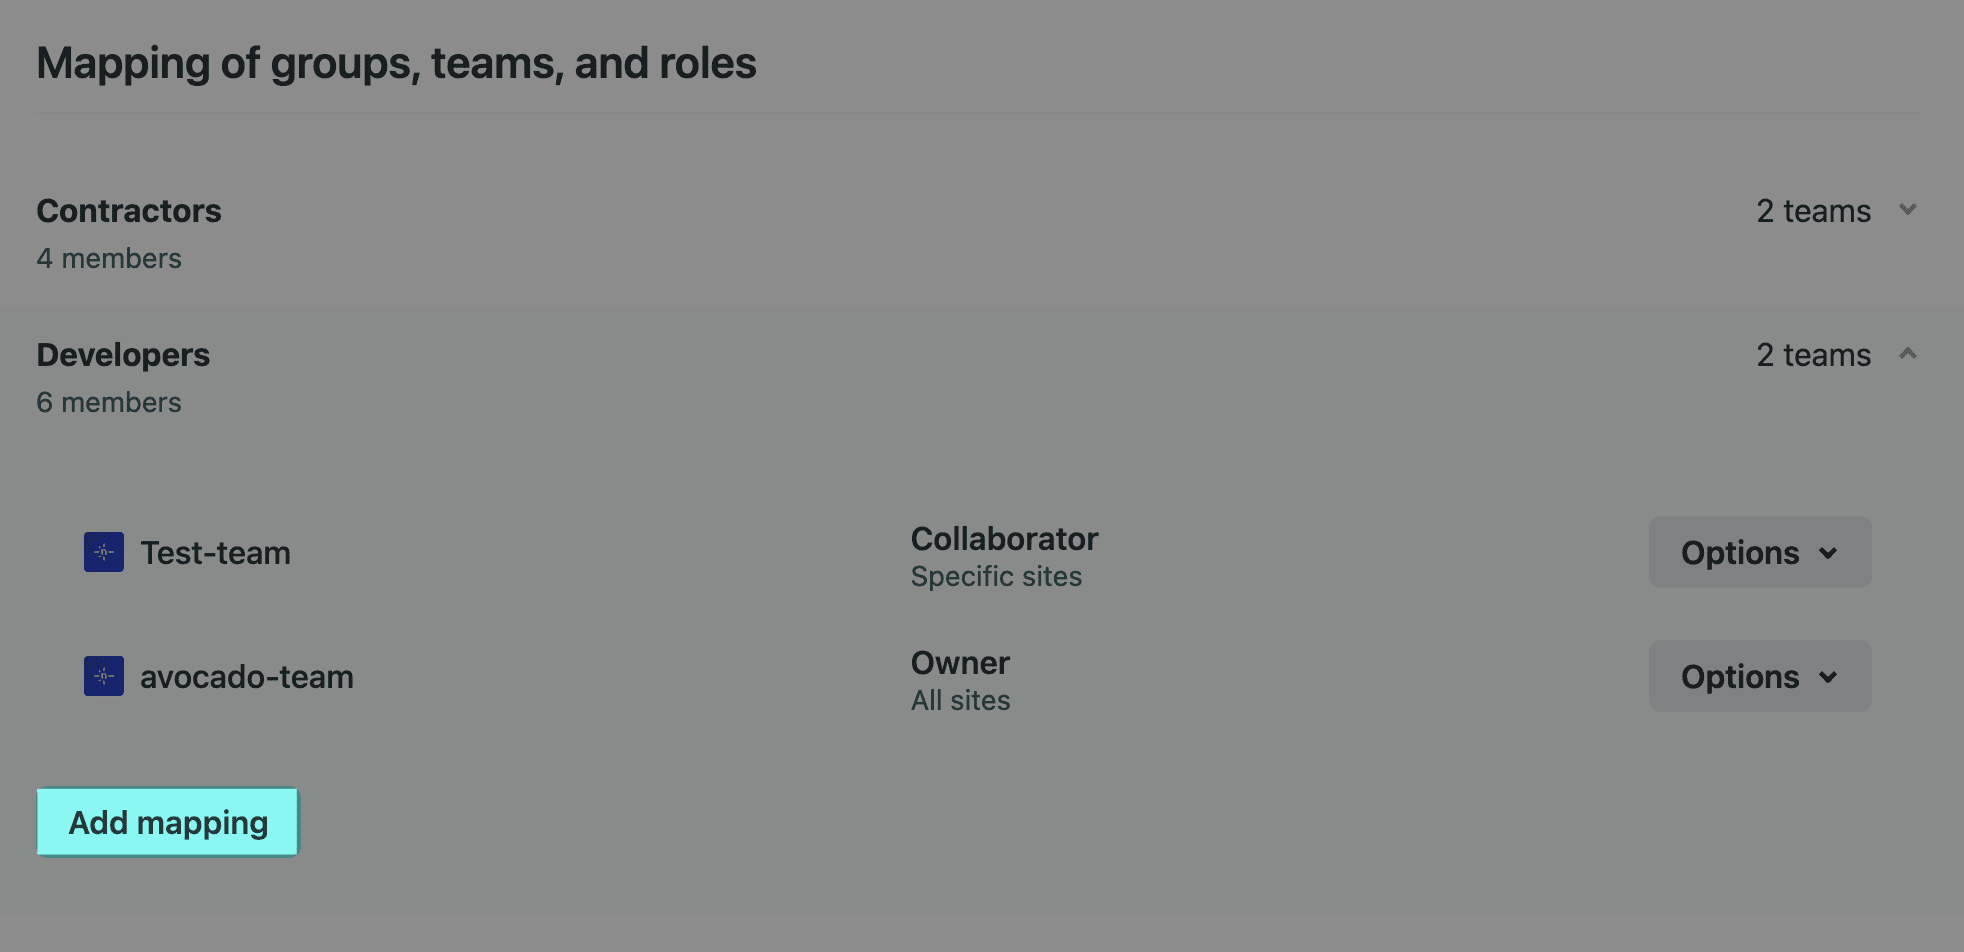
Unable to Add mapping?
If you have mapped all available teams to a directory group, you will not be able to select Add mapping because you can only map a team to the same directory group once. You must either create a new team or remove a directory group mapping.
Assign a Netlify team and user role. The available roles include Team Owner, Developer, Billing Admin, and Reviewer. The same user can have different user roles in different teams.
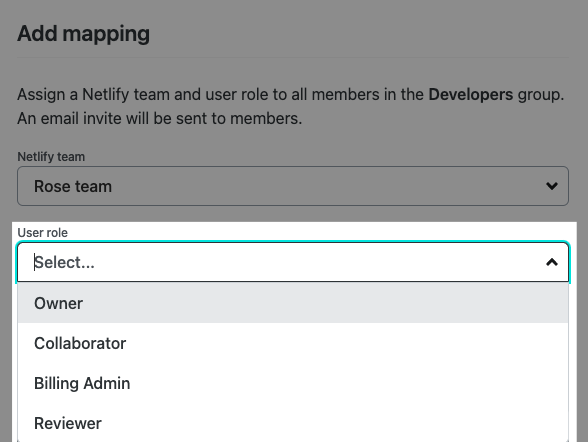
Note that if a user is granted two user roles within the same team, Netlify will grant them the user role with the most access and permissions.
If you assigned a Developer or Reviewer role, choose the default site access for this role. Developers and Reviewers will have access to all sites within the team by default if you do not limit their site access to only specific sites.
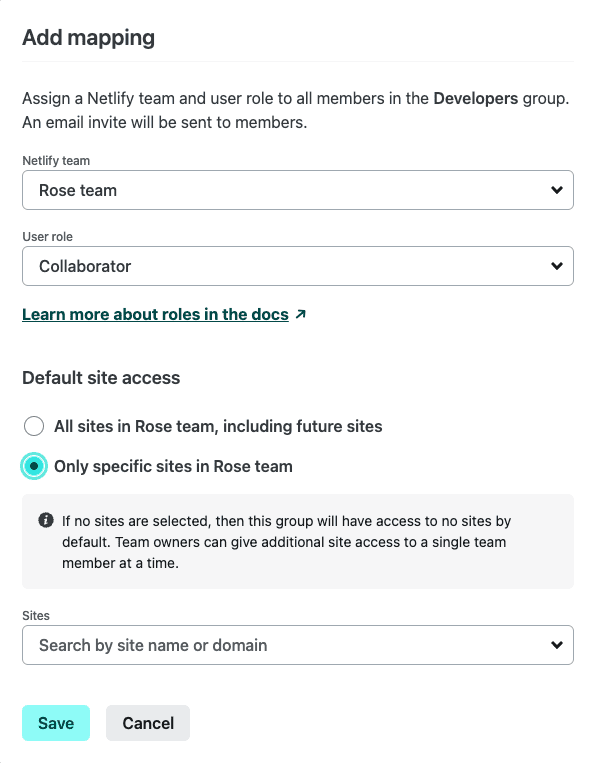
Keep the following in mind:
- Team Owners always have access to all sites within their team.
- If you would like Team Owners to manage site access for Developers or Reviewers, you can choose the Only specific sites option in the UI but then not specify any sites. Team Owners can then completely add or remove sites for a single provisioned user at a time from the team Members page.
- If you chose the Only specific sites option and new sites are created on your team, then Reviewers and Developers will not have access to these new sites unless an Organization Owner or Team Owner gives them additional site access.
Select Save. Note that users are not provisioned and the access you set up will not take effect until Directory Sync is activated.
# 3. Confirm directory groups and access assignments are accurate
We strongly recommend confirming that you are ready to enable SCIM provisioning through Directory Sync and your identity provider to avoid having your users lose access.
In your identity provider, confirm that your directory groups for your Netlify app have all of the expected users. Note how many users are in each group.
On Netlify, go to Organization overview > Team management > Directory group mapping to review the Netlify access assignments for your directory groups. Confirm all of your expected directory groups are in the Netlify UI and that the user count for each directory group in Netlify matches the user count from your identity provider.
# 4. Activate Directory Sync
After mapping your directory groups, you can enable SCIM Directory Sync to provision users and enable your access assignments.
Once you enable provisioning by activating SCIM Directory Sync:
- existing users in your Netlify teams are automatically provisioned and may change or lose access based on the relevant directory group mappings
- provisioned users who are new to a Netlify team will get an email invite to join your team
- a provisioned user who was already a part of your Netlify team is now managed by Directory Sync
To enable provisioning and activate Directory Sync:
In your Organization Overview, go to Access & security > Directory Sync.
Select Edit status.
Change the status to Active and select Save.

# Manage provisioned team members
Once you activate Directory Sync, provisioned members will show on their team’s Members page as Managed by Org, which indicates they are managed by your organization’s Directory Sync settings.
Provisioned users can be managed in the following ways:
- Organization and (in some cases) Team Owners can change a provisioned team member’s site access.
- Organization Owners can change a user role for a directory group.
- Organization Owners can change which team is assigned to a directory group by removing an existing directory group mapping.
# Change site access for a provisioned user
These steps cover how to change site access for provisioned users depending on the choices of the Organization Owner.
When an Organization Owner sets up Directory Sync, they can give provisioned users in a Developer or Reviewer role one of these site access options:
- access to all sites in the team, including newly created sites (default option)
- only specified sites in the team
There is also an indirect option to choose “No sites”. This allows Team Owners to fully manage site access for your provisioned users individually like they can for unprovisioned users from the team Members page. To choose “No sites”, select Only specified sites, and then save without adding any sites.
What about unprovisioned users?
If a Developer or Reviewer is not provisioned through Directory Sync, then a Team Owner can still completely manage their site access from the team Members page. They can only manage site access for one user at a time.
# Manage site access as an Organization Owner
Once Directory Sync is activated, Organization Owners can only change a provisioned user’s site access by changing site access for the entire directory group.
To change site access for a provisioned user through the directory group mapping:
In Team management > Directory group mapping, find the group you want to edit.
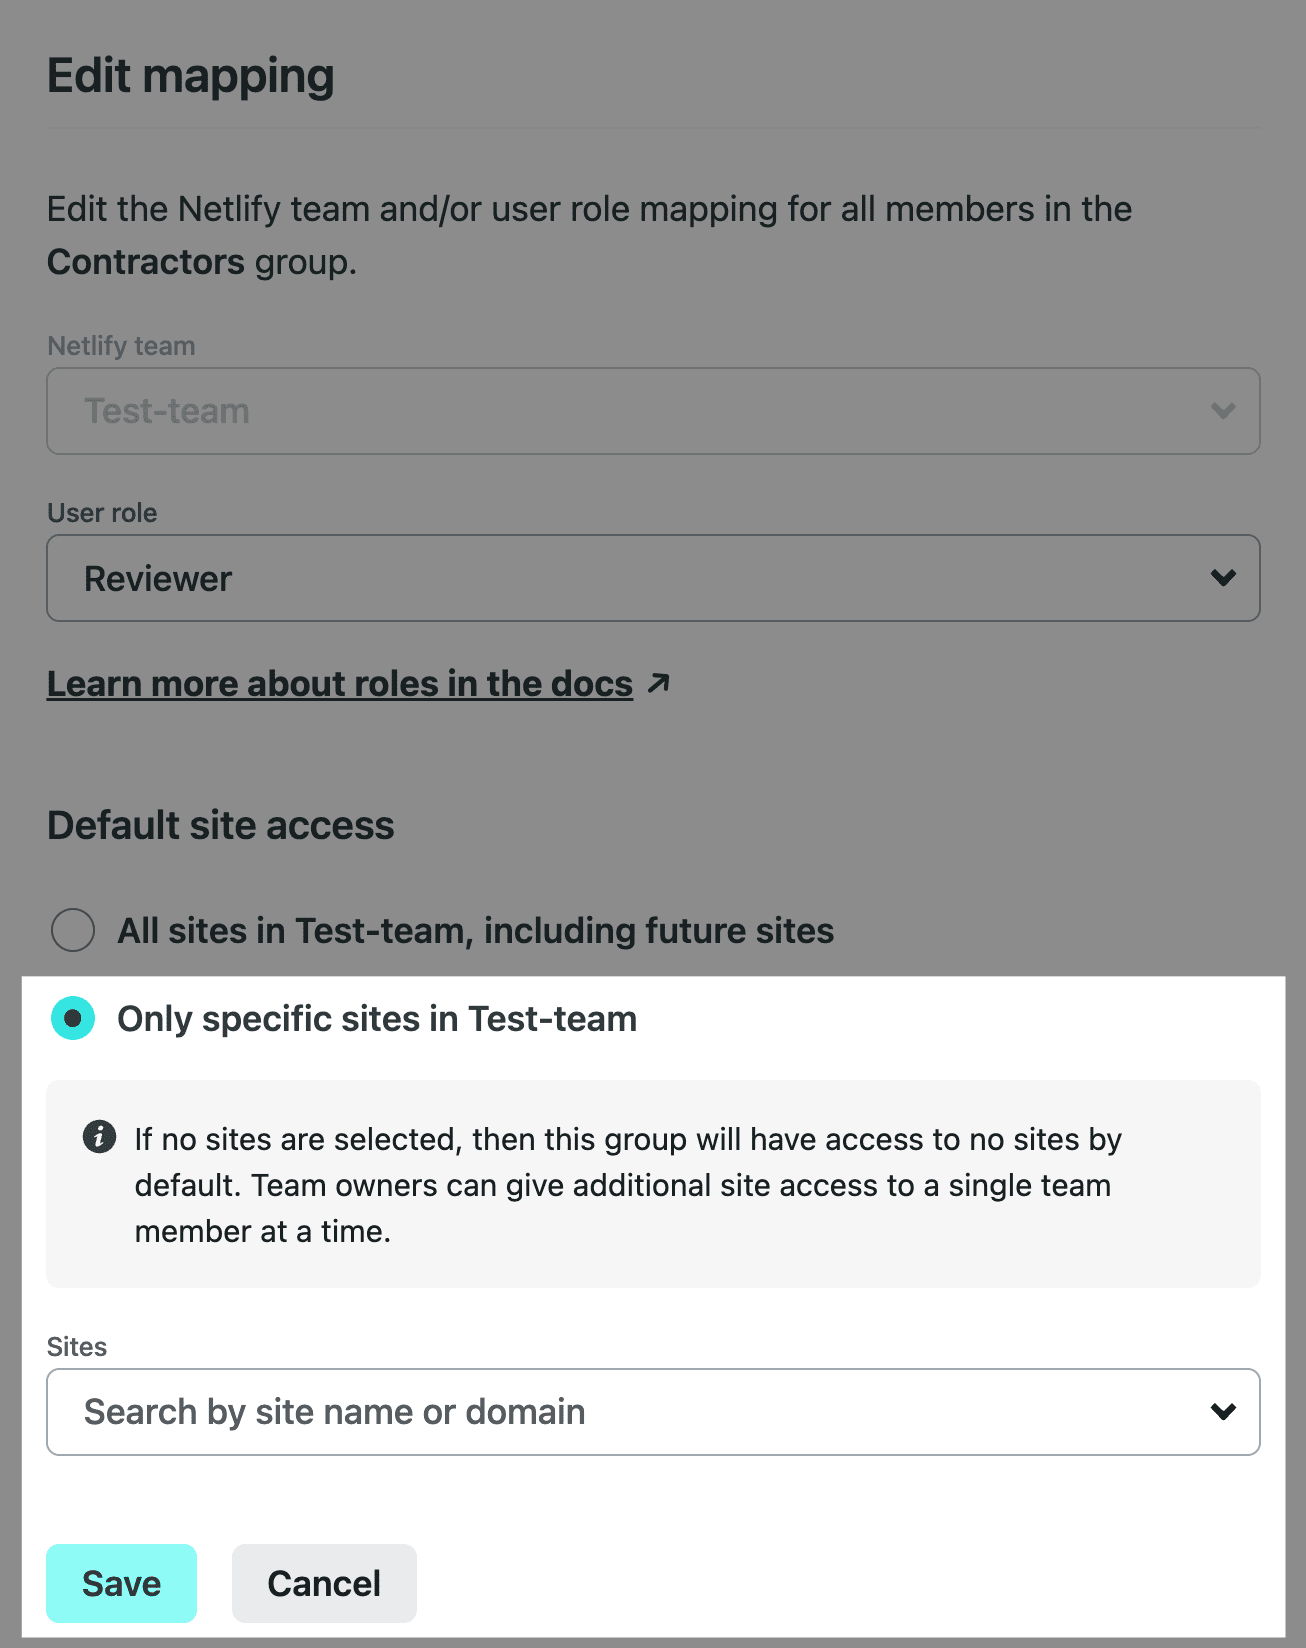
Next to the group, select Options > Edit mapping to select a new site access option. This will change the site access for everyone in the specified group.
After choosing new site access, select Save.
# Manage site access as Team Owner
Team Owners can manage site access for provisioned users when an Organization Owner has chosen to limit site access for Developers or Reviewers. When limited site access is configured through Directory Sync, Team Owners can never remove site access that an Organization Owner has granted but they can add additional site access.
Team Owners can also manage site access for unprovisioned users.
To manage site access for a single user at a time as a Team Owner:
In the navigation, select a team.
Go to the team’s Members page to access the list of team members.
Select Options > Edit member next to a team member to change the sites they are able to access.
# Change the user role for a directory group
Once Directory Sync is activated, Organization Owners can only change a provisioned user’s role through their directory group.
In Team management > Directory group mapping, find the group you want to edit.
Next to the group, select Options > Edit mapping to select a new user role. This will change the role for everyone in the specified group.
After choosing a new role, select Save.
# Remove directory group mapping
Organization Owners can remove all users in a directory group from their assigned team and roles by going to Team management > Directory group mapping and selecting Options > Remove mapping.
# Deactivate Directory Sync
When Directory Sync is inactive, members will not be automatically provisioned to roles and teams. Any changes you make in your identity provider or in your Netlify directory group mapping will not take effect until the status is Active.
Organization Owners can deactivate Directory Sync in
. Select Edit status and choose Inactive. Select Update to save your changes.If the status is changed to Inactive, existing team members will keep their assigned teams and roles and will still be able to access the Netlify UI.
# Delete Directory Sync
Organization Owners can delete Directory Sync for their organization by going to
. When deleting, there are two options:Keep provisioned users (default): provisioned users will not be removed from Netlify, and will retain their assigned teams and roles. You can still manage them on their respective team’s Members page.
Remove provisioned users: provisioned users will be removed from their teams and will no longer be able to access Netlify. If you want to set up Directory Sync again, you will have to re-map the users to Netlify teams and roles.
Did you find this doc useful?
Your feedback helps us improve our docs.