For the complete Netlify documentation index, see llms.txt. Markdown versions of this page are available by appending .md to the URL. Netlify’s command line interface (CLI) lets you configure continuous deployment straight from the command line. You can use Netlify CLI to create a new project from a prompt, run a local development server that you can share with others, run a local build and plugins, and deploy your site.
The sections below describe how to perform common tasks with Netlify CLI. You can also access a full command reference online, or get help within Netlify CLI.
Installation
Section titled “Installation”To install Netlify CLI, make sure you have Node.js version 18.14.0 or later.
Then, run this command from any directory in your terminal:
npm install -g netlify-cliThis installs Netlify CLI globally, so you can run netlify commands from any directory. You can check the version and find out some basic information about the tool with the following command:
netlifyInstallation in a CI environment
Section titled “Installation in a CI environment”When using Netlify CLI in a continuous integration (CI) environment such as GitHub Actions, CircleCI, or Travis CI, we recommend installing it locally as a development dependency instead of globally. This binds a specific CLI version to your project repository. To install Netlify CLI locally, run the following command from the root directory of your project:
npm install netlify-cli --save-devFor CI environments, we also recommend using a lock file to guarantee reproducible builds and relying on an automated tool like Renovate or Dependabot to manage Netlify CLI version updates.
Authentication
Section titled “Authentication”Netlify CLI uses an access token to authenticate with Netlify. You can obtain this token using the command line or in the Netlify UI.
Obtain a token with the command line
Section titled “Obtain a token with the command line”To authenticate and obtain an access token using the command line, enter the following command from any directory:
netlify loginThis will open a browser window, asking you to log in with Netlify and grant access to Netlify CLI.
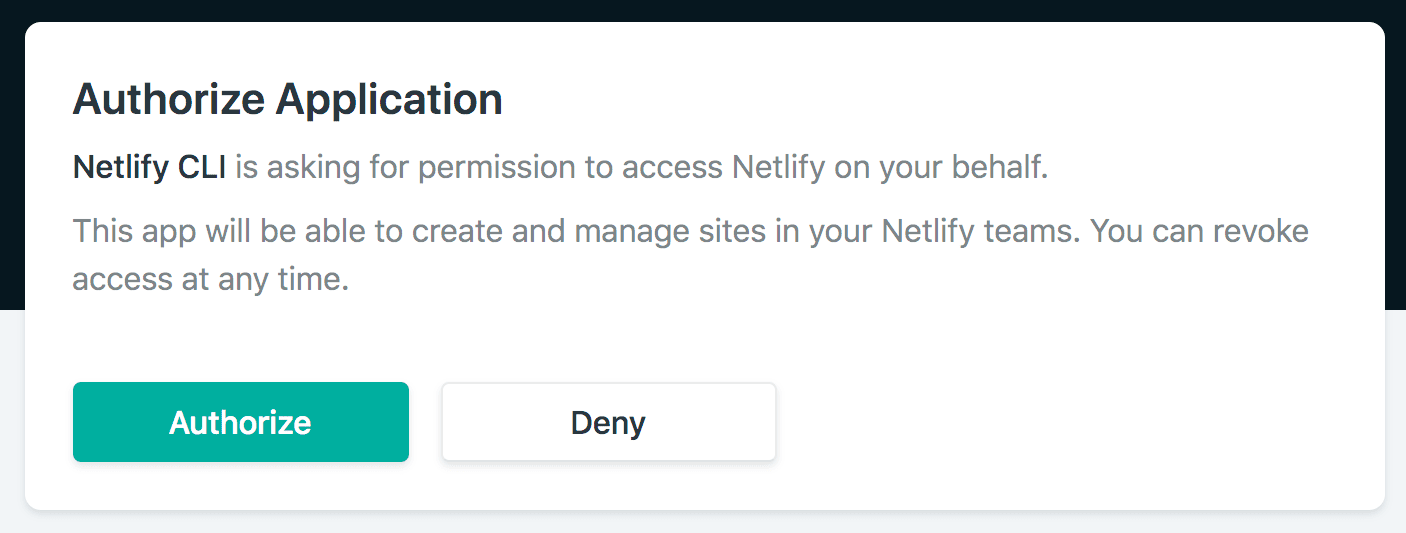
Once authorized, Netlify CLI stores your access token in a config.json global configuration file. The Netlify CLI uses the token in this file automatically for all future commands.
config.json location
Section titled “config.json location”You can find the Netlify CLI global configuration file, config.json, under your user in these OS-specific locations:
- macOS:
Library/Preferences/netlify/config.json - Linux:
.config/netlify/config.json - Windows:
AppData\Roaming\netlify\Config\config.json
Obtain a token in the Netlify UI
Section titled “Obtain a token in the Netlify UI”You can generate a personal access token (PAT) manually in your Netlify user settings:
- Go to Applications Personal access tokens.
- Select New access token.
- Enter a descriptive name to help you remember what the token will be used for.
- Select Allow access to my SAML-based Netlify team to authorize access to your SAML-based team data through the API.
- Select an Expiration date for your token to help keep your information secure.
- Select Generate token.
- Copy the token to your clipboard and store it in a safe location. Once you navigate away from this page, you won’t be able to access the value again.
- Select Done.
- Save the token as a
NETLIFY_AUTH_TOKENenvironment variable in your terminal settings or in the UI of a Continuous Integration (CI) tool.
Cancel access tokens
Section titled “Cancel access tokens”To revoke your user access token for Netlify CLI, go to your Netlify user Applications settings. The procedure for revoking access depends on how access was granted.
- For access granted using the
netlify logincommand, scroll to the Authorized applications section, and find Netlify CLI. Select . - If you manually created a personal access token, you can find it in the Personal access tokens section. Select .
Usage data collection
Section titled “Usage data collection”By default, Netlify collects data on usage of Netlify CLI commands. We do this to improve the reliability and performance of Netlify CLI, and to help drive new features and improvements.
If you’d like to opt out of sending usage data, you can do so by editing the telemetryDisabled property in the Netlify CLI config.json. You can also do this with the command line:
# opt out of sharing usage datanetlify --telemetry-disable
# allow your usage to help shape developmentnetlify --telemetry-enable
Create a project from a prompt
Section titled “Create a project from a prompt”You can use the netlify create command to generate, deploy, and download a new Netlify project from a natural language description. This command uses Agent Runners to build and deploy your project automatically.
netlify create "a landing page for a SaaS product with a waitlist signup"When you run netlify create, the CLI will:
- Generate a new Netlify project based on your prompt
- Deploy it to a live URL
- Download the code to your local machine for further iteration
You can also connect the project to a GitHub repository during creation, allowing the CLI to create the repository and set up continuous deployment without manual configuration.
Continuous deployment
Section titled “Continuous deployment”With continuous deployment, Netlify will automatically deploy new versions of your site when you push commits to your connected Git repository. This also facilitates features like Deploy Previews, branch deploys, and split testing. (Some of these features must be enabled in the Netlify UI.)
Automated setup
Section titled “Automated setup”For repositories stored on GitHub.com, you can use Netlify CLI to connect your repository by running the following command from your local repository:
netlify initIn order to connect your repository for continuous deployment, Netlify CLI will need access to create a deploy key and a webhook on the repository. When you run the command above, you’ll be prompted to log in to your GitHub account, which will create an account-level access token.
The access token will be stored in the Netlify CLI config.json. Your login password will never be stored. You can revoke the access token at any time from your GitHub account settings; however, this will disable continuous deployment on all sites that were configured with that access token.
Manual setup
Section titled “Manual setup”For repositories stored on GitLab, Bitbucket, or Azure DevOps, you can connect your repository manually with the --manual flag.
For repositories on GitHub, you can also connect your repository manually, if you prefer to give more limited, repository-only access for your repositories on GitHub.
From your local repository, run the following command:
netlify init --manualThe Netlify CLI will prompt you to set your deploy settings and then provide you with a deploy/access key and a webhook URL. You’ll need to manually add the key and webhook URL to your Git provider.
Add your deploy or access key
Section titled “Add your deploy or access key”Netlify uses a deploy or access key to fetch your repository using ssh for building and deploying. The deploy key does not require write access.

Copy the key printed in the command line, then add it to your Git provider.
- GitHub, GitLab, or Bitbucket. Add the deploy key to your repository’s settings. If you have more than one site connected to a repository, you will need a unique key for each repository.
- Azure DevOps. Add the Netlify SSH public key to your Azure DevOps user settings under SSH Public Keys.
Add your webhook URL
Section titled “Add your webhook URL”Your Git provider will send a message to this webhook when you push changes to your repository, triggering a new deploy on Netlify.

Copy the webhook address printed in the command line, then add the URL and webhook details to your Git provider. If available, the Content type should be set to application/json.
-
GitHub, GitLab, or Bitbucket. Add the webhook address as the Payload URL for a new webhook in your repository’s settings. When selecting events to trigger the webhook, Push events will trigger production and branch deploys on watched branches, and Pull/Merge request events will trigger Deploy Previews.
-
Azure DevOps. In your project’s settings under Service hooks, add webhooks for these Azure DevOps events using the Netlify webhook address as the Payload URL:
- Code pushed
- Pull request created
- Pull request merge attempted
- Pull request updated
Ensure that you set webhooks for your repository with the default
[Any]branch setting. Once configured, these webhook events can trigger production and branch deploys on your watched branches.
Run a local development environment
Section titled “Run a local development environment”Netlify Dev brings the functionality of your Netlify production environment directly to your local machine.
For more information on how to configure and use Netlify Dev, refer to our local development with Netlify Dev doc.
Run builds locally
Section titled “Run builds locally”You can run builds in Netlify CLI to mimic the behavior of running a build on Netlify — including Build Plugins. To execute a build locally, run the following command from the root of your linked repository:
netlify buildThe command will build your project using environment variables set in netlify.toml and those set using the Netlify UI, CLI, or API. Note that environment variables apply to all scopes when running netlify build locally.
If you’d like to get a summary of what a build will do without taking the time to do a full build, you can use the --dry flag:
netlify build --dryThis command will output a list of all the stages of the build and the behaviors that are configured to run during each stage.
The default deploy context is production but you can also use the --context flag to run a build for a different deploy context.
netlify build --context deploy-previewThis command will run the build as if it is a Deploy Preview, applying any settings and environment variable values specific to that context.
Manual deploys
Section titled “Manual deploys”It’s also possible to deploy a site manually, without continuous deployment. This method uploads files directly from your local project directory to your site on Netlify. If builds are stopped, manual deploys are the only way you can update your site.
A common use case for this command is when you’re using a separate Continuous Integration (CI) tool, deploying prebuilt files to Netlify at the end of the CI tool tasks.
To get started with manual deploys, run the following command from your project directory:
netlify deployThe first time you run the command, Netlify CLI will prompt you to select an existing site or create a new one, linking the site for all future deploys.
The following sections describe the requirements and options for manual deploys.
Deploy directories
Section titled “Deploy directories”The deploy command needs to know which folder to publish. If your project includes serverless functions, it needs to know the location of the functions folder as well. Netlify CLI will look for this information in three places, in the following order:
- in flags specified in the command itself.
- in a netlify.toml file stored at the root of your project directory.
- in your project configuration in the Netlify UI, if continuous deployment is set up for the site.
Here is an example using command flags to set the publish folder and functions folder:
netlify deploy --dir=_site --functions=functionsIn both cases, folder paths are relative to the current directory. Note that paths starting with / will begin at the computer’s root directory — not the base of your project directory.
Draft deploys
Section titled “Draft deploys”By default, the deploy command deploys to a unique draft URL for previewing and testing.

The default draft URL uses random alphanumeric characters for the subdomain. To customize the subdomain of your draft URL with a unique string, use the --alias flag with the deploy command.
netlify deploy --alias=YOUR_ALIAS
Production deploys
Section titled “Production deploys”To do a production deploy to your main site URL, use the --prod flag (or -p for short):
netlify deploy --prodAnonymous deploys
Section titled “Anonymous deploys”You can deploy without logging in or creating a Netlify account by using the --allow-anonymous flag:
netlify deploy --allow-anonymousThis creates a project, deploys it, and generates a live URL. You have one hour to claim ownership of the deployed project by logging in or creating a Netlify account. After one hour, unclaimed projects are removed.
This is particularly useful for AI agents and automated workflows that need to create temporary projects without requiring credentials.
Node.js function dependencies
Section titled “Node.js function dependencies”Before manually deploying TypeScript or JavaScript functions with Netlify CLI, populate node_modules folders with your dependencies by running the following command in any folder containing package.json.
npm installyarnWhen you deploy TypeScript or JavaScript functions using the netlify deploy command, Netlify CLI parses each function file to note its dependencies. For each function, the CLI then pulls the required dependencies from the associated node_modules folder and zips them with the function file for deployment.
Clone and link a Netlify site
Section titled “Clone and link a Netlify site”Clone a Netlify site
Section titled “Clone a Netlify site”The netlify clone command is the recommended way to get started with a Netlify site that's already connected to a Git repository. Instead of manually finding the repository URL, cloning it with Git, navigating into the directory, and then linking it to Netlify, you can do all of this with a single command.
To clone a repository and link it to a Netlify site, run the following command with the repository URL or GitHub owner/repo format:
netlify clone owner/repoOr with a full repository URL:
netlify clone https://github.com/owner/repo.gitYou can also specify a target directory:
netlify clone owner/repo my-project-directoryThe CLI will automatically detect and link to the matching Netlify site. If multiple sites match or none are found, you'll be prompted to select one. You can also specify a site explicitly using the --id or --name flags:
netlify clone owner/repo --name my-site-nameWhen you run netlify clone, the CLI will:
- Clone the Git repository to your local machine
- Automatically link the local repository to the Netlify site
- Set up the necessary configuration for local development
This streamlined workflow is particularly useful when:
- Joining a team project: New team members can get set up in seconds
- Working across multiple machines: Quickly set up your development environment on a new computer
- Contributing to deployed sites: Start working on a site that's already live on Netlify
Link an existing local project
Section titled “Link an existing local project”If you want to connect an existing local project or repository to a site already on Netlify, you can skip the initial setup steps above and run the following command from the root of the local directory:
netlify linkThis will add a siteId field to a new file inside your project folder, at .netlify/state.json.
To unlink your folder from the site, you can remove this field, or you can run the following command from inside the project folder:
netlify unlinkLink with an environment variable
Section titled “Link with an environment variable”Alternatively, you can link to a site by finding the site ID in the Netlify UI, then adding it to your local terminal environment:
- Go to Project configuration General Project details Project information, and copy the value for Project ID. (Also known as Site ID.)
- Assign the ID to a
NETLIFY_SITE_IDenvironment variable, in your terminal settings or in the UI of a Continuous Integration (CI) tool.
Manage environment variables
Section titled “Manage environment variables”You can create and update site environment variables stored on Netlify with the CLI’s env command. Any changes made using the CLI will be reflected in the Netlify UI. Environment variable changes require a build and deploy to take effect.
By default, the Netlify CLI context is the local development context (dev). Unless a different context is specified, CLI commands will retrieve and use variables that have values set specifically for use with the dev deploy context and variables that have a single value for use across all contexts.
Use the --context and --scope flags with your CLI commands to set contextual or scope values, or to filter results. You can use both flags in the same command, for example:
netlify env:set API_KEY someValue --scope functions --context production branch-deploynetlify env:list --scope builds --context deploy-previewCreate or update environment variables
Section titled “Create or update environment variables”To create or update a site environment variable on Netlify, use env:set with the key followed by a space and then the value. You can only set one value at a time, but you can specify multiple deploy contexts and scopes in a space-separated list (no commas) using the --context and --scope flags.
netlify env:set API_KEY someValuenetlify env:set ANOTHER_API_KEY someValue --scope builds --context devIf you omit the --scope or --context flags when running the env:set command, the variable is set to all scopes and with the same value for all deploy contexts.
To set one value for production and deploy-preview and another value for a branch named staging, run the command twice:
netlify env:set API_KEY someValue --context production deploy-previewnetlify env:set API_KEY someOtherValue --context branch:stagingYou can also import environment variables from a .env file into Netlify using env:import followed by the filename. The imported variables are set to all scopes and with the same value for all deploy contexts.
netlify env:import .envTo copy environment variables from one project to another, use env:clone.
netlify env:clone --to destinationSiteId --from sourceSiteIDIf you are using environment variable secrets with Netlify’s Secrets Controller, you can flag that an environment variable value is secret using the --secret flag when creating or modifying a value.
netlify env:set API_KEY someValue --context production --secretGet environment variables
Section titled “Get environment variables”To retrieve a list of site environment variables stored on Netlify, use env:list. The CLI gets all variables that have values set for local development with the Netlify CLI (deploy contexts dev or all) and outputs a list of keys with an option to display their values.
You can request other contextual values using the --context flag and filter the list using the --scope flag. You can also use the --json and --plain flags to retrieve the list in JSON or plain text format, which can be helpful if you want to copy the values into a .env file locally.
The list will only include shared environment variables if the command is run by a Team Owner.
This list will not include raw, unmasked values of any environment variables marked as secret unless the --context is dev. Review the environment variable secrets policy for more details on the access restrictions.
netlify env:listnetlify env:list --context branch:stagingnetlify env:list --scope functionsnetlify env:list --plainTo retrieve an individual environment variable’s value, use env:get. The CLI gets the values set for local development with the Netlify CLI (deploy contexts dev or all). You can use the --context flag to retrieve a value from another context or the --scope flag to retrieve a value only if the variable is available to a specific scope.
netlify env:get API_KEYnetlify env:get API_KEY --context productionDelete environment variables
Section titled “Delete environment variables”To delete environment variables from Netlify, use env:unset. This command deletes the specified variable and its values from all deploy contexts. Once unset, these variables will no longer be stored on Netlify or appear in the UI. You can use the --context flag to delete one value from a specific deploy context instead.
netlify env:unset API_KEYnetlify env:unset API_KEY --context devWork with monorepos
Section titled “Work with monorepos”A monorepo is a repository that contains multiple sites or apps, each in its own subdirectory.
When you use the Netlify CLI, Netlify automatically scans the repository to detect if you are using a monorepo. If you are, the Netlify CLI will ask you to specify the site to run a command on and you can choose from the list of detected sites.
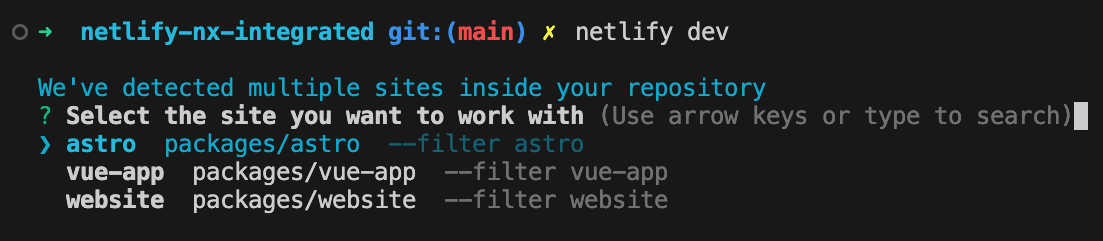
You also have the option to manually set the following flag:
-
--filter: to specify which site in your monorepo to use for a command. You can use the package name or the path to the package. This way you can run commands directly from the repository root for all projects in your monorepo.Terminal window netlify dev --filter websitenetlify dev --filter packages/website
Note that selecting a site with the Netlify CLI only applies to the command you are running and doesn’t influence the build settings in the Netlify UI. Learn more about how to set up a site from a monorepo.
Print debugging output
Section titled “Print debugging output”To print the full debugging output for a command to the terminal, set the DEBUG variable before running the command.
On Mac OS, Linux, and some common Windows terminals, add DEBUG=* to the beginning of the command:
DEBUG=* netlify deployIf you are using the Windows command prompt (cmd.exe), use set to set the variable:
set DEBUG=* & netlify deployIn Windows PowerShell, use $env: to set the variable:
$env:DEBUG='*';netlify deployGet help
Section titled “Get help”To get usage tips and learn more about available commands from within Netlify CLI, run the following:
netlify helpFor more information about a specific command, run help with the name of the command.
netlify help deployThis also works for sub-commands.
netlify help sites:createIf you have additional questions or ideas for new features, you can start an issue on Netlify CLI’s open source repository. You can also visit our Support Forums to start or join a conversation. We’d love to hear from you!
Did you find this doc useful?
Your feedback helps us improve our docs.