Auth0 by Okta Integration
Auth0 by Okta is an identity platform that adds authentication and authorization to your applications with features to manage users and customize access control. The Auth0 by Okta Integration provides a streamlined and secure solution so you can connect your Netlify team to Auth0 from the Netlify UI. With the Auth0 by Okta Integration, you can add authorization to your functions to manage access across multiple services.
# Before you begin
To get started with Auth0 by Okta on Netlify, ensure that you have the following:
- An Auth0 account. If you don’t have one already, you can sign up for free. When you create your account you create a tenant as you set up your dashboard.
- A Netlify site to configure with an Auth0 Machine-to-Machine (M2M) Application and API. M2M Applications are non-interactive applications ideal for if you have a service that requires access to an API. Note that although you need a Netlify site to get started using authentication and authorization, you connect to your Auth0 tenant at the team level in the Netlify UI.
The steps below guide you through:
- how to create a M2M Application in your Auth0 dashboard and grant access to the Auth0 Management API
- how to enable the Auth0 by Okta Integration in the Netlify UI and connect your team to Auth0
- how to configure your tenant on a site so you can use the integration in your code
# Set up your Auth0 M2M application
To begin, log in to your Auth0 account. You can set up your M2M application from your Auth0 dashboard.
From the dashboard, select Applications > Create Application.
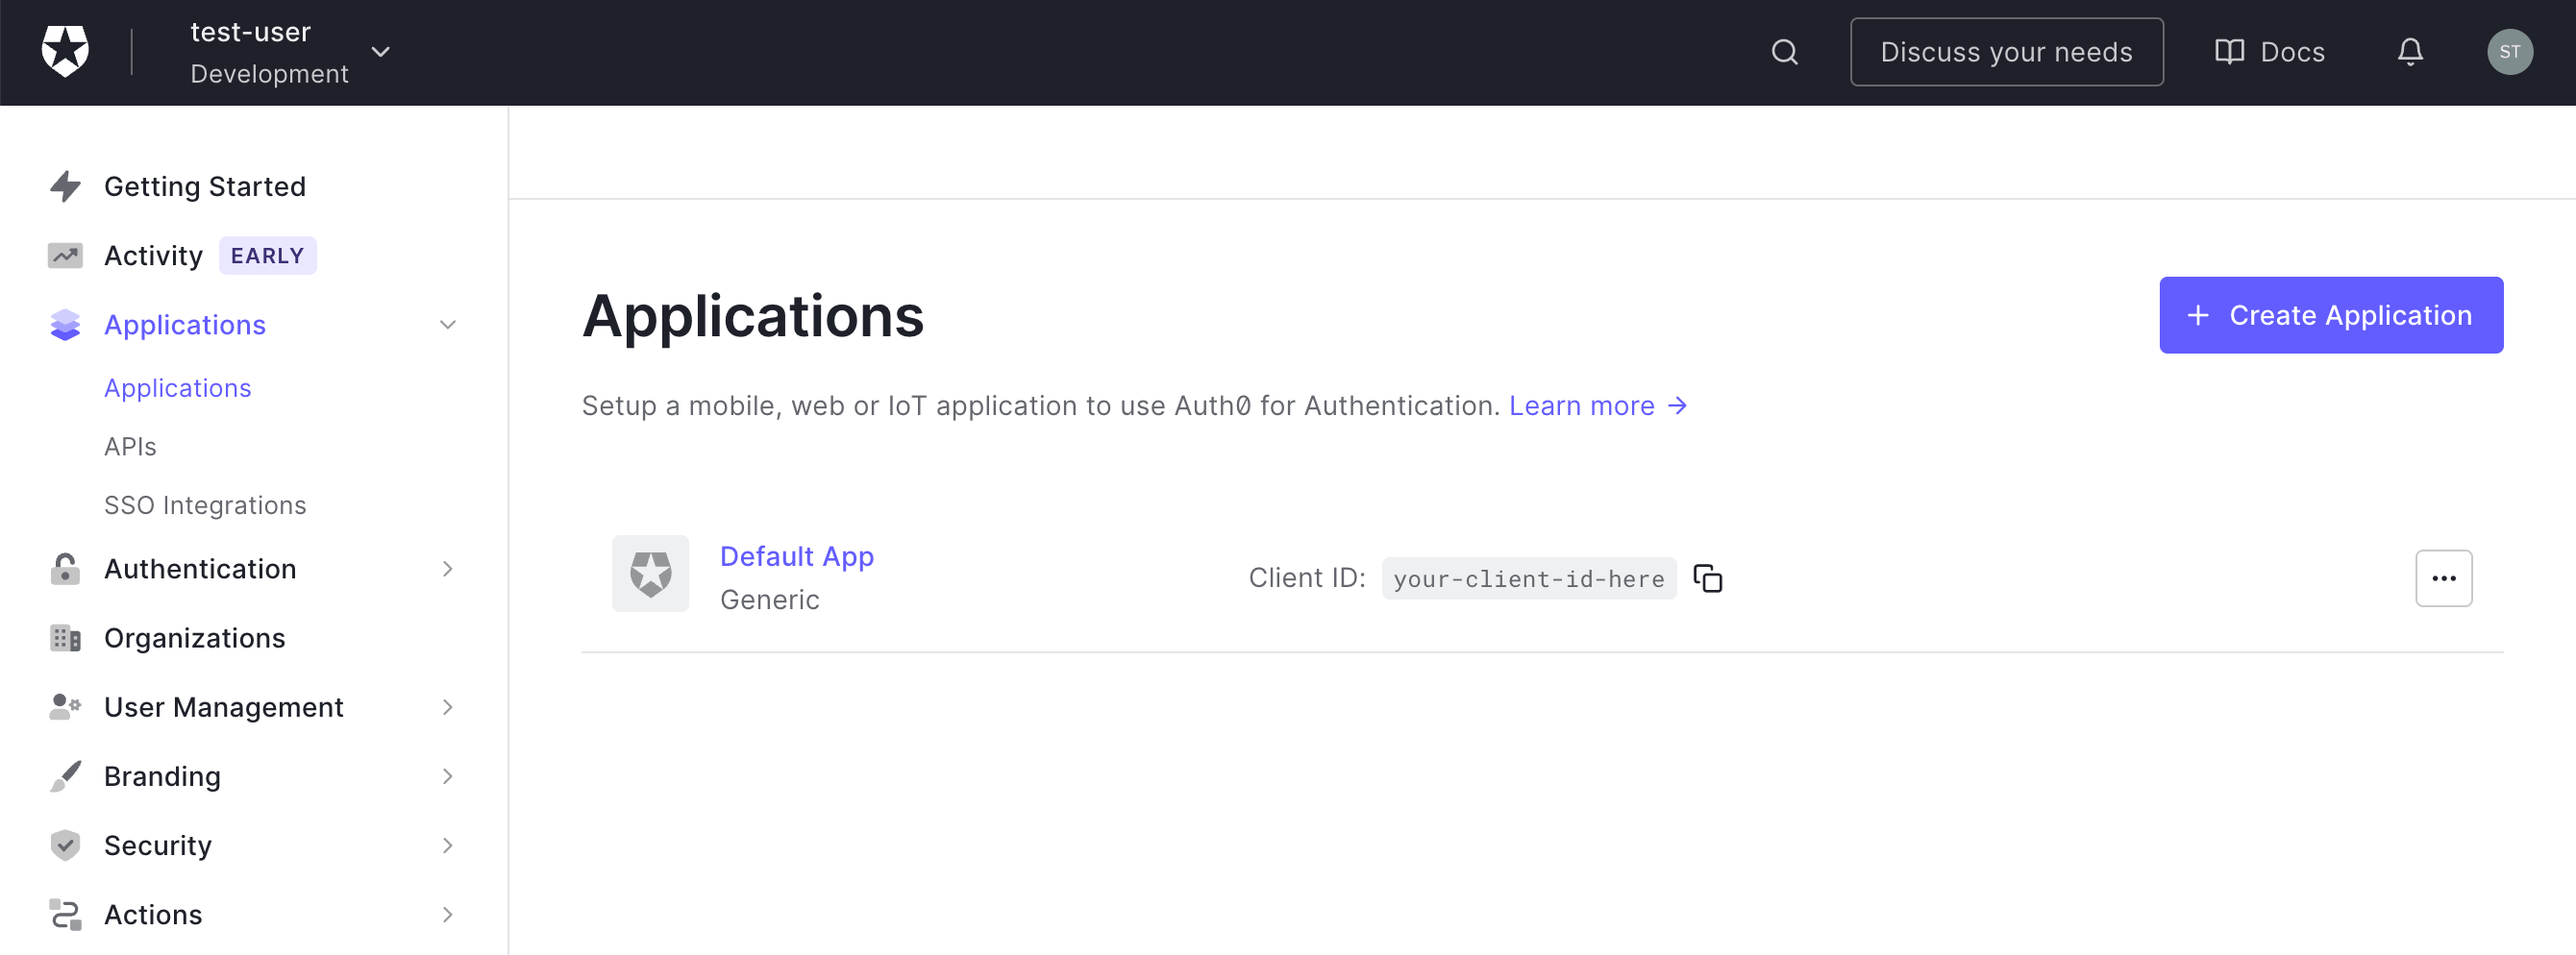
In the Create application menu, enter a name for your application.
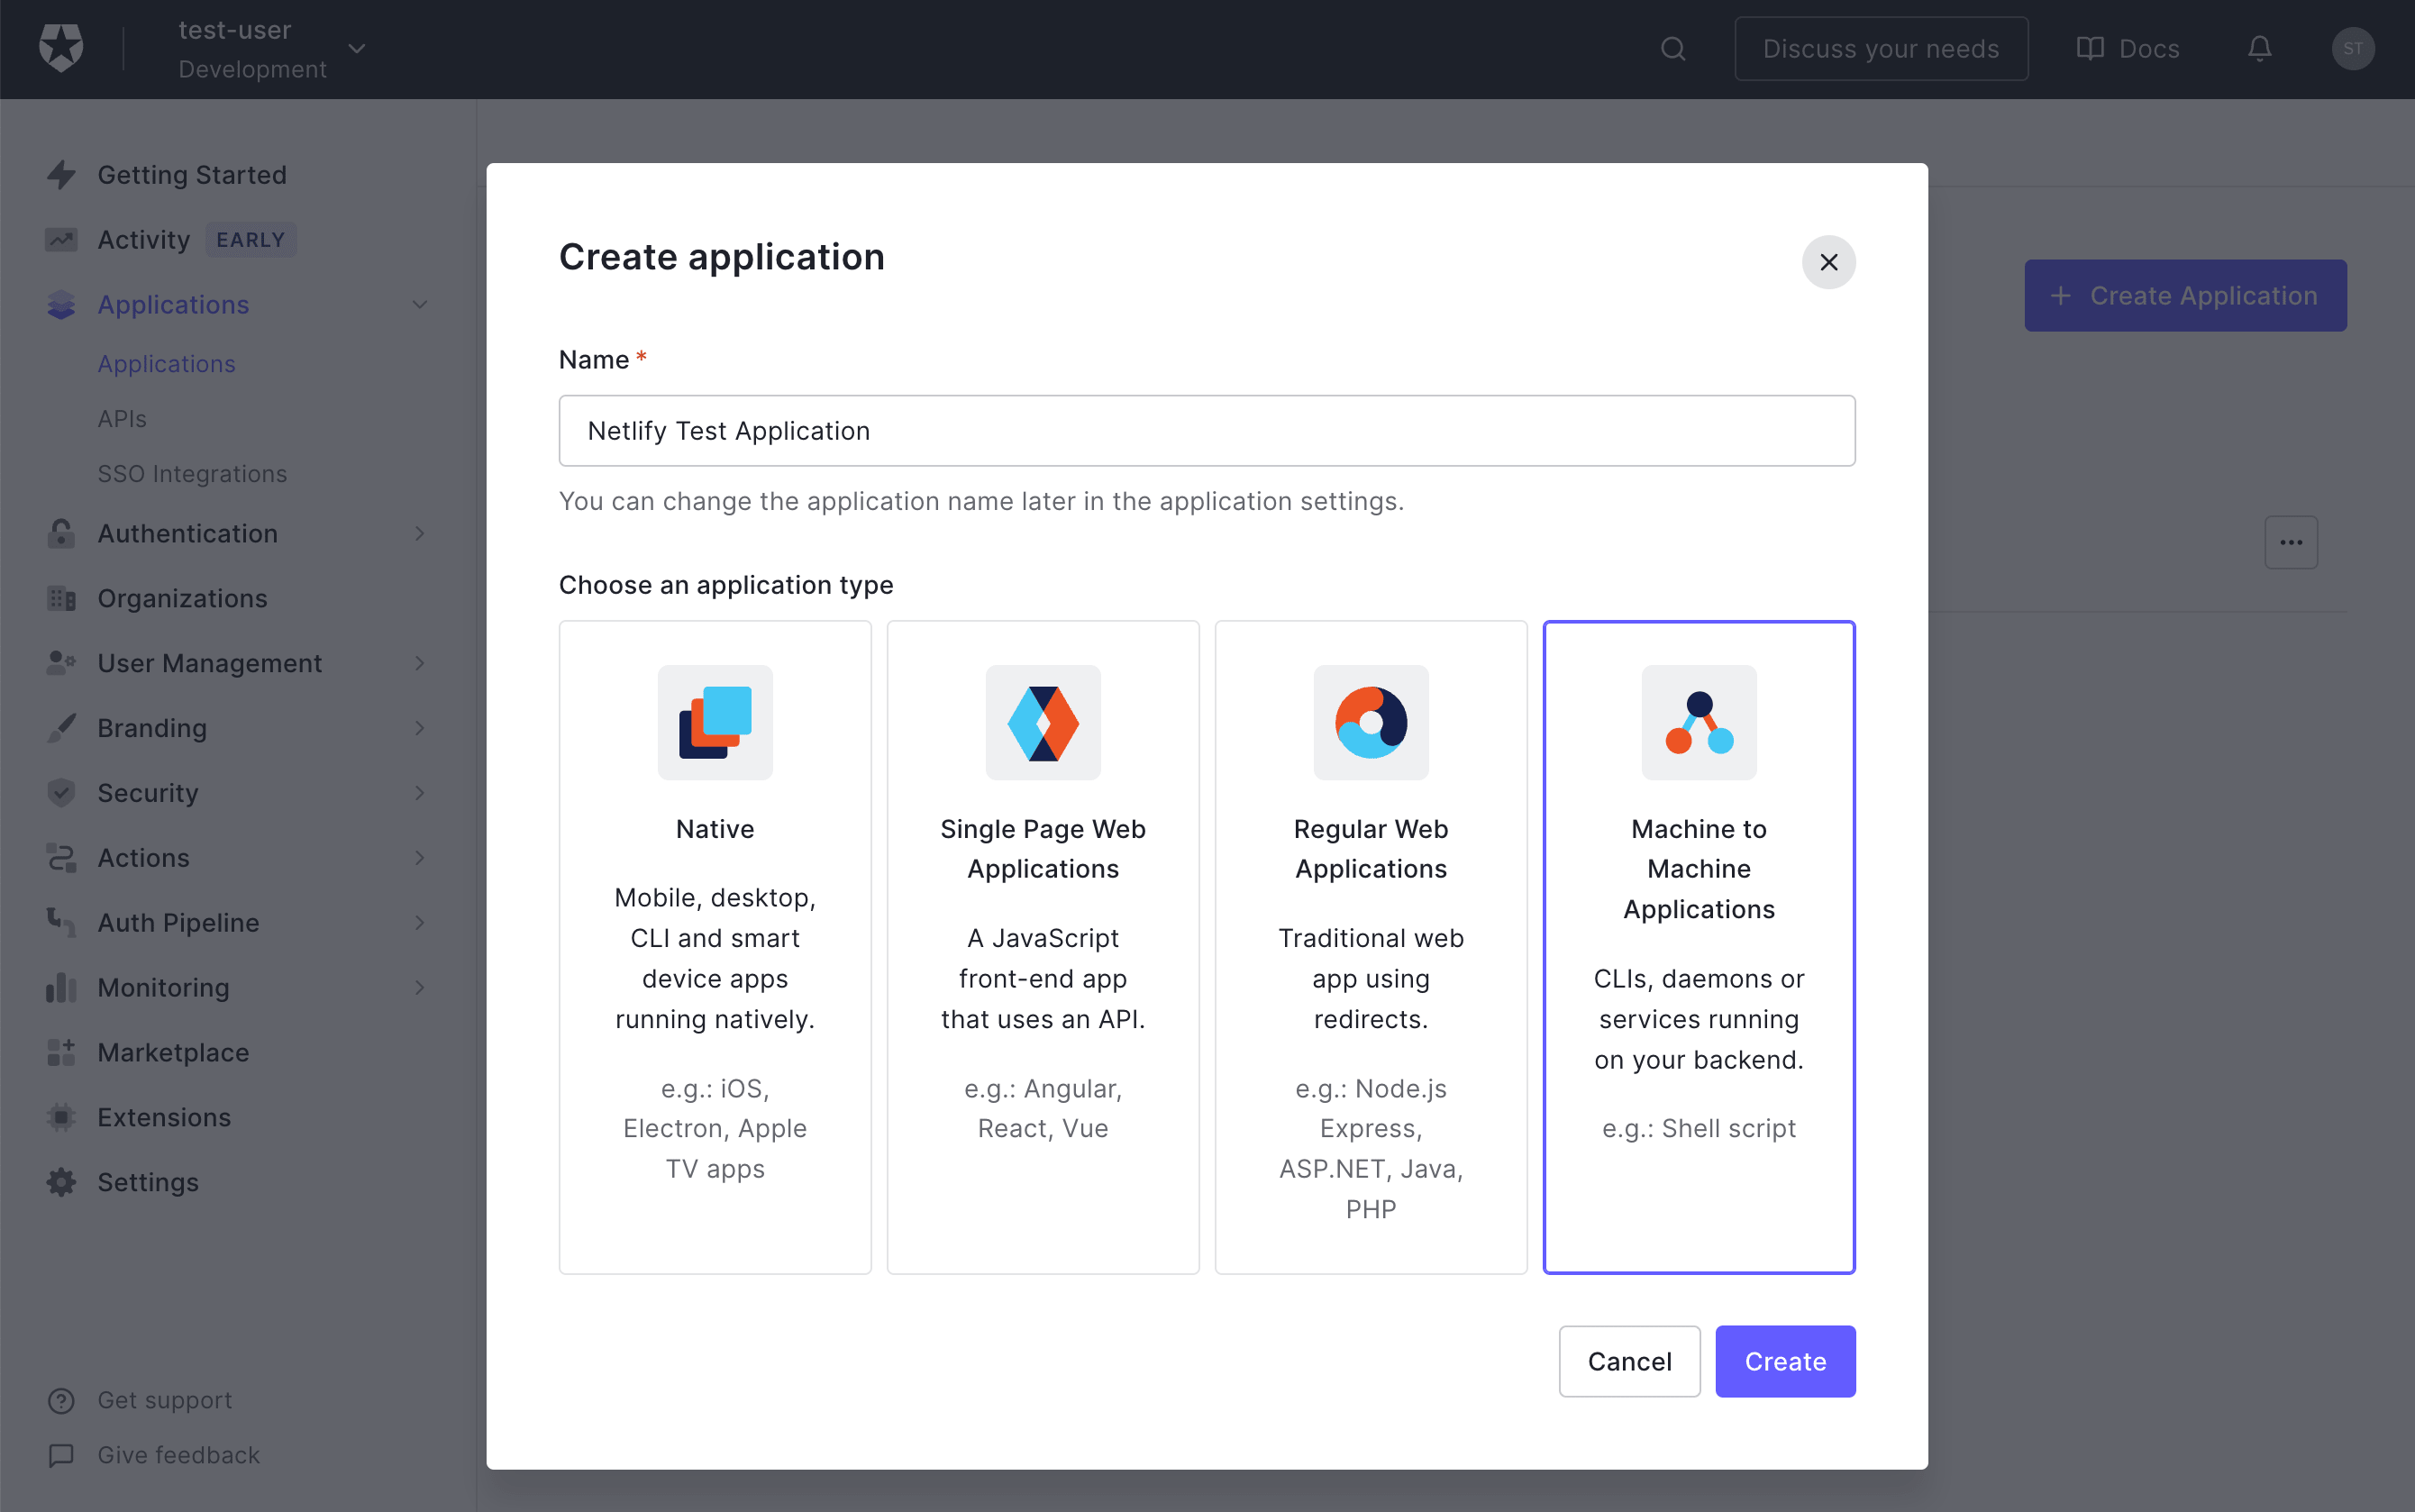
Select Machine to Machine Applications > Create.
Authorize the M2M Application by selecting the Auth0 Management API, which was created automatically when you created your tenant.
Select the required permissions for this integration, then select Authorize.
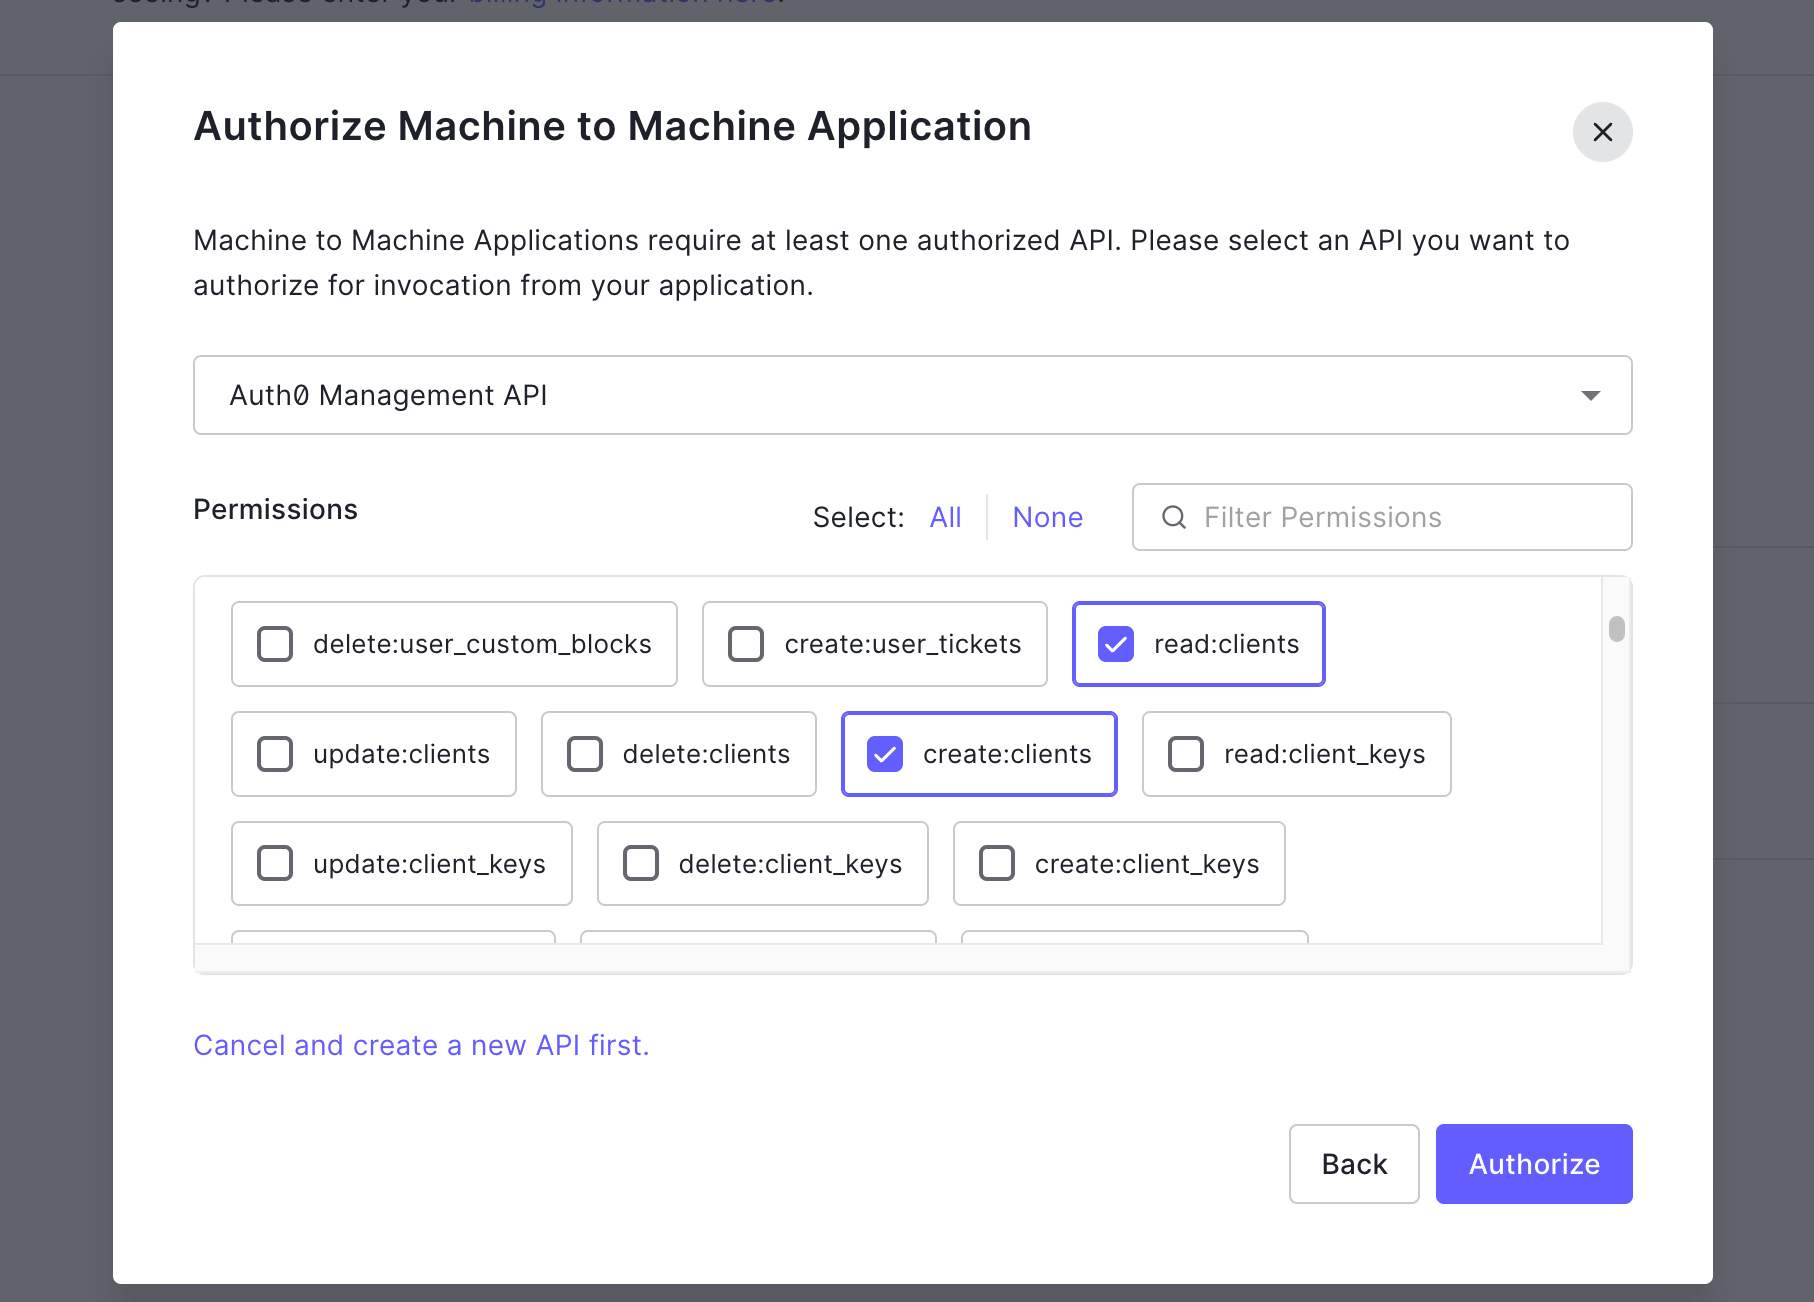
Once you’ve created your M2M application, Auth0 generates a domain, client ID, and client secret. Navigate to Applications > [Your Application Name] > Settings to access these values. You need these values when you configure your connection in the Netlify UI.
# Required permissions
The following permissions are required to integrate your Auth0 M2M application with Netlify:
- read:clients – fetch the apps that a site can connect to
- create:clients – create the Netlify-configured app on Auth0
- read:tenant_settings – fetch any metadata around tenants needed for Netlify UI purposes
- read:resource_servers – fetch the APIs that a site can connect to
- create:resource_servers – create the Netlify-configured API on Auth0
# Connect to Auth0
Navigate to the Netlify UI to get started. Since this is a team-level connection, you don’t need to select a site first to enable Auth0 by Okta. To begin:
Select
and under Auth0 by Okta, select Enable.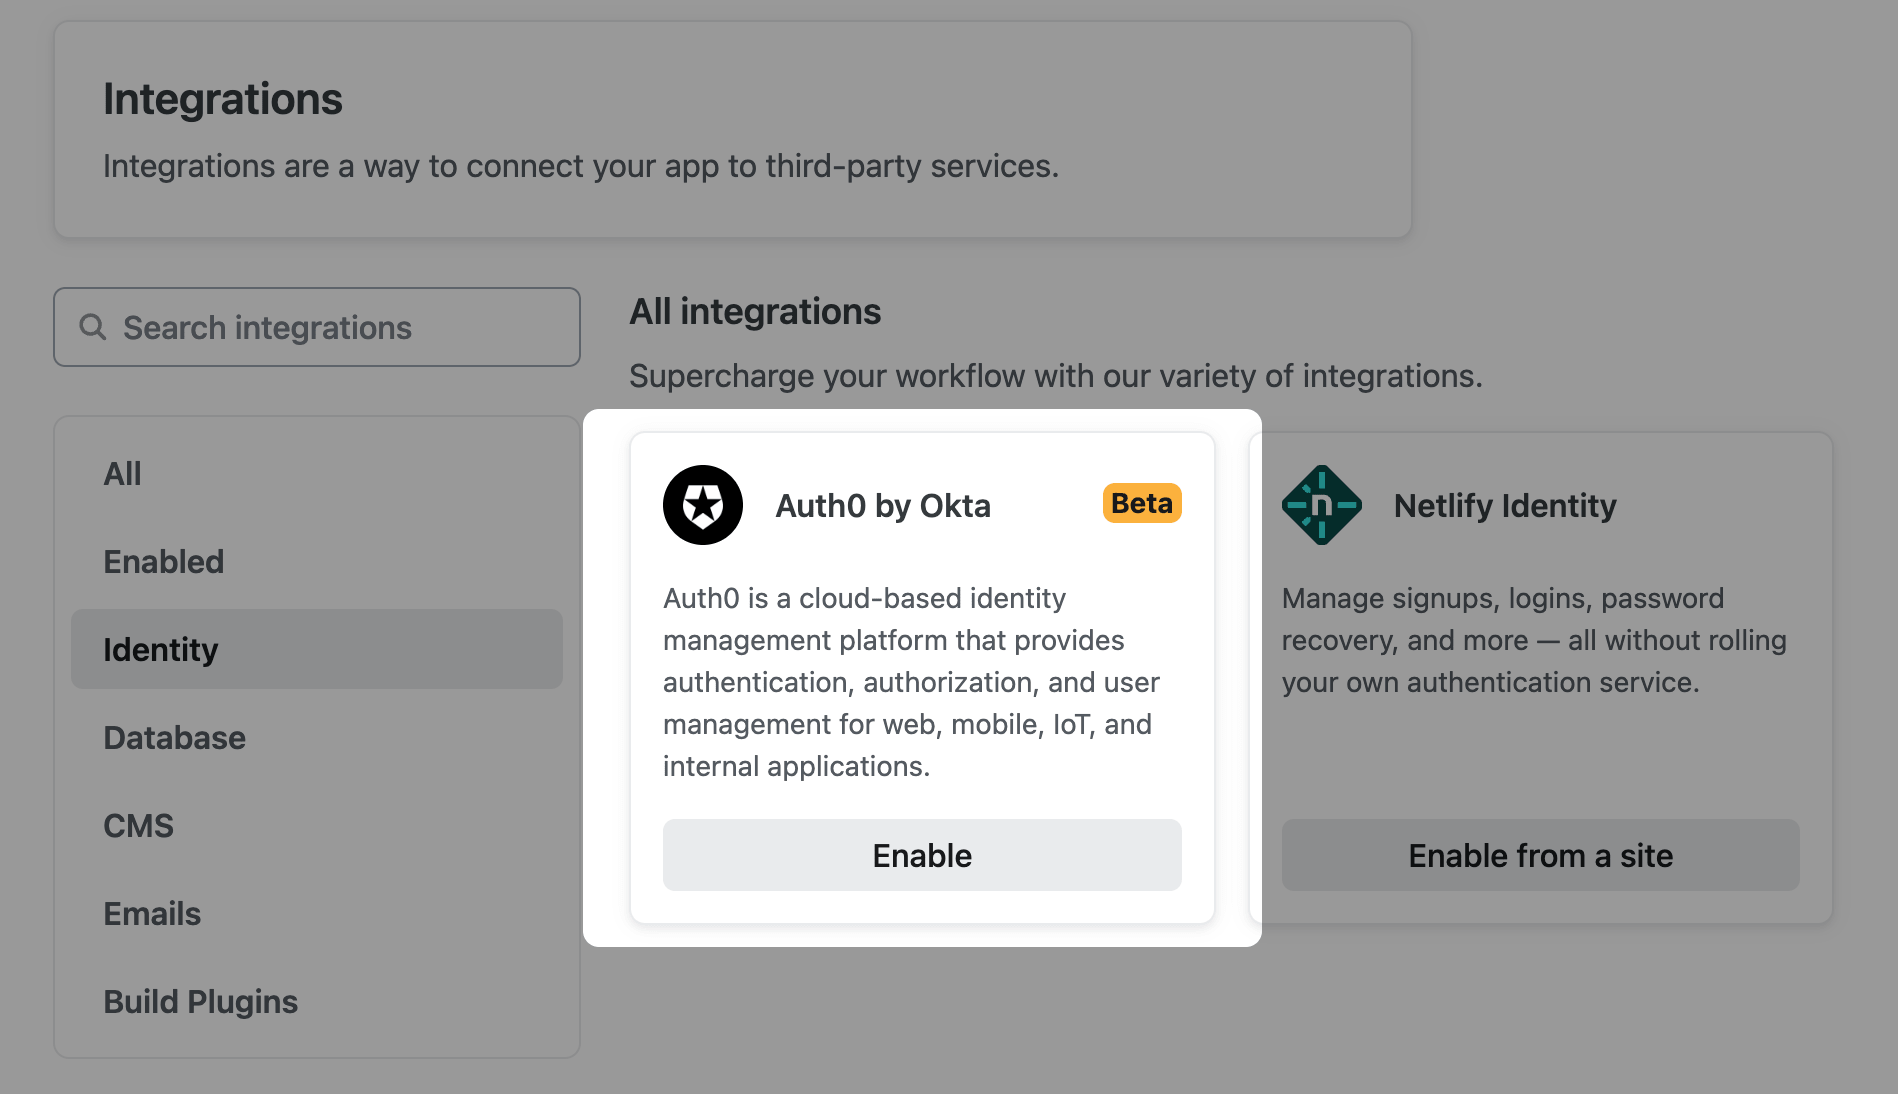
Since you already set up your M2M Application in the steps above, copy over the name, domain, client ID, and client secret values here. Note that the domain for your application is the URL your frontend app uses to authenticate, while the client ID and secret enable you to fetch tokens on the backend.
Select Save.
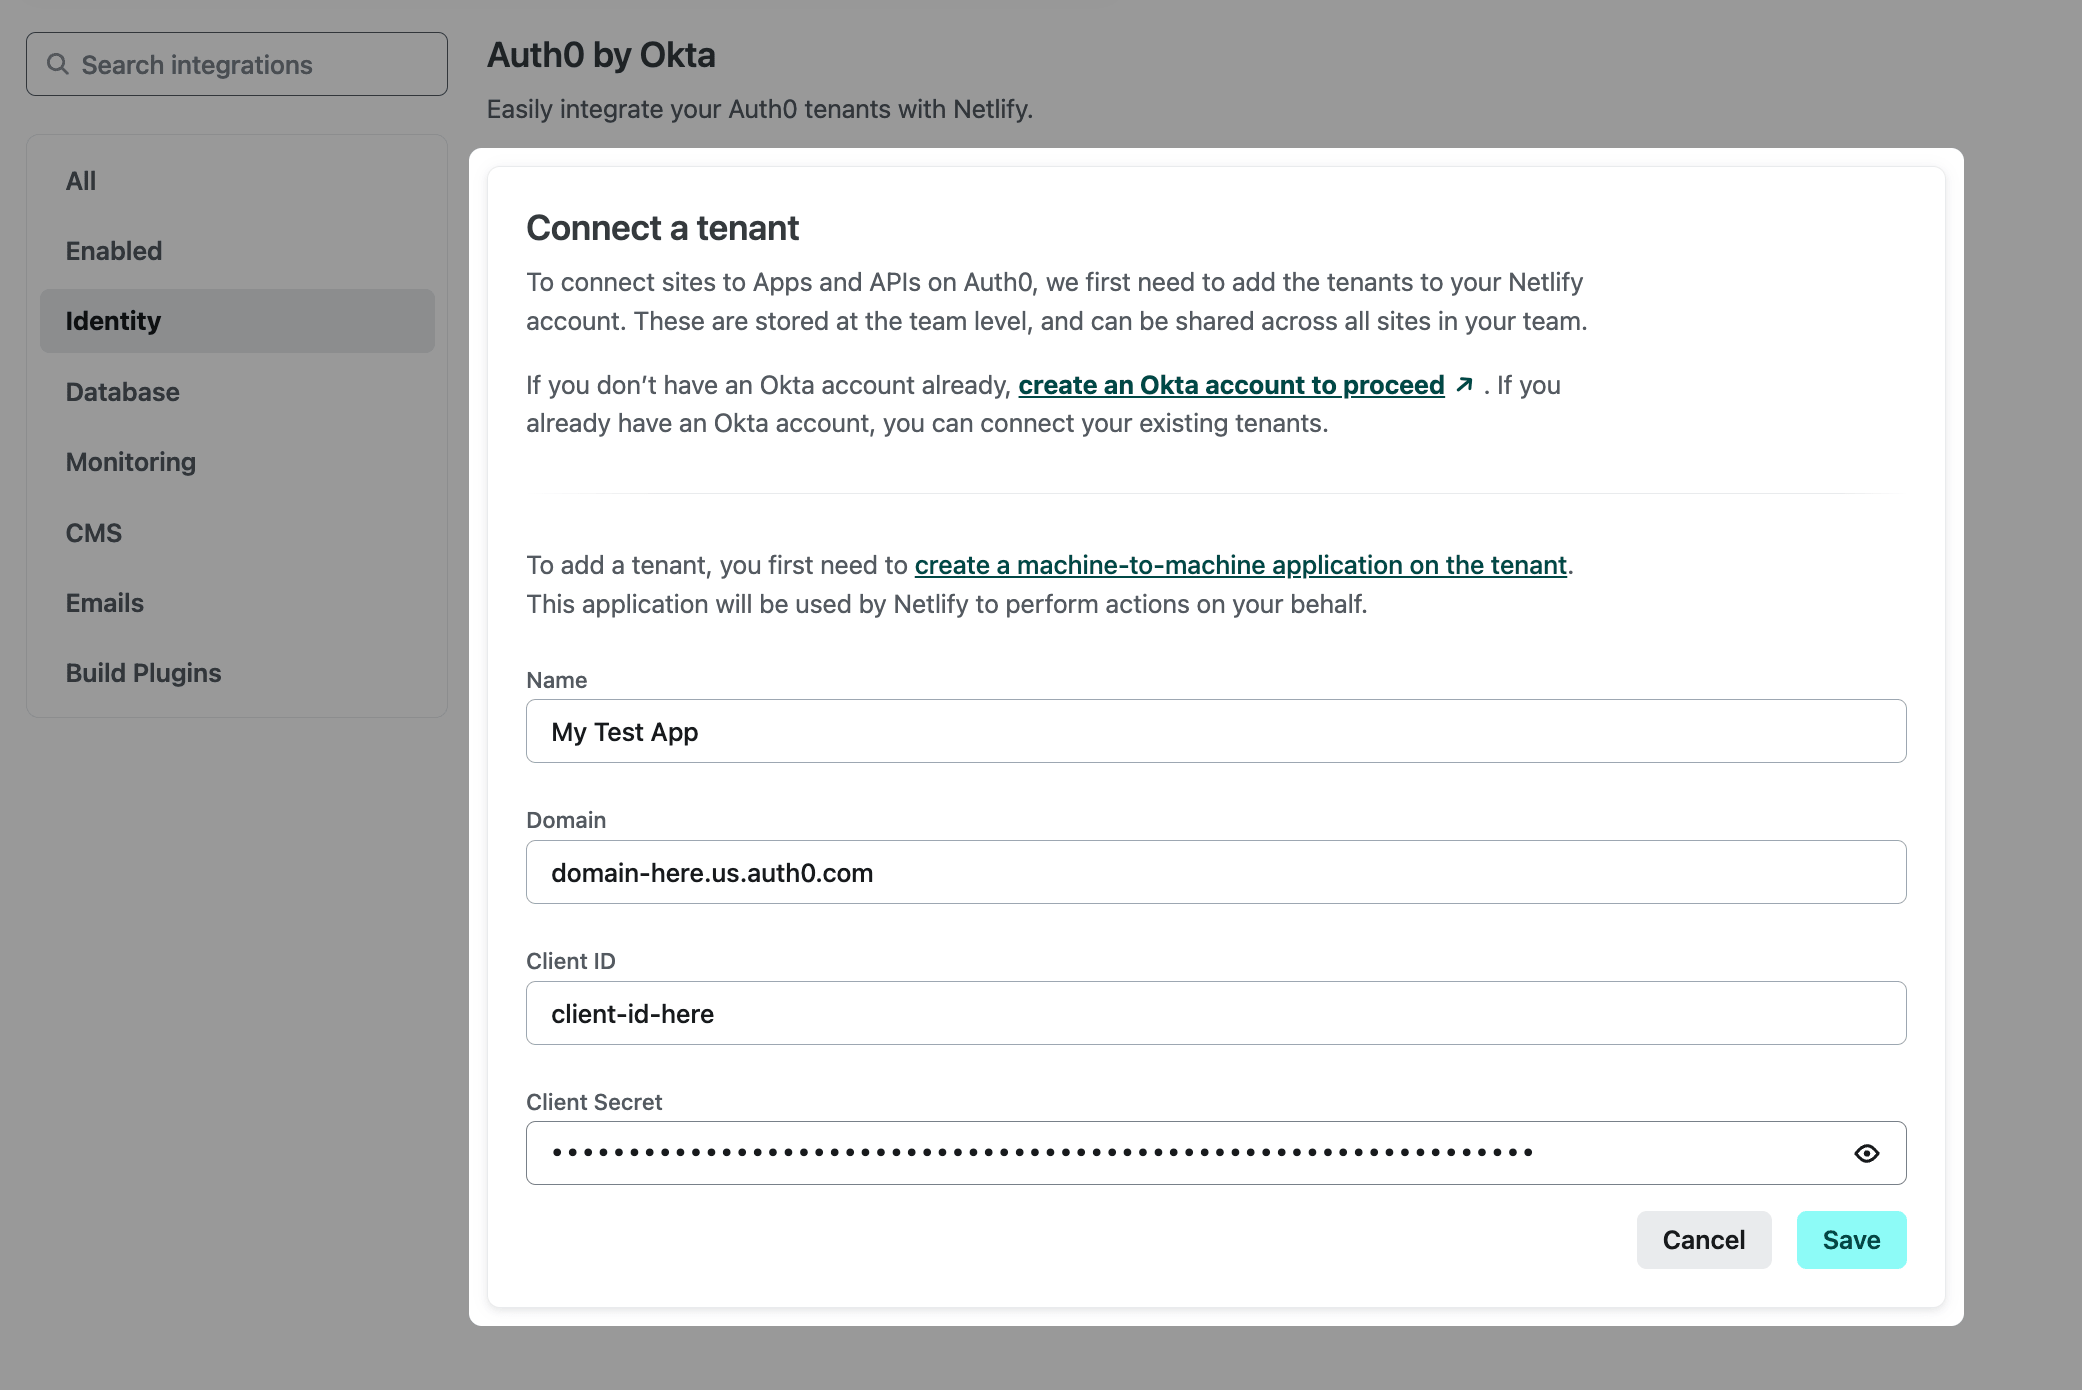
Now that you added your tenant, you can establish a connection to a site. Select Connect to a Site to choose the site you want to use the integration with.
Select that site’s name to be routed to the Auth0 by Okta Integration page for the site.
Here, you can configure your integration on the site level. Select a tenant for your Production, Deploy Preview, and Development deploy contexts. You can use the same tenant or, if you have multiple environment tenants configured, you can assign those here.
Deploy context limitation
This integration does not currently support branch deploys.
Once you’ve selected the tenant on your site, you can access the Manage Apps and Manage APIs menus. These menus pull in the applications and APIs you’ve created in Auth0 associated with the configured tenant. If you haven’t created any yet, you can create them from the Netlify UI by following the steps below. Creating Auth0 applications and APIs directly in the Netlify UI also optimizes their settings for use with Netlify.
# Configure your tenant
To get started using your Auth0 applications and APIs from the Netlify UI:
In the Configuration menu, enter your build system prefix as it would appear in an environment variable in the Prefix field. For example, if you’re using Vite, the prefix here would be
VITE_. This is used to prefix the following environment variables, which Netlify creates automatically once you set this value:AUTH0_AUDIENCEAUTH0_CLIENT_IDAUTH0_DOMAIN
If you have an application already created, you can select it in the Manage Apps menu. To create one, select Create an App. Select your newly created App in the Manage Apps menu.

When you create an application from the Netlify UI, this creates a Single Page Application (SPA), distinct from the M2M Application we created above. SPAs are ideal for frontend applications that use an API.
To verify that your app was created, navigate to your Auth0 dashboard, then select Applications. The application name corresponds to your Netlify site name, and the type is Single Page Application.
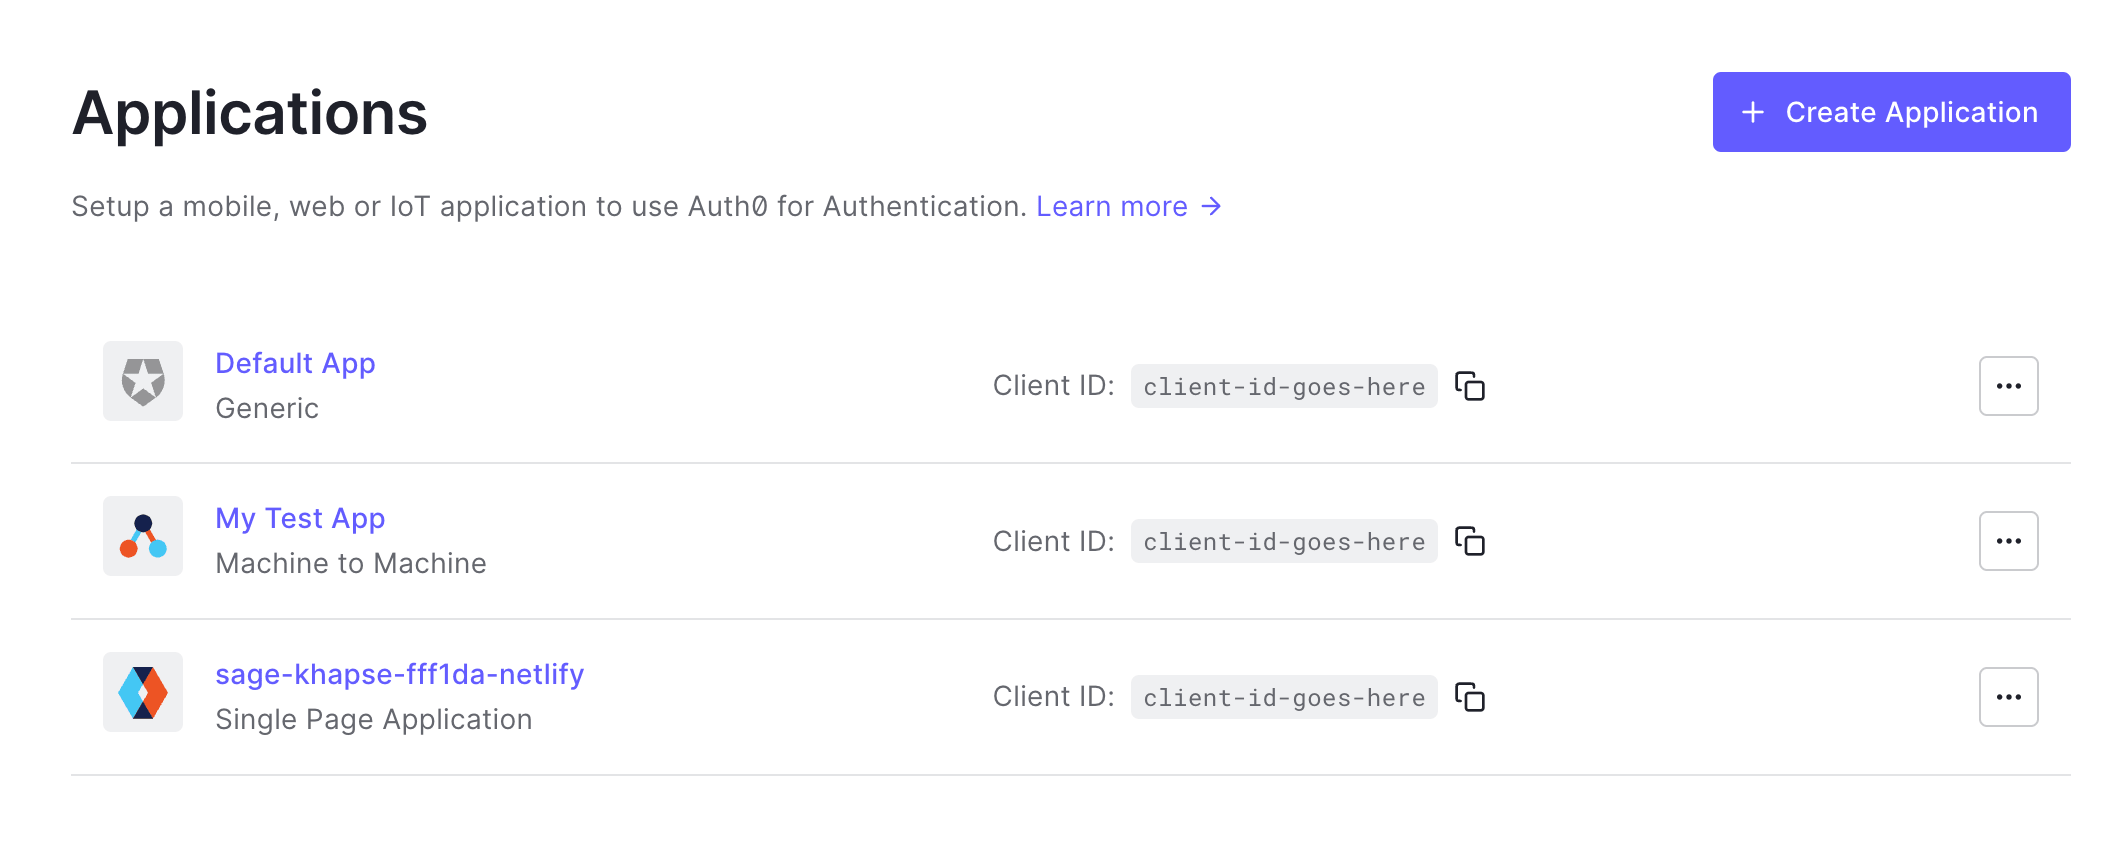
Return to the Netlify UI to continue configuring your tenant. If you have an API already created, you can select it from the Manage APIs menu. To create a new one, select Create an API. Select your newly created API from the Manage APIs menu.
To verify that your API was created, navigate to your Auth0 dashboard, then select APIs. Just like with the application, the name of the API corresponds to your Netlify site name.
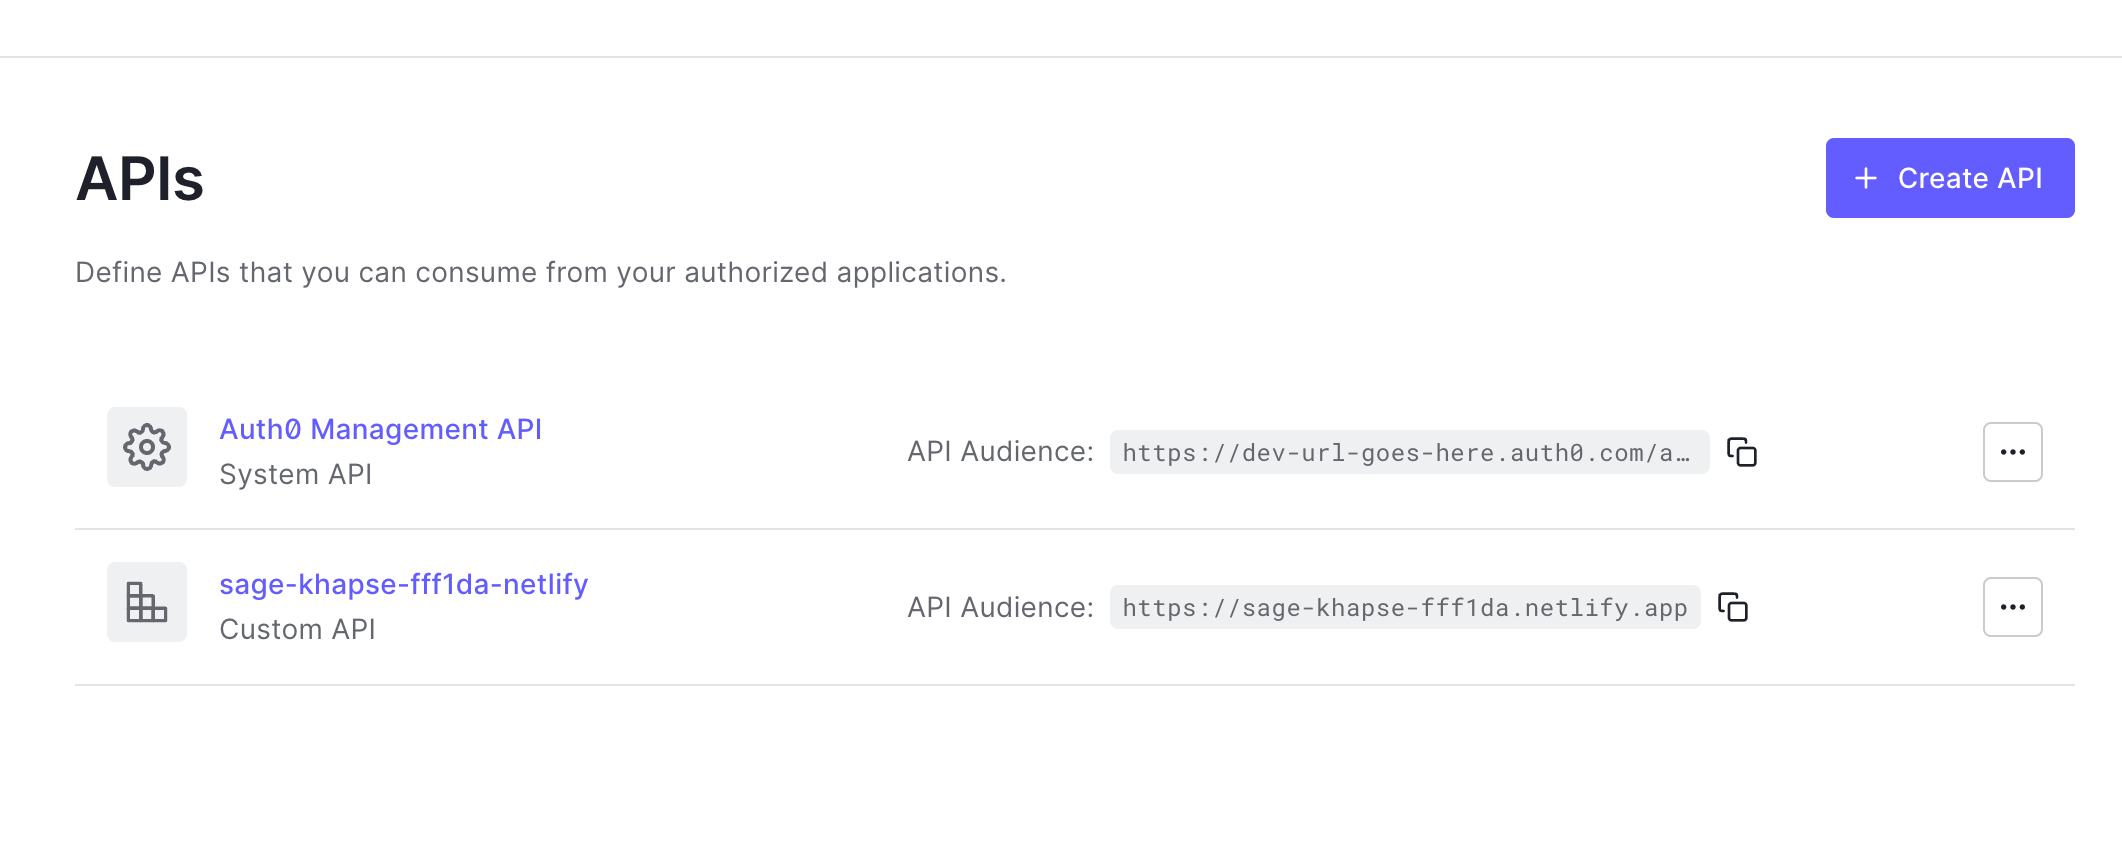
Return to the Netlify UI and select Save to save your configuration.
The complete integration for your site should be similar to this when complete:
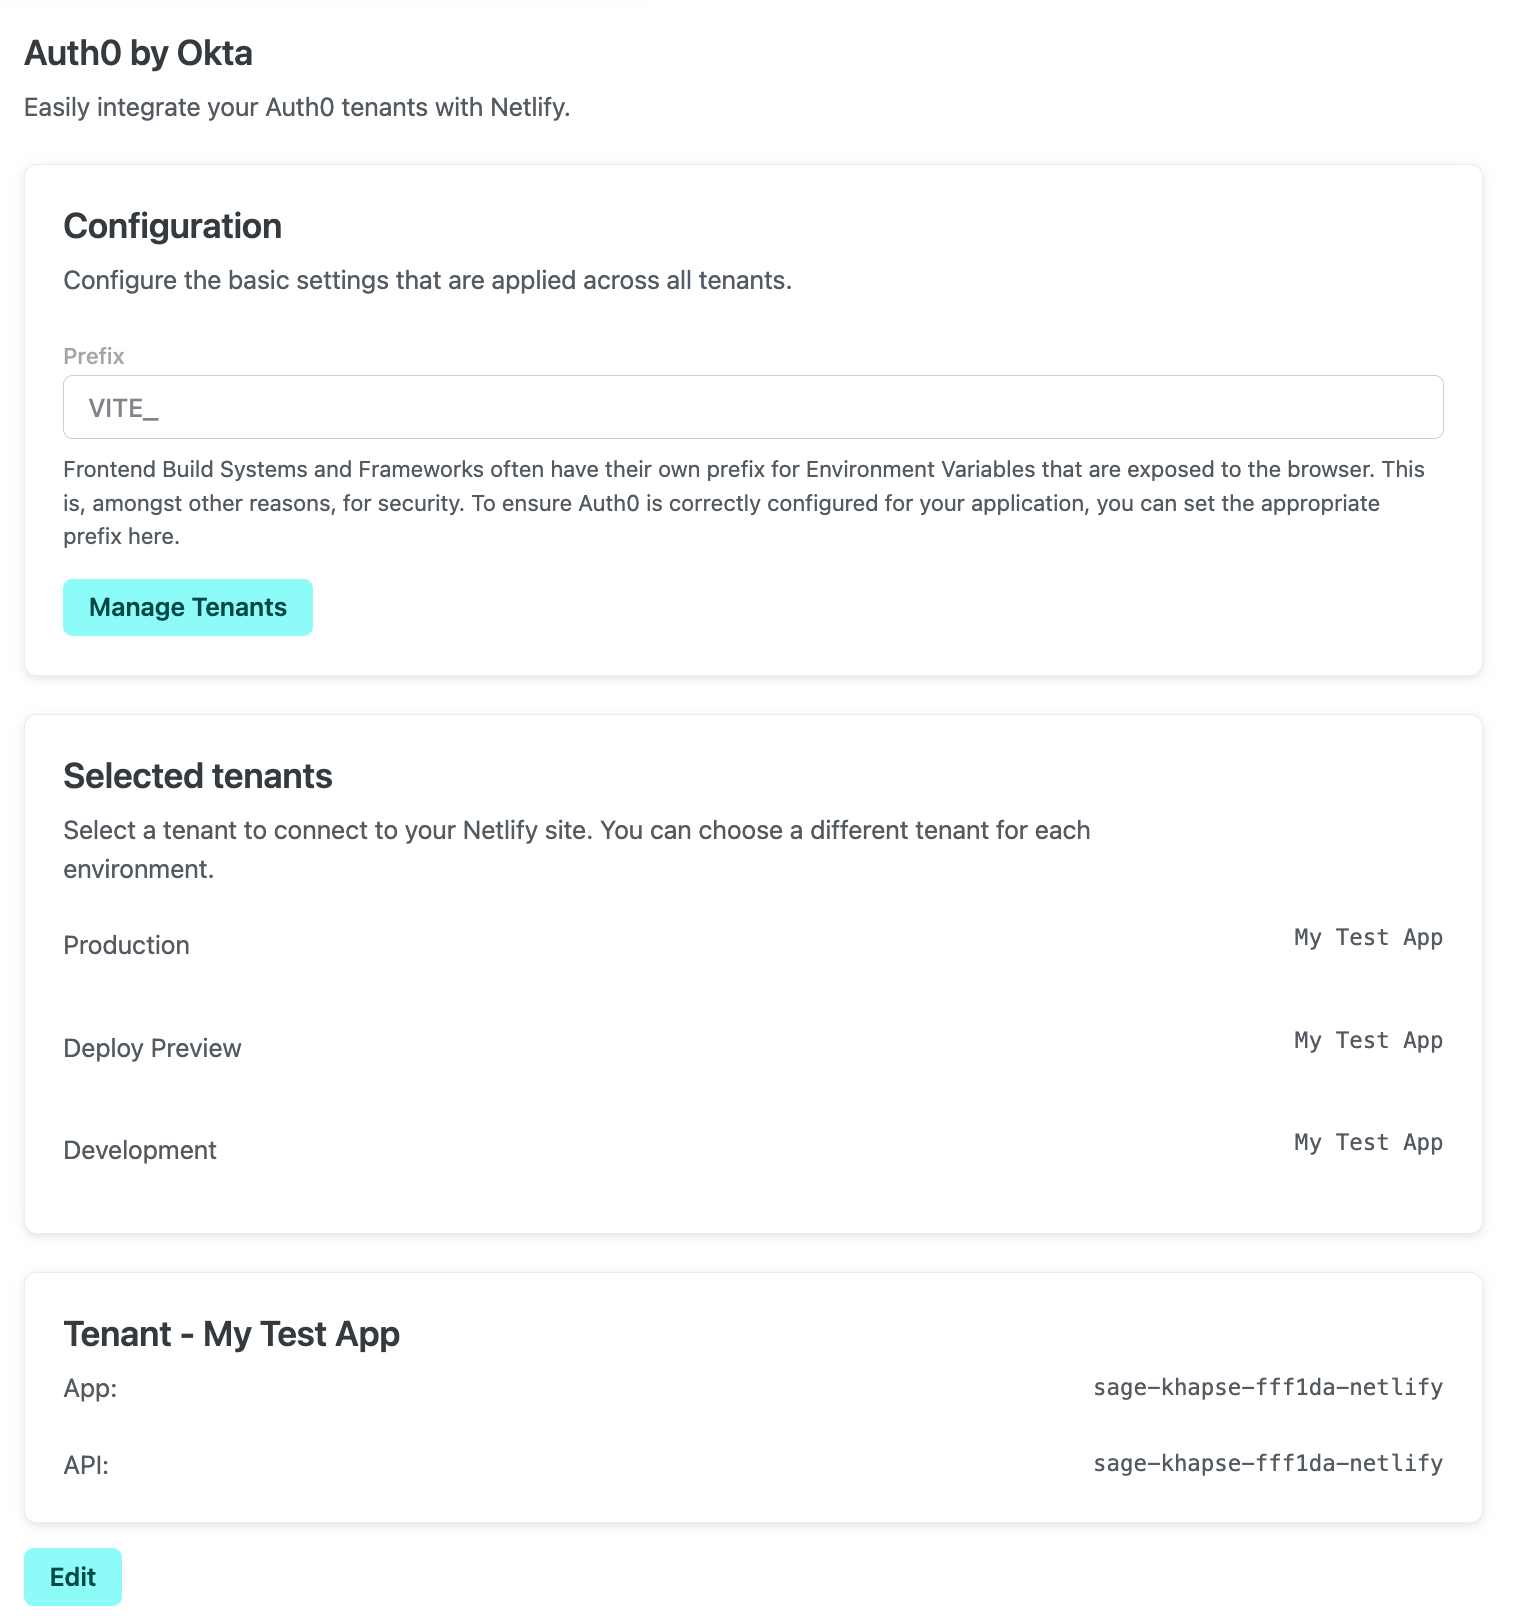
In addition to the environment variables described above, this integration also creates the AUTH0_AUDIENCE and AUTH0_ISSUER environment variables to use with your backend logic. In the Netlify UI, select
# Default settings
When you create applications and APIs in the Netlify UI, there are several default settings to be aware of. Below are a few of the settings that are optimized for use on Netlify.
# Applications
The sections below correspond to application settings in Auth0:
- Application Properties – the Token Endpoint Authentication Method is set to None so that you can exchange tokens on the frontend. This is the only option for public applications.
- Application URIs – we pre-configure the Allowed Callback URLs and Allowed Web Origins to support local development.
- Advanced Settings – in the OAuth settings, the JSON Web Token (JWT) Signature Algorithm is set to RS256, which is recommended by Auth0 and enables the token to be signed by your tenant’s private key. Refer to the Auth0 documentation to learn more about JWT Signing Algorithms.
# APIs
The features below are enabled by default when you create your API from the Netlify UI:
- Role-based Access Control (RBAC) allows you to use role and permission assignments.
- Allow Skipping User Consent ensures that your API will skip user consent for applications flagged as first party.
You can manage your settings in the Auth0 dashboard, but the default settings described above are set to optimize your applications and APIs to use with Netlify. If you’ve already created applications and APIs in Auth0, you can’t edit them from the Netlify UI so any existing applications or APIs remain configured as expected.
# Use Auth0 in your frontend application
Here is an example of how you can set up a frontend application to use the Auth0 by Okta Integration. This example uses the Auth0 SDK for React Single Page Applications, which provides the Auth0Provider function to wrap the App component. The App component can contain the logic for your specific use case, such as a login screen or a screen that grants access to an account.
You might recall that when you established your connection, you added your Auth0 client ID and domain, which created the environment variables needed to pass as properties to the Auth0Provider function. Here, the environment variables use the prefix VITE_ because the project is built with Vite. These environment variables provide the client ID and domain for the configured Auth0 application, as well as the default audience used for requesting access.
Below is how you can pass these environment variables as properties to the Auth0Provider component:
import { Auth0Provider } from "@auth0/auth0-react";
import React from "react";
import ReactDOM from "react-dom/client";
import App from "./App";
import "./index.css";

ReactDOM.createRoot(document.getElementById("root") as HTMLElement).render(
  <React.StrictMode>
    <Auth0Provider
      clientId={import.meta.env.VITE_AUTH0_CLIENT_ID}
      domain={import.meta.env.VITE_AUTH0_DOMAIN}
      authorizationParams={{
        redirect_uri: window.location.origin,
        audience: import.meta.env.VITE_AUTH0_AUDIENCE,
        scope: "openid profile admin"
      }}
    >
      <App />
    </Auth0Provider>
  </React.StrictMode>
);
You can learn more about using Auth0 with Single-Page Applications in the Auth0 documentation.
# Create a function to use Auth0 on the backend
You can use the Auth0 by Okta Integration to add authentication and authorization to a serverless function in your project. Below is an example of how to set up the backend logic for this project. For this example, the function that contains this logic is named get-users.ts.
├─ netlify/
│  └─functions/
│   └─ get-users.ts
To get started, install the necessary packages:
npm install @netlify/auth0 @netlify/integrations
This example uses withAuth0 as well as PlanetScale’s connection, which enables a database call to get users. This method requires the PlanetScale Integration, so install the following package as well:
npm install @netlify/planetscale
In the example function below, withAuth0 wraps the handler function. The required parameter is set to true, ensuring authentication is required. By default, this parameter is set to false and handles authentication. Note that when set to true, required returns a 401 if the request doesn’t contain a JWT.
It’s also possible to use Auth0’s RBAC to add authorization to the function by using the roles property. RBAC is enabled by default for APIs created in the Netlify UI but you do need to configure permissions for roles on the API in your Auth0 dashboard.
import type { Handler, HandlerEvent, HandlerContext } from "@netlify/functions";
import { withAuth0 } from "@netlify/auth0";
import connection from "@netlify/planetscale";

export const handler: Handler = withAuth0(
  async (event: HandlerEvent, context: HandlerContext) => {

    const { rows: users } = await connection.execute("SELECT * FROM  users");

    return {
      statusCode: 200,
      body: JSON.stringify(users),
    };
  },
  {
    auth0: {
      required: true,
    },
  }
);
With the example above, if a user isn’t authenticated, they won’t be authorized to access the users pulled from the call to the database.
When calling this example API, it’s important to make sure you send an authentication token. To get an authentication token, you can use a library such as @auth0/auth0-react. Read more on how to get an Access Token in Auth0’s documentation.
You can test your function locally when you launch Netlify Dev to start a development environment and inject the environment variables created when you configured your tenant on your site:
netlify dev
Visit localhost:8888 to launch your site locally. From here, you can test the action that triggers your function.
# More resources
- Auth0 by Okta documentation
- Netlify Blog: New Auth0 Integration to Streamline Enterprise App Security
# Feedback
We welcome your feedback on the Auth0 by Okta Integration. Fill out our survey to share your thoughts or ideas.
Did you find this doc useful?
Your feedback helps us improve our docs.