For the complete Netlify documentation index, see llms.txt. Markdown versions of this page are available by appending .md to the URL. Understand how deploys work, how to find information about deploys, and how to manage branches, deploy contexts, deploy permissions, and more.

How atomic deploys work
Section titled “How atomic deploys work”Netlify enforces a strict concept of atomic deploys. If you’re used to uploading files with FTP, SSH, RSync or S3’s API, this is quite a different concept.
Instead of pushing individual files to Netlify, you always create a new deploy. Netlify will compare the new deploy with your existing deploy and determine which files have changed and need to be uploaded.
No changes go live on your site’s public URL before all changes have been uploaded. Once all the changes are ready, the new version of the site immediately goes live on the CDN.
This means deploys are atomic, and your site is never in an inconsistent state while you’re uploading a new deploy.
With FTP or S3 uploads, each file is pushed live one after the other, so you can easily get into situations where a new HTML page is live before the supporting assets (images, scripts, CSS) have been uploaded. And if your connection cuts out in the middle of an upload, your site could get stuck in a broken state for a long time.
Atomic deploys guarantee that your site is always consistent.
Skew protection
Section titled “Skew protection”Netlify offers skew protection to address version skew, which is a common challenge when deploying a new version of a production site while users are actively using it.
The issue occurs when the server code is updated, but some clients continue to use an older version, typically due to stale browser caches or long-lived browser sessions that span multiple Netlify deploys.
This drift can cause unpredictable behavior, especially if the server update includes breaking changes.
For example, consider this scenario:
-
A user opens your app and loads the client-side code in their browser.
-
You deploy a new version that removes a field from one of your API endpoints.
-
The user continues using the app without reloading. The outdated client code sends a request that includes the now-removed field, resulting in an error.
Skew protection fixes this by tracking which deploy each client should communicate with and routing requests to the appropriate server version. As long as a deploy is available, it will be served to clients that require it.
If you are a framework maintainer, here is how to add support for skew protection to your framework.
Deploy contexts
Section titled “Deploy contexts”Skew protection is only available on the production context. When you make a request for a branch deploy or a Deploy Preview, Netlify will bypass skew protection and serve the latest deploy associated with those contexts.
Deploy permalinks, where the URL itself already contains a reference to a specific deploy ID, also bypass skew protection.
Page loads
Section titled “Page loads”If not implemented correctly, skew protection can lead to clients perpetually using old versions of your application.
Imagine a scenario where your application sends a cookie that locks the client to deploy A. If we keep using that cookie for as long as it's persisted on the user's browser, they keep requesting deploy A even if your application is now on deploy Z.
To mitigate this, Netlify discards skew protection signals whenever the browser navigates between pages. This is typically known as a hard navigation, in constrast with the concept of a soft navigation popularized by Single Page Applications.
Netlify uses the following heuristics to detect a hard navigation:
- The
Sec-Fetch-Modeheader is set tonavigate, or - The
Sec-Fetch-Siteheader is present and is not set tosame-origin.
Password Protection
Section titled “Password Protection”If your site has Password Protection enabled, skew protection works only if you're only protecting non-production deploys. This means that if you are protecting production deploys, then skew protection will not work.
The skew protection token lets clients continue to request the specific deploy they were served, but they can't use that token to request other deploys. In practice, this means that any production deploy that was ever published can still be accessed by the clients who received it, but production deploys that were never published are still fully private.
If your password protection settings target all deploys, skew protection will be ignored. This means that you can still fully gate access to your site at any point, regardless of whether any clients still hold any skew protection tokens that gave them access to a specific deploy.
Deploy summary
Section titled “Deploy summary”You can find a deploy summary on the detail page of any successful deploy, right above the deploy log. It allows you to quickly identify your deploy status and refer to the details in the log based on different types of information.
This summary indicates how many files have been uploaded to our CDN. It also indicates the status of site headers and redirects included in the deploy. It also shows you how many functions and edge functions were deployed.
When you have branch deploys enabled, the summary will inform you if the files to upload have already been uploaded by a previous deploy with the same commits. Netlify’s deployment infrastructure knows how to avoid uploading the same file twice, even between different deploys, so we get your changes ready without duplicating content. You can read more about how this works in this article about our deploying and routing infrastructure.
If the summary continually indicates that many more files were uploaded than you were expecting, your site may be taking longer to deploy than it needs to. Visit our Forums for a verified Support Guide on making the most of Netlify’s CDN cache to learn about why this might be happening and get advice about what you can do to reduce the number of files uploaded each time in order to speed up your deploys.
Deploy log
Section titled “Deploy log”You can find a deploy log on the detail page of every deploy. The log provides content such as:
- details about your site’s build image, dependency caching, and Netlify Build process, including all of the standard output which comes from running your build
- information about any Build Plugins your site may have installed and their execution
- details about the success, failure, or cancellation of the deploy
For any successful deploy, highlights from the deploy log will be included in the deploy summary.
Fix a failed deploy
Section titled “Fix a failed deploy”To help you fix failed deploys, Netlify offers AI capabilities that diagnose and suggest solutions for deploy failures and build errors so you can get back to shipping code.
Learn more about Netlify’s AI capabilities to give solutions for failed deploys.
 For additional troubleshooting help, check out our Forums for a verified Support Guide on using the log to debug your build process.
Note that Netlify deletes failed and canceled deploys that are 6 months old. Learn more about automated cleanup for failed deploys.
Share log content
Section titled “Share log content”Deploy logs for a site linked to a private repo are available to all site members. For a site linked to a public repo, you can control deploy log visibility to determine the privacy level.
To share deploy log content, you can copy the entire log by selecting Copy to clipboard (the clipboard icon). You can also generate a shareable URL for a single log line or a range of lines.
-
For a single log line, select the line number to highlight the line.
-
For a range of log lines, select the line number for the first log line in the range, then press shift and select the final log line number to highlight the full range.

-
If needed, press esc to deselect log lines.
Once you’ve selected a line or range, copy the resulting URL from the address bar of your web browser. The URL syntax should resemble this:
https://app.netlify.com/sites/SITE_NAME/deploys/DEPLOY_ID#L5-L10
Branches and deploys
Section titled “Branches and deploys”Netlify lets you control which branches in your Git repository you want to deploy.
Definitions
Section titled “Definitions”The following definitions highlight terms related to site deploys. For definitions regarding build commands, directories, and settings, visit the build configuration overview.
- Production branch: the Git branch that Netlify uses to build and deploy changes to your site’s main URL, such as
www.yourcustomdomain.comormysitename.netlify.app. - Production deploy: a deploy from the production branch. If auto publishing is enabled, each new production deploy will become the published deploy.
- Published deploy: the deploy that is currently available as the live version of your site, accessible from your site’s main URL.
- Branch deploy: a deploy generated from a branch that is not your production branch. Branch deploys are published to a URL which includes the branch name and two hyphens (
--) as a prefix. For example, if a branch is calledstaging, it will deploy tostaging--mysitename.netlify.app. If you use Netlify DNS, you can enable branch subdomains, so thestagingbranch example would deploy tostaging.yourcustomdomain.com. To set up a branch deploy, learn more. - Deploy Preview: a deploy generated from a pull request, merge request, or agent run, building a preview of the site based on the latest changes. Deploy Previews from pull/merge requests are published to a URL with the prefix
deploy-previewfollowed by the identifier number and two hyphens (--). For example, a Deploy Preview for pull/merge request #42 will deploy todeploy-preview-42--mysitename.netlify.app. Deploy Previews from agent runs use a URL with the prefixagent-followed by the run ID, for exampleagent-69a6140cc823ebba94b8ef32--mysitename.netlify.app. For more information, visit the docs on Deploy Previews.
- Permalink: every successful deploy of your site also creates a deploy permalink that starts with the deploy ID number and two hyphens (
--). For example:1234abcd12acde000111cdef--mysitename.netlify.app. The web content at this URL never changes. This is in contrast to production deploys, branch deploys, and Deploy Previews where the web content is updated when you merge or push new commits.
Branch deploys versus Deploy Previews
Section titled “Branch deploys versus Deploy Previews”| Deploy Previews | Branch deploys | |
|---|---|---|
| Default setup | Netlify automatically builds Deploy Previews for pull/merge requests and agent runs unless you change the Deploy Preview controls. | Requires setup in Netlify UI. Set up branch deploys for only specific branches or for all new branches. |
| URL | For pull/merge requests: URL includes deploy-preview- and the PR/MR number. For agent runs: URL includes agent- and the run ID. | Default URL generated from the branch name. Can customize your branch deploy domain with Netlify DNS. |
| Scope | Preview site changes scoped to a single pull/merge request or agent run. | Preview site changes scoped to a branch. |
Netlify generates a new branch deploy for every commit to your branch deploy branch. Site visitors can visit your branch deploy at the same stable branch deploy URL.
By default, if a pull/merge request is opened on a branch against a production or branch deploy branch, then Netlify also generates a Deploy Preview.
For example, you can open a pull/merge request on a branch deploy branch and find both a Deploy Preview and a branch deploy in your site’s deploy list from this update.

Collaboration tools for your site
Section titled “Collaboration tools for your site”By default, the Netlify Drawer is enabled for Deploy Previews but if you want to use the Netlify Drawer on branch deploys, you must configure this in the Netlify Drawer settings.
The Netlify Drawer enables stakeholders to share context-rich feedback about your deploy. This includes image, video, and browser metadata that syncs with your established workflows and project tracking tools.
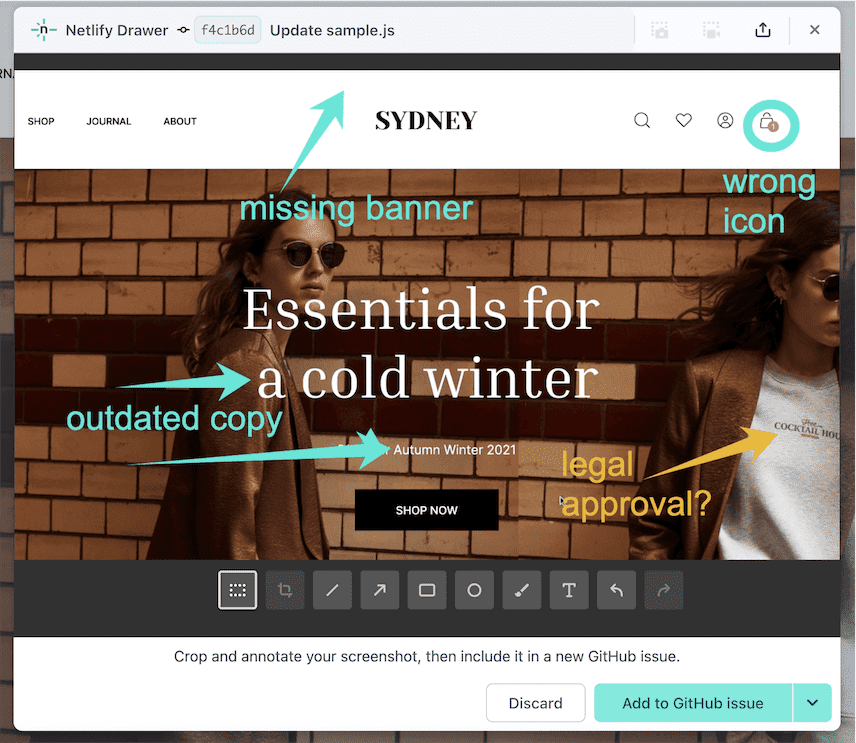

You can also invite an unlimited number of people to review your site deploys with Netlify’s Reviewer role.
Stakeholders can open issues, items, or cards that sync with their preferred project tracking tools. The Netlify Drawer integrates with project tracking tools, such as GitHub, GitLab, GitLab self-hosted instances, Jira Software, Jira Server/Data Center, Azure DevOps, Trello, and more.
Learn more about making your Deploy Previews and branch deploys more collaborative with the Netlify Drawer in our deploy collaboration docs.
Production branch controls
Section titled “Production branch controls”By default, Netlify deploys your site’s production branch after every merge to the production branch.
If you want to pause publishing your production branch, you can lock a deploy and stop auto-publishing to your site’s designated production branch.
To change the production branch name, go to Project configuration Build & deploy Continuous Deployment Branches and deploy contexts, and select Configure.
Branch deploy controls
Section titled “Branch deploy controls”You can set up a branch deploy for a specific branch or for all new branches in your repository through your project configuration.
By default, Netlify will not generate a branch deploy unless a Developer or Owner has set up branch deploys for your site.
Set up a branch deploy for specific branches
Section titled “Set up a branch deploy for specific branches”To set up a branch deploy for one or more specific branches, such as staging or qa:
-
Go to Project configuration Build & deploy Continuous Deployment Branches and deploy contexts, and select Configure.
-
Select Let me add individual branches and enter the name of each branch you want to deploy. You can also enter branch names you haven’t created yet in your repository. To deploy all branches with a specific prefix, add an asterisk to the end of your branch name, e.g.
features/*.
-
To confirm, select Save.
Set up branch deploys for all new branches
Section titled “Set up branch deploys for all new branches”To automatically generate branch deploys for every new branch pushed to your remote site repository:
-
Go to Project configuration Build & deploy Continuous Deployment Branches and deploy contexts, and select Configure.
-
Next to Branch deploys, select All. This excludes the designated production branch for your repository.
-
To confirm, select Save.
Turn off all branch deploys for your site
Section titled “Turn off all branch deploys for your site”To turn off all branch deploys for your site:
-
Go to Project configuration Build & deploy Continuous Deployment Branches and deploy contexts, and select Configure.
-
For Branch deploys, select None.
-
To confirm, select Save.
Protect all branch deploys with a password
Section titled “Protect all branch deploys with a password”You can control who can access your site's branch deploys by requiring a password. Learn more at our Password Protection docs.
Deploy Preview controls
Section titled “Deploy Preview controls”Netlify builds Deploy Previews by default for pull requests and merge requests. To learn how to configure Deploy Previews, review the Deploy Previews docs.
Search engine indexing
Section titled “Search engine indexing”Netlify automatically ensures that only your currently published production deploy and most recent branch deploys can be indexed by search engines. Requests to Deploy Previews, unpublished production deploys, and old branch deploys will have an X-Robots-Tag: noindex header included in the response. Depending on how you use branch deploys, you may want to prevent even your most recent branch deploys from being indexed by search engines. You can do so by configuring custom headers in your branch.
Deploy contexts
Section titled “Deploy contexts”Deploy contexts give you the flexibility to configure your site’s builds depending on the context they are going to be deployed to.
There are five predefined deploy contexts:
production: this context corresponds to the main site’s deployment, attached to the Git branch you set when the site is created.deploy-preview: this context corresponds to the previews we build for pull/merge requests and agent runs.branch-deploy: this context corresponds to deploys from branches that are not the site’s main production branch.preview-server: this context corresponds to Preview Server environments.dev: this context corresponds to local development environments run using Netlify Dev.
Besides these predefined contexts, sites can also use branch names as custom deploy contexts. For example, a branch called staging will match a deploy context called staging.
Deploy contexts allow you to override options from your site’s configuration including the build command, the environment variables added to the build, Build Plugin configuration, and more.
Overrides are applied in a hierarchical order. The site’s global settings apply to each deploy, if we’re building the production site, and if you change options in your production context, they will be overridden. Only options that are set explicitly are overridden; if you leave one out, the build will use the value of the global settings or previous contexts. Environment variables are also overridden individually, for example, you can have access tokens as environment variables per context.
To customize settings for each deploy context, create a file called netlify.toml in the root of your Git repository. There, you can set as many contexts as you want to configure. For environment variables, you can also set different values for each deploy context using the Netlify UI, CLI, or API.
Note that, as the configuration file is stored in your repository, you should be mindful of what sensitive values you include. Where possible, we recommend you set sensitive environment variables with the Netlify UI, CLI, or API instead.
# Production context:# All deploys from the main repository branch# will inherit these settings. Be mindful# when using this option and avoid committing# sensitive values to public source repositories.[context.production]  command = "make production"  [context.production.environment]    ACCESS_TOKEN = "super secret"  # Deploys from main branch run this plugin in the build.  # Plugins context requires double brackets.  [[context.production.plugins]]    package = "@netlify/plugin-sitemap"
# Deploy Preview context:# All deploys generated from a pull/merge request or agent run# will inherit these settings. Be mindful# when using this option and avoid committing# sensitive values to public source repositories.[context.deploy-preview.environment]  ACCESS_TOKEN = "not so secret"
# Branch deploy context:# All deploys that are not from a pull/merge request# or from the production branch will inherit these settings.[context.branch-deploy]  command = "make staging"
# Dev context:# Environment variables set here are available for local# development environments run using Netlify Dev. These# values can be overwritten on branches that have a more# specific branch context configured.[context.dev.environment]  NODE_ENV = "development"
# Specific branch context:# Deploys from this branch will take these settings# and override their current ones.[context.feature]  command = "make feature"
[context."features/branch"]  command = "gulp"
File-based configuration settings will override those set in the UI. In the netlify.toml file, settings for more specific contexts will override more general ones. For example, settings for a specific branch will override those for branch-deploy.
Visit our docs on file-based configuration to learn more about what you can do with deploy contexts.
Deploy protection
Section titled “Deploy protection”Netlify gives you the ability to protect your site deploys with the following features:
- Firewall Traffic Rules, which protect your site by applying traffic rules to block or allow certain IP addresses or geographic locations to access your site deploys.
- Rate limiting, which protects your site by applying highly-customizable rate limiting rules
- Password Protection features, which protect your site by requiring site visitors to enter a basic universal password or their Netlify team login credentials to access your site deploys.
Deploy permissions
Section titled “Deploy permissions”Netlify has a Deploy Request Policy that ensures that Netlify only builds and deploys changes pushed to private repositories from recognized authors. This policy applies to production deploys, branch deploys, and Deploy Previews. Builds from build hooks are not affected.
Recognized authors include Owners, Developers, and Git Contributors. Netlify also treats bots from GitHub Marketplace as recognized authors in private repositories.
Unrecognized authors, or non-team members, are people, automated services, or bots who are not associated with a Netlify team member account. This includes some Git-based services, like a CMS. This policy does not apply to build hooks. Deploys triggered by build hooks are treated as trusted deploys.
Similar to the Sensitive Variables policy, the Deploy Request Policy treats deploys from unrecognized authors as "untrusted."
Working with deploy requests from non-team members
Section titled “Working with deploy requests from non-team members”When a non-team member merges a pull request that triggers a build, the subsequent deploy will have the status Pending approval on the Deploys page. The Deploy log will show a similar message of Deploy request is pending review. A pending deploy request can be approved by a Team Owner, who must associate the non-team member with a Netlify team account before the build can start.
If the non-team member has an existing Netlify account, they can connect their Git provider account to their Netlify user.
Depending on your team plan, a Team Owner can take the following actions for non-team members:
Require manual review for deploy requests
Section titled “Require manual review for deploy requests”Team Owners can require that all deploy requests triggered by users who are not already Netlify team members are manually approved by a Team Owner.
This ensures that your team is not charged for any Git Contributors unless they are manually approved. Learn more in this Billing FAQ.
To require manual approval for all deploy requests:
-
Go to Team settings Access & security Visitor access Auto-approve deploys from non-team members.
-
Select Edit settings.
-
Select Require approval, then Save.
Enable auto-approval for deploy requests
Section titled “Enable auto-approval for deploy requests”Team Owners can allow all builds for non-team members to run and deploy without needing approval or prompting a deploy request. This automatically adds the non-team member to the team as a Git Contributor.
Teams on plans that charge for Git Contributors, such as the Legacy Pro plan, will be charged for auto-approved Git Contributors. See the Billing FAQ page for details. Credit Pro includes unlimited team seats and is not charged for auto-approved Git Contributors.
To enable auto-approval for all deploy requests:
-
Go to Team settings Access & security Visitor access Auto-approve deploys from non-team members.
-
Select Edit settings.
-
Select Auto-approve, then Save.
Match to an existing team member
Section titled “Match to an existing team member”To match an unrecognized author with an existing team member:
-
Go to a sites’s Deploys page and find the pending deploy in the list of deploys.
-
Select Start approval process.
-
Next, use the Further action required drop-down menu to select Approve and match with existing team member.
-
Use the list to select the existing team member to match.
-
To confirm, select Match contributor and approve deploy.
Add a non-team member as a Git Contributor
Section titled “Add a non-team member as a Git Contributor”Not every Git committer in your repo must be added as a Git Contributor. Only the Git committer who you’d like to trigger a deploy needs to be added to your team as a Git Contributor.
To add a non-team member as a Git Contributor:
-
Go to a sites’s Deploys page and find the pending deploy in the list of deploys.
-
Select Start approval process.
-
Next, use the Further action required drop-down menu to select Approve and add as Git Contributor.
Git Contributors will appear on the Members page as Active Git Contributors.
Reject a pending deploy
Section titled “Reject a pending deploy”To reject a non-team member’s pending deploy request, go to the Site overview page and select Reject next to the pending deploy. The pull/merge request or changes from a Git commit will not be deployed, even if it is merged, and any future deploys by the same contributor will continue to require approval.
Sensitive variable policy
Section titled “Sensitive variable policy”For sites connected to public repositories, Netlify may block some deploys depending on sensitive variable policy settings. A site member can approve or reject these deploys. Check out our sensitive variable policy docs for more information.
Netlify deploys as previews
Section titled “Netlify deploys as previews”Netlify previews allow you to test and review changes before launching your updates to your production web project.
Types of previews
Section titled “Types of previews”| Type | Description |
|---|---|
| Deploy Preview | Preview changes from a pull request, merge request, or an AI-powered site or app generator |
| Branch Deploy | Preview changes from a Git branch, such as for a release, optimized for multiple people making changes |
| Preview Server | Preview changes live to share development or code changes with others |
| Netlify Drawer | Collect and share feedback from Deploy Previews or Branch deploys to issue trackers/pull requests/merge requests/project tools |
| Visual Editor preview | Preview changes in the Visual Editor |
Preview URL visibility
Section titled “Preview URL visibility”Preview URLs for Deploy Previews or Branch deploys can be shared with anyone with the link, unless you set up the following:
Preview Server URLs require a Netlify login to preview.
More site deploys resources
Section titled “More site deploys resources”Did you find this doc useful?
Your feedback helps us improve our docs.