For the complete Netlify documentation index, see llms.txt. Markdown versions of this page are available by appending .md to the URL. You can access your Netlify user settings by selecting your avatar (labeled “User” for screen readers) in the Netlify UI, then selecting User settings.
Personal profile
Section titled “Personal profile”Your profile includes your avatar, name, email, password, default team, connected Git providers, and appearance preference for the Netlify UI.
Password requirements
Section titled “Password requirements”Netlify requires that the password you use to log in is at least 10 characters.
Add a user avatar
Section titled “Add a user avatar”If you signed up for Netlify using GitHub, GitLab, or Bitbucket, then your Netlify user avatar will default to your Git provider avatar. Users can upload a custom avatar to display by going to User settings. Select User settings General Personal information Edit settings, then select Upload image. After uploading your image, select Save.
Avatar image guidelines
Section titled “Avatar image guidelines”-
Maximum file size: 1 MB
-
Supported file formats: PNG, GIF, JPEG (.jpeg and .jpg), WebP
-
Resolution: There are no resolution or aspect ratio restrictions. Images will be resized and cropped as needed to fit the display area. Images will maintain their aspect ratios when being resized. Cropping may be horizontal or vertical but never both.
Remove a user avatar
Section titled “Remove a user avatar”You can remove either the avatar set by your Git provider or a custom user avatar you previously uploaded by going to User settings. Select User settings General Personal information Edit settings, then select Remove image. Then, select Save. Your avatar will fall back to a Gravatar using your user email.
Connect your Git provider accounts
Section titled “Connect your Git provider accounts”You can connect your Netlify user to one or more Git providers to make logging in and collaborating with your team easier. You can add, edit, and disconnect your Git provider accounts from User settings General Profile Connected accounts.
If you signed up for Netlify using GitHub, GitLab, or Bitbucket, then your Netlify user will already be linked to that Git provider.
You can connect your Netlify user to multiple Git providers. However, for log in purposes, you can’t connect two different Netlify users to the same Git provider account.
You also can’t connect one Netlify user to more than one account from the same Git provider, unless you’re matching a non-team member with a team member’s Netlify account.
Member lists at the site and team level include connected accounts for each member.
Choose a Netlify UI theme
Section titled “Choose a Netlify UI theme”You can choose a Netlify UI theme by going to User settings General Profile Appearance. You can select a theme or have it be set by your operating system preferences.
Manage keyboard shortcuts
Section titled “Manage keyboard shortcuts”Custom keyboard shortcuts can help you get around Netlify faster. You can define keyboard shortcuts in the Command Palette.
Shortcuts are made up of one or more modifier keys, such as shift or command + any other key.
Enable two-factor authentication (2FA)
Section titled “Enable two-factor authentication (2FA)”Secure how you access teams and organizations with two-factor authentication (2FA). From your Netlify user settings, you can set up 2FA with an authentication app. If your Netlify team has a Pro plan or higher, your Organization or Team Owner may encourage or require you to set up 2FA for your Netlify user ID through your personal user settings.
Once you enable 2FA for your Netlify user ID, you’re required to enter a temporary authentication code from your authentication app to access teams or organizations connected to that user ID and email. As a fallback, you can use a backup recovery code.
Example authentication apps include:
To enable 2FA for your Netlify user ID:
-
Choose and install an authentication app on your phone. Your company or organization may ask you to use a certain authentication app.
-
To enable 2FA for your Netlify user ID, go to User settings Security Two-factor authentication
-
Select Enable two-factor authentication, and you’ll be presented with a QR code to scan into your chosen authentication app. Alternatively, you can enter the alphanumeric code listed under Manual entry directly into your authentication app. In both cases, the app will then present a 6-digit authentication code to enter into the Netlify UI.
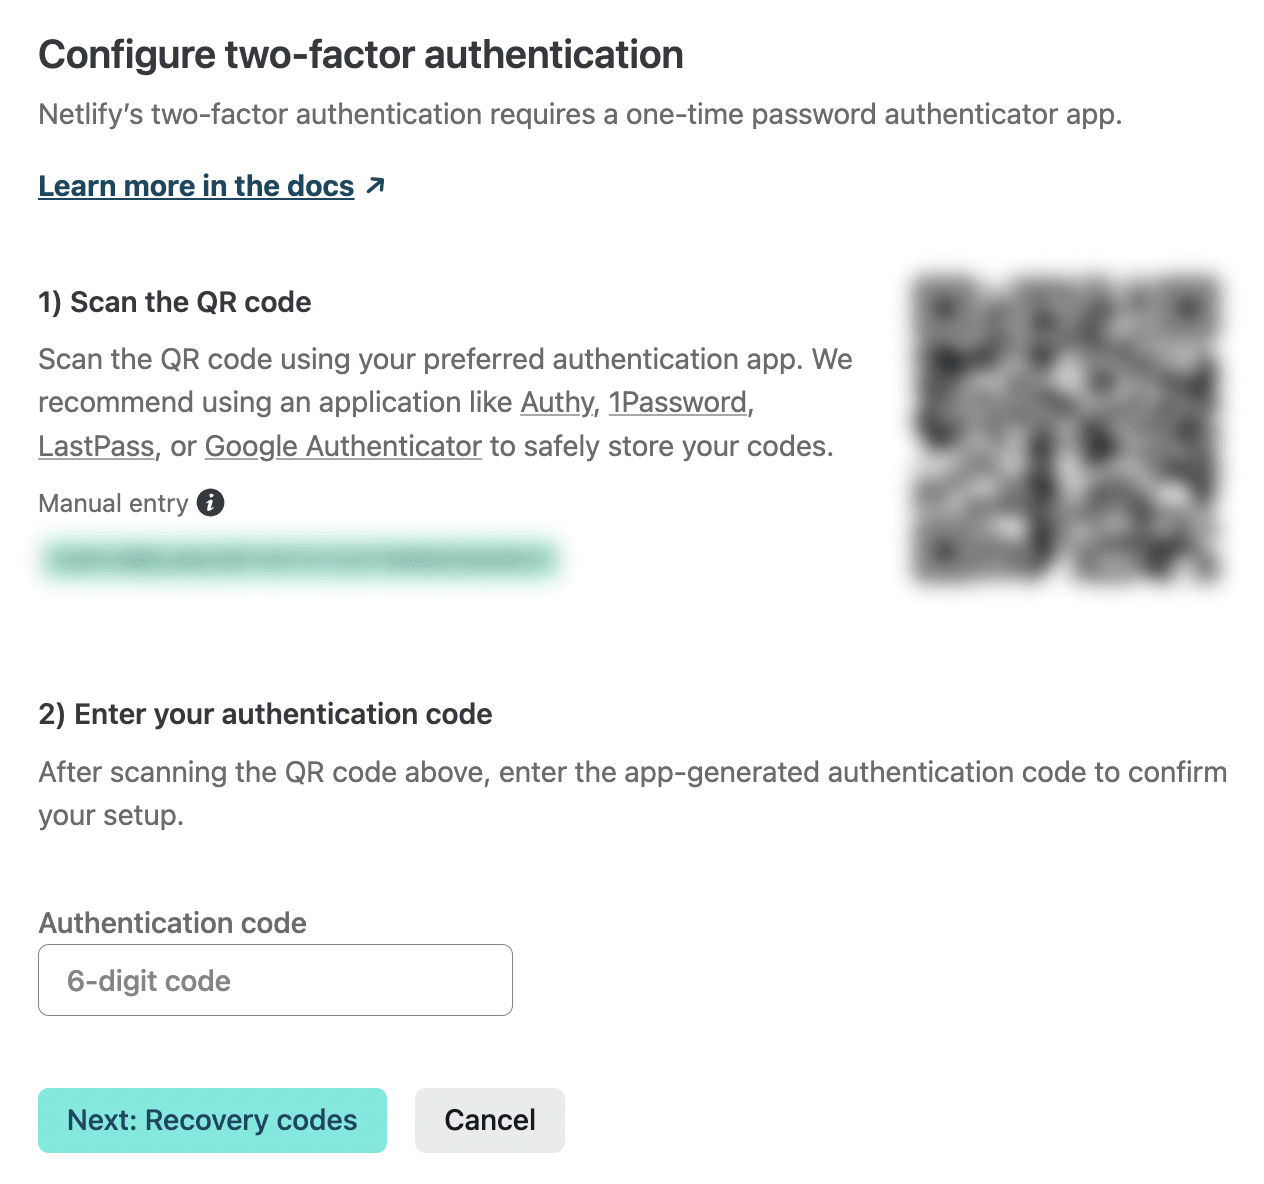
-
Enter the code and select Next: Recovery codes.
-
Copy or print your recovery codes so you can still access your account even if you don’t have your authentication app or phone. Your recovery codes are only presented once, so be sure to copy or print them and keep them somewhere safe before completing your setup. Note that you can only use a specific recovery code once.
- After saving your recovery codes, select Finished! I saved my recovery codes.
If you need to disable two-factor authentication for your user ID, go to User settings Security Two-factor authentication. Select Disable two-factor authentication. You will need to enter a valid authentication or recovery code to complete the task.
Connect with other applications
Section titled “Connect with other applications”Under the Applications section of your user settings are controls for three methods of connecting your Netlify user with other applications and services:
- OAuth applications – If you build or use an application that accesses the Netlify API as an OAuth app, you can add it here. When you register an application, Netlify will provide a client ID and secret you can use in your application settings.
- Personal access tokens (PATs) – You can generate these for manual authentication in shell scripts or commands that use the Netlify CLI or API. For each token you generate, you can set an expiration date to help keep your information secure. Go to Applications Personal access tokens to get started.
- Authorized applications – When you use your Netlify user account to log in with another application, such as Netlify CLI, Netlify Support Forums, or Zapier, the application is added to this list. You can revoke authorization by selecting for the application.
Did you find this doc useful?
Your feedback helps us improve our docs.