Some Netlify Identity actions, like inviting an Identity user or resetting a password, will trigger an email to the user. You can customize the email sender address, as well as the templates used.
Custom sender address
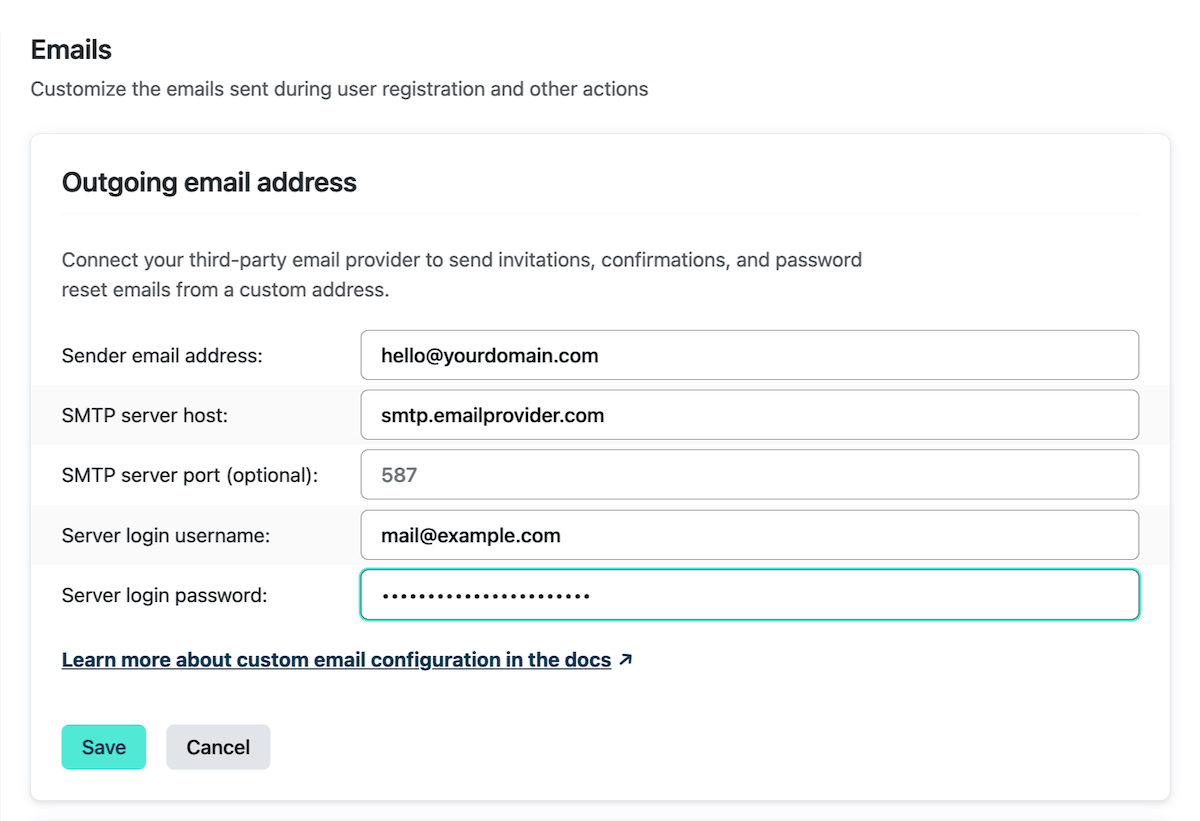
Section titled “Custom sender address”By default, all Identity-generated emails are sent from no-reply@netlify.com. If you’d like these emails sent from your own custom address, you can connect a third-party email provider that supports SMTP.
Refer to your email provider’s documentation to find the proper values for your SMTP server hostname, port, username, and password. Then enter these values into the fields under Project configuration Identity Emails Outgoing email address.
Email templates
Section titled “Email templates”All Identity-generated emails have basic templates built in. You may customize the emails.
The default templates use {{ .ConfirmationURL }}, which links back to your project with a hash fragment token (for example, #confirmation_token=...). Your project must handle these tokens to complete the action. If you use @netlify/identity, call handleAuthCallback() on your landing page to process these tokens automatically. It handles all token types: confirmation, invite, recovery, and email change.
Default templates
Section titled “Default templates”Default email templates are as follows:
Invitation
Section titled “Invitation”<h2>You have been invited</h2>
<p> You have been invited to create a user on {{ .SiteURL }}. Follow this link to accept the invite:</p><p><a href="{{ .ConfirmationURL }}">Accept the invite</a></p>Confirmation
Section titled “Confirmation”<h2>Confirm your signup</h2>
<p>Follow this link to confirm your user:</p><p><a href="{{ .ConfirmationURL }}">Confirm your mail</a></p>Password recovery
Section titled “Password recovery”<h2>Reset Password</h2>
<p>Follow this link to reset the password for your user:</p><p><a href="{{ .ConfirmationURL }}">Reset Password</a></p>Email change
Section titled “Email change”<h2>Confirm Change of Email</h2>
<p> Follow this link to confirm the update of your email from {{ .Email }} to {{ .NewEmail }}:</p><p><a href="{{ .ConfirmationURL }}">Change Email</a></p>Custom templates
Section titled “Custom templates”You can customize the Identity-generated emails by creating new templates and publishing them to a path on your deployed project, then specifying the path to the template file (relative to the project domain, starting with a /) in Project configuration Identity Emails.
When writing a template, you may use any email-ready HTML. CSS must be included inline, and images must use absolute links. Don’t include <html>, <head>, or <body> tags in the template.
You may include certain variables using Go template syntax, like {{ .SiteURL }}. The variable syntax must remain intact in the template output, so you should ensure that your project’s build process doesn’t update variables in template files. The following variables are available:
{{ .Email }}: user’s current registered email address{{ .NewEmail }}(email change template only): new email address the Identity user would like to use in place of the current address{{ .SiteURL }}: URL of your project{{ .ConfirmationURL }}: project URL with corresponding email action parameters appended{{ .Token }}: The token needed to confirm the action.
The {{ .ConfirmationURL }} variable links to your project with a hash fragment token. Your project must handle these tokens to complete the action. If you use @netlify/identity, handleAuthCallback() processes all token types automatically. If you use custom templates, you can customize the path the emails link to so that visitors are sent to a page that handles the token.
You can use the following patterns for custom links:
# Invitation:{{ .SiteURL }}/some/path/#invite_token={{ .Token }}
# Confirmation:{{ .SiteURL }}/some/path/#confirmation_token={{ .Token }}
# Password recovery:{{ .SiteURL }}/some/path/#recovery_token={{ .Token }}
# Email change:{{ .SiteURL }}/some/path/#email_change_token={{ .Token }}
You may change the email subject line directly in the settings UI.
Did you find this doc useful?
Your feedback helps us improve our docs.