

For the complete Netlify documentation index, see llms.txt. Markdown versions of any documentation page are available by appending .md to its URL. Claude Design lets you build applications visually, preview them in real time, and publish them straight to Netlify. Connect Claude Design to Netlify once, and you can deploy and redeploy your designs as real Netlify projects.
Before you begin
Section titled “Before you begin”- A Claude account with access to Claude Design.
- A Netlify personal account or team workspace.
Build a design with Claude Design
Section titled “Build a design with Claude Design”In Claude Design, describe the application you want in natural language, then build, preview, and refine it visually before you deploy. For example, you might ask Claude Design to create a journaling app with entries, image attachments, and a to-do list.
Claude bundles and deploys your finished design for you when you publish to Netlify.
Connect Claude Design to Netlify
Section titled “Connect Claude Design to Netlify”The first time you deploy, you need to authorize Claude to access your Netlify account. This is a one-time setup.
-
In your Claude Design project, select Share.
-
At the bottom of the export menu, select More formats and apps.
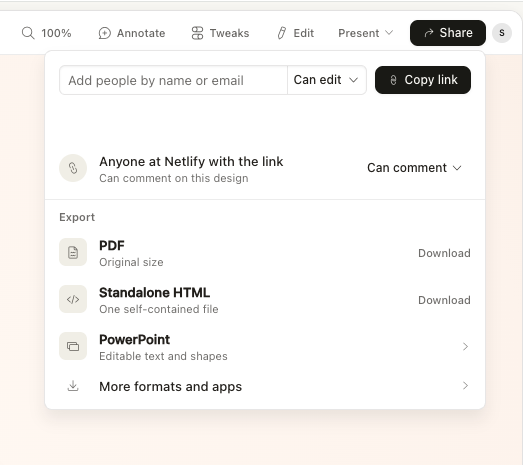
-
Find Netlify in the list of destinations, then select Connect. This opens Claude's Connectors settings.

-
On Netlify's authorization screen, authorize Claude to access your Netlify account.
Deploy your design to Netlify
Section titled “Deploy your design to Netlify”After you connect Netlify, there are two ways to deploy your design: from the Share menu or with a prompt in the Claude Design chat.
Whichever path you choose, Claude bundles your files, applies the necessary templates, and deploys your project to Netlify. When the deploy finishes, Claude gives you links to open your live site and to manage the project in your Netlify dashboard.
You can continue to update your site by adjusting your design in Claude Design and deploying again.
Deploy from the Share menu
Section titled “Deploy from the Share menu”-
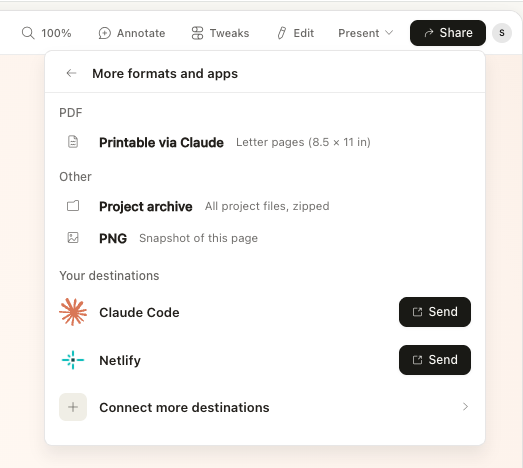
In your Claude Design project, select Share, then More formats and apps..
-
Under Your destinations, select Send next to Netlify.
Deploy with a prompt
Section titled “Deploy with a prompt”Ask Claude to deploy your design in natural language, for example:
Deploy to NetlifyWhat you get
Section titled “What you get”Sites deployed from Claude Design are real Netlify projects. They appear in your Netlify dashboard and behave like any other Netlify project, so you can manage domainsdomainsThe web address people use to visit your site, such as yoursite.com., deploys, and settings as usual.
Designs deploy as static sites, and any data is stored in the browser's local storage rather than a shared database. When you're ready to turn your prototype into a fullstack application, you can add features like databases, functions, and login. To learn how, see Go beyond a prototype.
Go beyond a prototype
Section titled “Go beyond a prototype”When you're ready to move beyond a static prototype, use Agent Runners to build a fullstack application. For example, you can:
- Save and share data with a database. Store data that persists across sessions, users, and devices, like journal entries, comments, bookings, or a product catalog.
- Run backend logic with Netlify Functions. Handle form submissions, call external APIs, send emails, or process payments without standing up a server.
- Let people sign in with login. Add accounts so users can create, save, and access their own private content.
For example, you can prompt an agent to review your project and suggest what to add:
Inspect the project for interactive content and propose appropriate fullstack integrations — Netlify Functions, databases, Identity/login, and other Netlify features.Next steps
Section titled “Next steps”- Turn your prototype into a fullstack app with Agent Runners.
- For more agent setup guidance, check out the agent setup overview.
Did you find this doc useful?
Your feedback helps us improve our docs.