

For the complete Netlify documentation index, see llms.txt. Markdown versions of any documentation page are available by appending .md to its URL. Prompt AI agents to create a new project, fix, update, ship code and ask questions about your project using your unique project context directly from your Netlify dashboard.
Without any extra setup or additional accounts, Agent Runners offer advantages over running AI agents in other environments by giving secure access to your Netlify project context, deployment pipeline, build settings, and more. This enables you and your team to optimize AI workflows for your Netlify projects.
Agent Runners offer agents unique advantages on Netlify's platform with the following:
- create a new project with an AI agent from your own prompt or a starter prompt
- no technical background needed to run the most powerful agents for building
- access to your Netlify project’s context, environment variables, build settings, and deployment pipeline
- no additional setup or extra accounts needed
- quick access from your mobile phone
- staging environments to preview changes
- staging environments with and without Git version control
- rollback capabilities
- consistent production and staging environments
- log tracking with role-based access control
Use cases
Section titled “Use cases”Agent Runners are optimized for the following use cases:
- Async-friendly or background tasks, such as maintenance tasks, including fixing broken links, redirects, and updating feature flag code
- Quick fixes, such as bugs, typos, and well-defined backlog items
- Well-defined content updates from your entire team, including Marketing, Design, and Content teams
- On-the-go changes from your mobile phone
- Jumpstart platform primitives with automated setup
- Jumpstart customizable features with code, such as Netlify forms
- Quick new pages, such as landing pages, maintenance pages, 404 pages, etc.
Get more ideas for use cases and practical guidance from our prompt examples.
You can use Agent Runners to make changes to projects you published using the Netlify drag and drop publisher. Learn more about iterating on projects published with Netlify Drop.
Supported AI agents
Section titled “Supported AI agents”Agent Runners support the following AI agents:
- Claude Code
- OpenAI Codex
- Google Gemini
- OpenCode
OpenCode gives you a selection of up-to-date coding models, served in partnership with OpenRouter. Netlify only routes these requests to model providers with a Zero Data Retention (ZDR) policy. Under this policy, model providers do not store your prompts or model outputs.
The other three agents run on models from Anthropic, OpenAI, and Google respectively, and are not routed through OpenRouter.
Choose AI models for your own agent runs
Section titled “Choose AI models for your own agent runs”By default, each agent picks its own model and reasoning effort level for every run.
However, you may want to experiment with different agents or models to find the best balance among output quality, credit usage, and the appeal of generated content or visual designs. You can read more about our recommendations below.
Netlify lets you configure the model each available agent will use, along with the model’s reasoning effort level.
These settings apply to subsequent runs on any project you work on, but they do not affect other team members. These are personal preferences available to anyone who can launch an Agent Run, rather than a shared project-level or team-level setting.
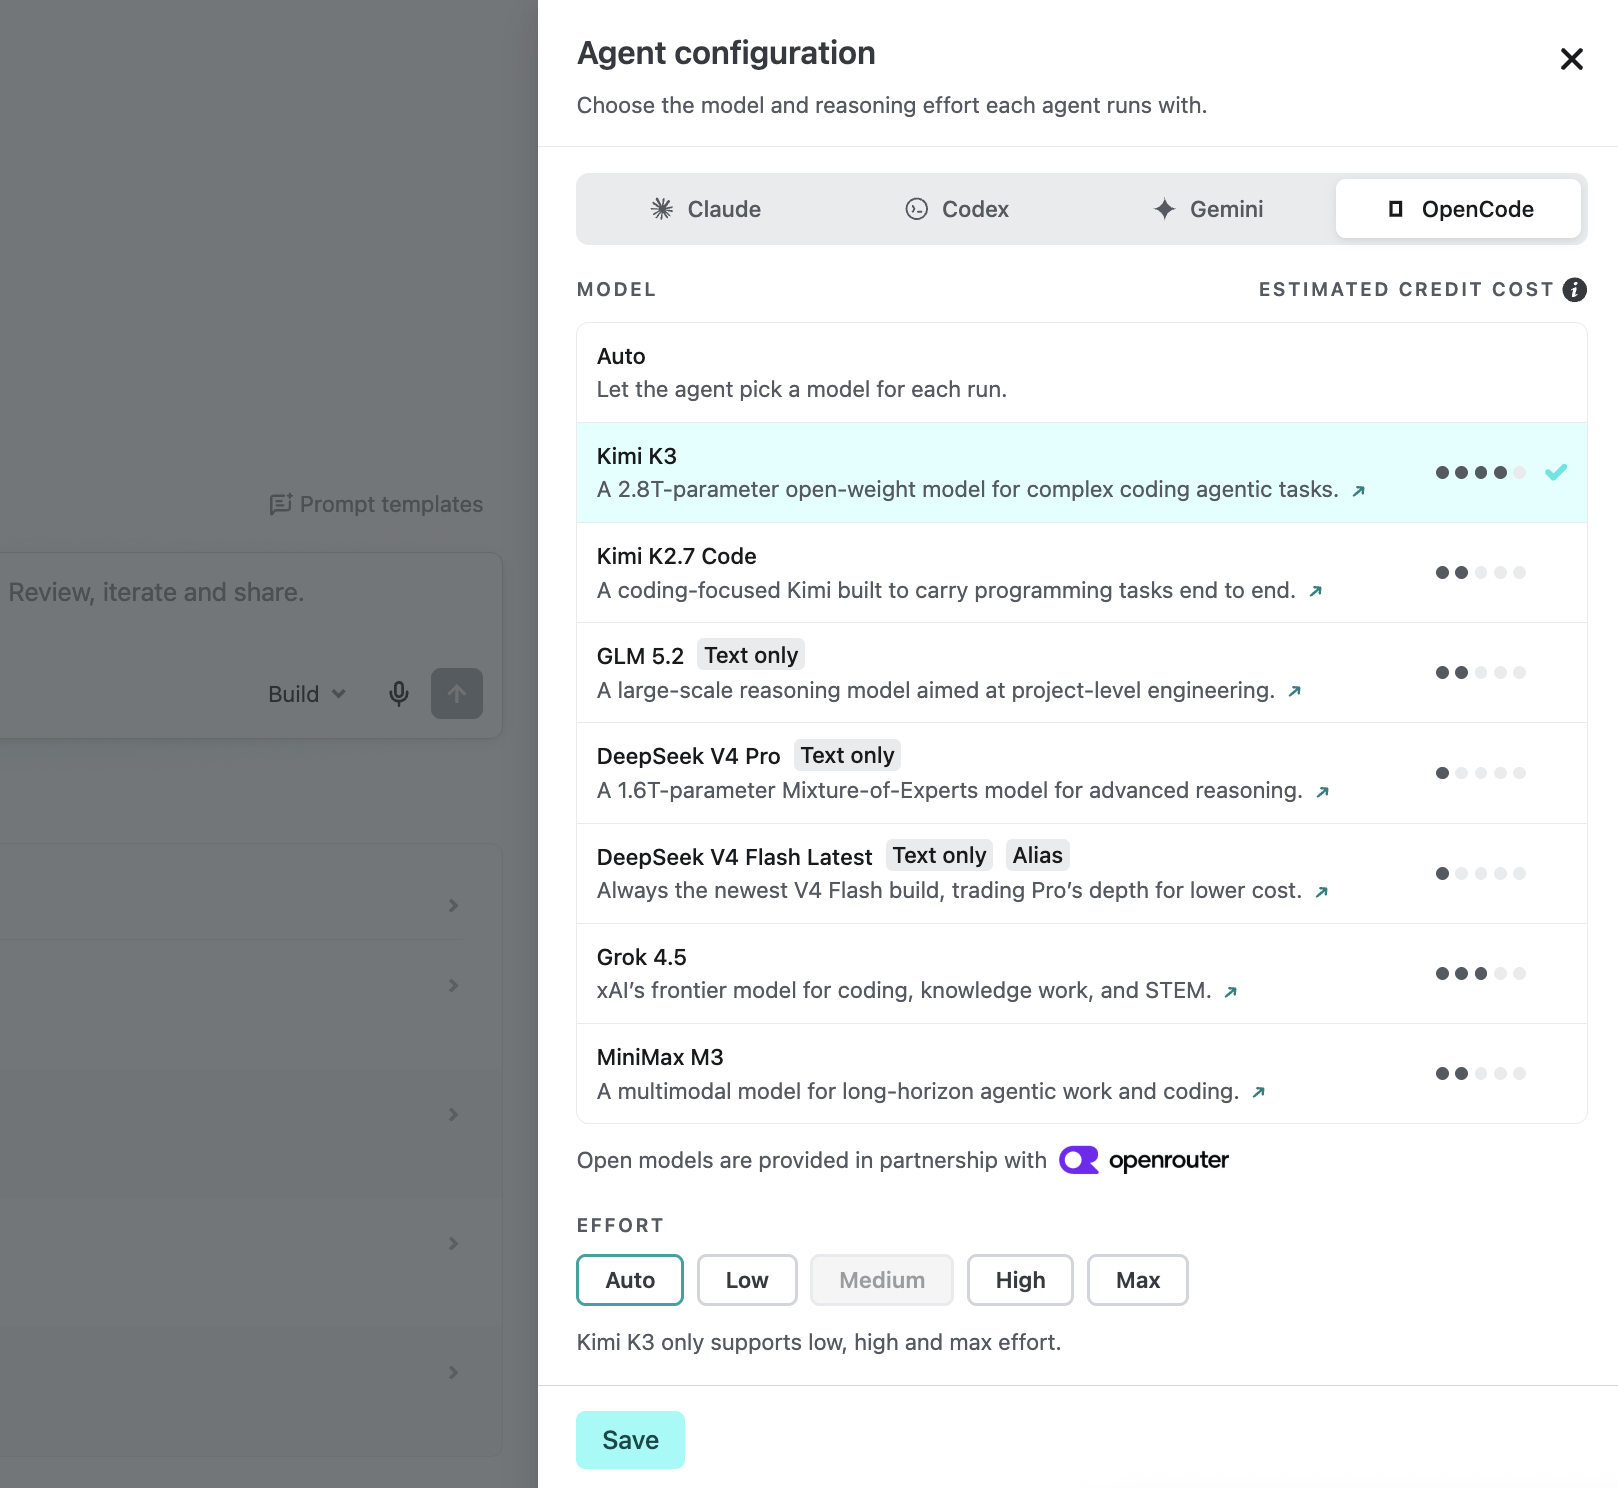
To configure your agent settings:
- From any Agent Runner prompt box, select agent to open your agent options and choose Configure….
- Choose the AI agent whose model and effort level you want to configure. Your selections are saved separately for each agent and remain in effect when you switch between agents.
- Select the model the agent should run with.
- Optionally, choose the reasoning effort the model should use for a run. A higher effort consumes more credits but often leads to better results, especially for complex tasks. You can keep the default Auto to let the agent decide per run.
- Choose Save to apply your changes.
Choosing the right model for the job
Section titled “Choosing the right model for the job”To help you choose a model, the list of available models also includes a cost estimate. All models available for use with Agent Runners are ranked on a scale of 1-5 (with 5 indicating the highest cost), based on aggregate cost information Netlify has.
More expensive models generally provide better visual fidelity, more creative ideation, and stronger self-verification. Cheaper models may omit features or create nonworking placeholders unless you explicitly request complete implementations.
We recommend more expensive models when you want more creative, complex, or advanced output based on a simple prompt. However, especially on a free plan, a single prompt can use most of your available credits.
Alternatively, you can choose a cheaper model and then iterate on the results with follow-up prompts to guide the output closer to what you had in mind.
To learn which model you should use, it's often best to try out the same prompt with a few different models, especially when you're in the ideation phase for a new project. You may find that a certain model is ideal for ideation, while a lower-cost model works fine for making smaller iterations. You can also use a higher-cost model to create a comprehensive plan with Ask mode, then switch to Build mode with a lower-cost model to implement it.
Agent run modes
Section titled “Agent run modes”When you start an agent run, you can select a mode from the dropdown:
- Build (default): The agent makes changes to your code and creates a Deploy Preview so you can review and ship the results.
- Ask: The agent answers questions about your project without making any changes to your code or creating a Deploy Preview. Use Ask mode to explore or understand a project before you make changes.
Both modes are available for all supported AI agents.
In both modes, your agent can pause and ask you a question when your prompt leaves open a decision that would change the result. Learn more about answering questions from your agent.
Learn more about starting a run in each mode in Make changes with Agent Runners.
Requirements
Section titled “Requirements”To use Agent Runners, you must meet the following requirements:
- Your Netlify team must have a Credit-based plan.
- You must have one of the following roles on a Netlify team with a Credit-based plan:
- Team Owner
- Developer
- Internal Builder
- Publisher
- Your Netlify Team Owner must keep AI features turned on. AI features are on by default for all Credit-based Free, Personal, and Pro plans.
- Your Netlify team must have credits available to use an Agent Runner.
Learn more about enabling or disabling Netlify AI features.
How agent runs consume credits
Section titled “How agent runs consume credits”Agent runs use two usage meters: AI inference and compute. AI inference costs depend on the AI agent, model, and effort you use for a run. The agent run detail view shows how many credits a run consumed.
There are also related actions to Agent Runners that consume credits, for example:
- If you start an agent run to fix a failed deploy, your usage of web requests, bandwidth, and compute will consume your available credits.
- When your agent runner is done, you may wish to publish the changes it made to production. When you publish a production deploy the credit costs for deploying to production will apply. If this deploy fails it does not consume any credits.
To learn more about how pricing works for Agent Runners, check out Pricing for AI features.
When your team runs out of credits
Section titled “When your team runs out of credits”If your team is close to running out of credits, the agent tries to finish what’s in progress and stops instead of starting anything new. If your team runs out of credits earlier than the agent can finish up, Netlify keeps the progress the agent made and cancels the run. To continue the run, your team needs credits again. You can get more credits in one of the following ways:
- Wait until your plan’s monthly credits reset.
- Upgrade from the Free plan to a paid plan.
- Buy more credits with a credit pack if your team is already on a paid plan.
Once your team has credits again, select Continue on the cancelled run to resume the task. For details, see Running out of credits during an agent run.
Use Agent Runners
Section titled “Use Agent Runners”- Go to your Netlify project dashboard under Build with an AI agent, select your preferred AI agent, such as Claude Code, Google Gemini, OpenAI Codex, or OpenCode, enter your prompt and optionally add any additional context. Then choose Run task.
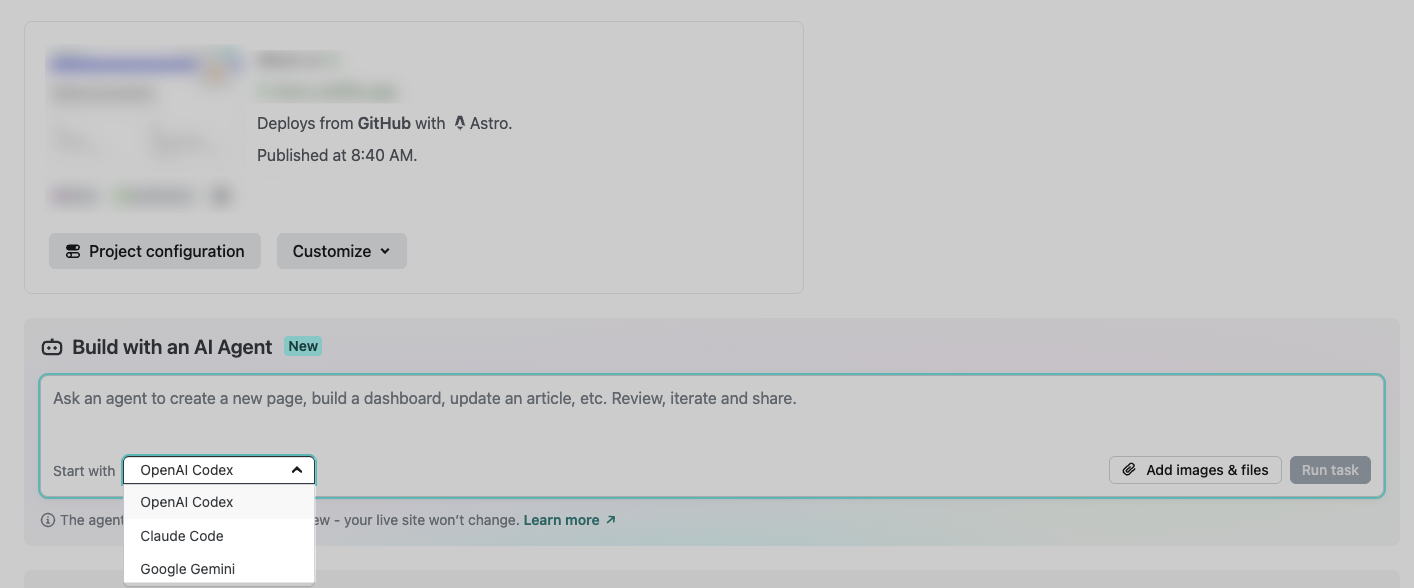
To check out the fuller process of prompting and reviewing agent run results, check out Make changes with Agent Runners.
You can also check out example prompts in our prompt examples.
Agent runs for different branches
Section titled “Agent runs for different branches”By default, Agent Runners work on a new automated custom branch created off your production branch.
To use Agent Runners for a branch deploy, you can choose a branch deploy branch from the Netlify UI or specify the branch deploy branch with --branch when using the Netlify CLI.
You can also start an agent run from any deploy details page. From your project’s Deploys tab, open a deploy and select Run AI agent. If your project is connected to a Git remote repository, the agent run will use that deploy’s branch as the base branch.
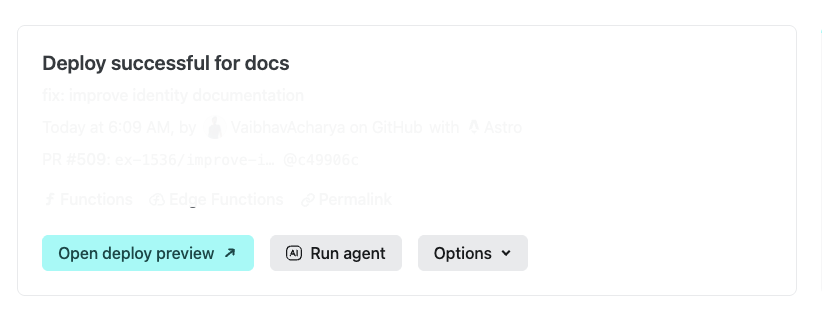
To learn more about different types of deploys and branch types, check out our deploy docs.
Redeploy an agent run
Section titled “Redeploy an agent run”After a successful agent run, you or a team member may update your project's environment variables or build settings. To see these changes reflected in your agent run's Deploy Preview, you can redeploy the agent run. This rebuilds the Deploy Preview with your updated configuration without re-running the AI agent and costing you more AI inference credits.
Redeploying a Deploy Preview from an agent run is useful when you or someone on your Netlify team changes your project configuration.
For example, when updates are made to the following:
- changes to environment variables that your project needs at build time or runtime
- updates to your build configuration or build commands
To redeploy an agent run:
- From your Netlify project dashboard, go to your project’s Agent runs page.
- Find the completed agent run you want to redeploy.
- On the far right of the agent run, select the hamburger icon menu, then choose Redeploy.
The redeploy creates a new agent run session that applies the same code changes from your original agent run but builds with your updated project configuration. Because the AI agent does not re-run, redeployments are faster than the original agent run and don't use credits for AI inference like other agent runs.
Limitations
Section titled “Limitations”Your team can have only a limited number of agent runs active at the same time, based on your plan. Learn more about the limit and how to free up a slot in Stop an agent run.
If your project is set up with continuous deployment through a connection to a Git provider, then Agent Runners will only work with your project if it is using GitHub as a Git provider. You cannot use Agent Runners with projects connected to Git repositories hosted on GitLab, Bitbucket, Azure DevOps, or Cursor Origin.
Agent Runners are not compatible with Split Testing. If your project has Split Testing enabled, you must disable it before using Agent Runners.
Troubleshoot with Agent Runners
Section titled “Troubleshoot with Agent Runners”When a deploy fails, you can use Agent Runners to start fixing the issue directly from your failed deploy details page.
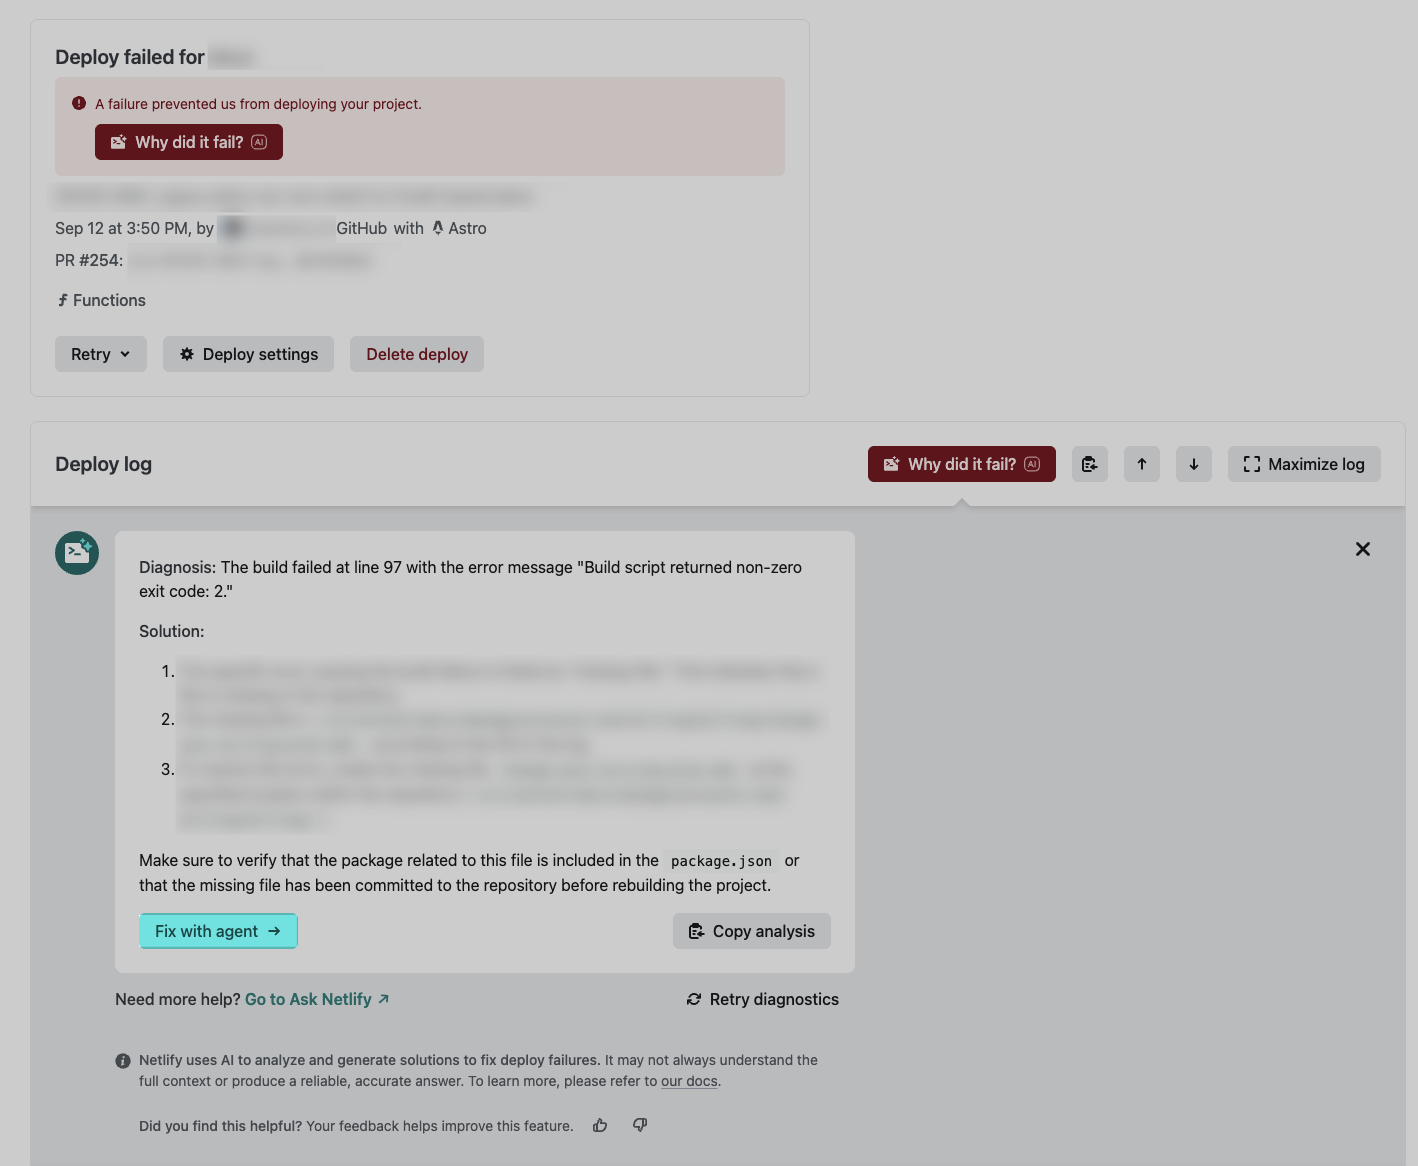
Prompt examples
Section titled “Prompt examples”For practical prompt examples, check out our Agent Runners prompt examples.
Did you find this doc useful?
Your feedback helps us improve our docs.