

For the complete Netlify documentation index, see llms.txt. Markdown versions of any documentation page are available by appending .md to its URL. Learn how to make changes and iterate on an existing project with your preferred AI agent using Agent RunnersAgent RunnersAn AI coding tool that makes changes to your site on your behalf, right from the Netlify dashboard. in your Netlify project dashboard.
If you want to create a new project with an AI agent, check out our Agent Runners quickstart for new projects.
Prerequisites
Section titled “Prerequisites”Before you begin, you must have the following:
- a Netlify team account with a Credit-based plan and some available credits
- a Team Owner, Developer, Internal Builder, or Publisher role on your Netlify team
- Netlify AI features enabled
Agent run modes
Section titled “Agent run modes”When you start an agent runagent runA single task or batch of tasks you or a team member prompted an AI agent to complete., you select a mode that determines what the agent does with your prompt. Both modes are available for all supported AI agents.
Build mode
Section titled “Build mode”Build mode is the default. The agent makes changes to your project's files and code based on your prompt and creates a Deploy PreviewDeploy PreviewA type of deploy that lets you preview and share changes for feedback before they go live. so you can review the results before you ship them. Use Build mode when you want the agent to fix, update, or add code, such as fixing a bug, updating content, or creating a new landing page.
Ask mode
Section titled “Ask mode”In Ask mode, the agent answers questions about your project without making any changes to your code or creating a Deploy Preview. Use Ask mode to explore or understand a project before you make changes, such as learning how a feature works or planning an approach before you switch to Build mode.
Ask mode is read-only: the agent can read your whole project but can't edit files, run commands, deploy, or configure settings for you. Get the most out of Ask mode with prompts that investigate, explain, diagnose, or produce a plan:
- Scope the question: choose a specific feature, file, or symptom instead of the whole project.
- Name the output you want: a list of files, a root cause, or a step-by-step plan.
- Ask for understanding or a plan: To change code, switch to Build mode.
Example prompts
Section titled “Example prompts”- Understand how authenticationauthenticationThe process of verifying who someone is before letting them access your site. works:
Walk me through how authentication is implemented in this project. Which files handle it, and where is the token stored?
- Inventory work before a migration:
Plan out how we can migrate to the latest version of Astro.
- Generate a spec to hand to a Build mode run:
Describe in detail how our main site handles builds that require a build step, so I can instruct another agent run to implement the same flow on our marketing site.
- Think through an architecture or design decision:
How would you architect a system for configuring MCP servers that works across multiple AI agents?
- Ask questions about your database:
Which data fields are required to add a new entry to the users list?
How to use Agent Runners
Section titled “How to use Agent Runners”1. Start an agent run
Section titled “1. Start an agent run”To start an agent run to make changes to your project, follow these steps:
- Go to your Netlify project dashboard. Under Build with an AI agent, select your preferred AI agent, such as Claude Code, Google Gemini, OpenAI Codex, or OpenCode. To set the model and reasoning effort the agent runs with, choose Configure... in the same dropdown. For details, see Agent configuration.
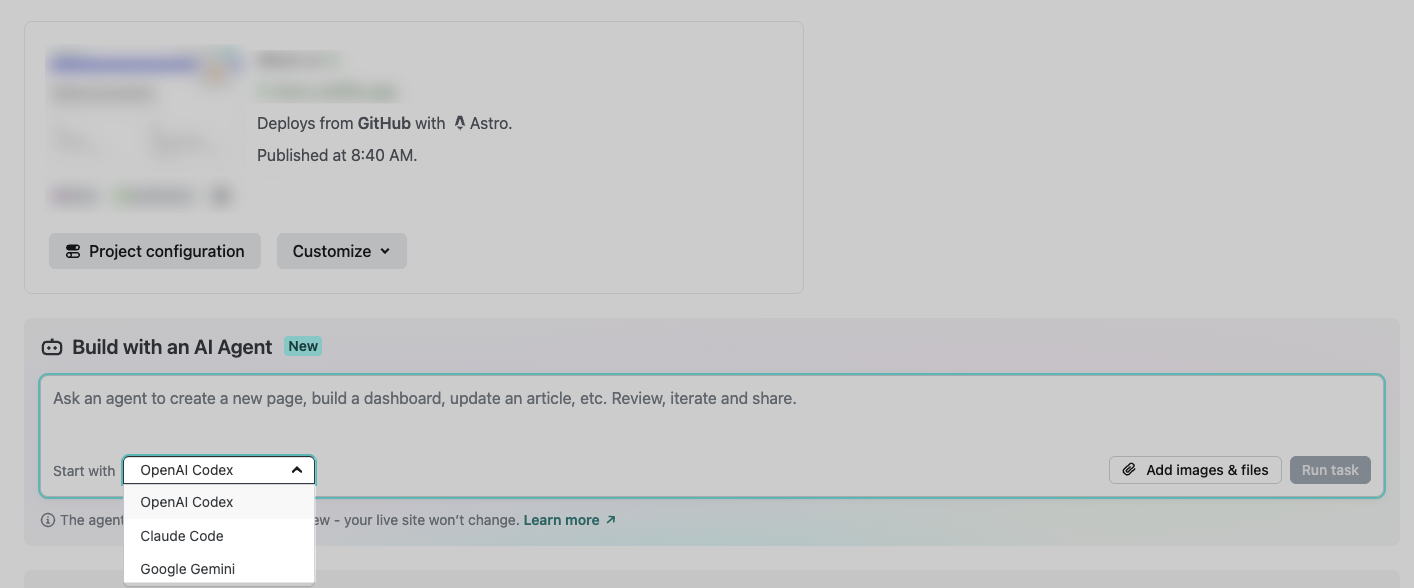
- Add your prompt. For examples of prompts, check out our prompt examples. You can optionally add more context as a file or image. Or you can add project context that applies to all agent runs, such as project-specific prompt guidelines or a link to a publicly available design system or style guide.
- Select a mode from the mode dropdown. To make changes, use the default Build mode so your agent can make code or file changes. To get answers or make plans without changing your project, use Ask mode. For details, see Agent run modes.
- Choose Run task.
- Your chosen AI agent will complete the task asynchronously and notify you when it's done. At this point, you can wait or take care of other tasks. If your agent needs a decision from you before it can continue, it will pause and ask you a question. For details, see Respond to any questions from your agent.
2. Respond to any questions from your agent
Section titled “2. Respond to any questions from your agent”When your prompt leaves open a decision that would change the result, your agent can pause and ask you a few questions instead of guessing. This usually happens early in the run, as your agent first assesses your prompt.
If your agent asks you a question, you can answer it, or skip it and let your agent decide for itself. When your agent asks more than one question, you can skip a single question or all of them, and you can always add extra context in your own words. If you'd rather send your agent in a different direction, enter a new prompt instead of answering and your agent follows that instruction.
There's no need to hurry. Your agent run waits until you respond, and it doesn't use any credits while it waits.
3. Check the status of your agent run
Section titled “3. Check the status of your agent run”To check the status of your agent run, go to the Agent Runs tab in your Netlify project dashboard. Then choose your agent run and check the log for the current status.
You can expand a task within your agent run to view its credit usage. Note that credit usage for a run may take a brief moment to appear after the run begins. Learn more about agent run statuses or how agent runs consume credits.
If you change your mind about a run that’s still going, you can stop it and take a different approach. For details, see Stop an agent run.
4. Preview Agent Runners updates
Section titled “4. Preview Agent Runners updates”Your agent run shows a preview of the changes the agent made right next to your prompt, so you can review the result and write your next prompt in one view.
The preview that loads next to your prompt is the same Deploy Preview you’d visit if you entered the preview URL in your browser.
You can also compare updates the agent made in your project's files with how they render, which is especially useful for troubleshooting or refining your work. Check the Code tab to see the changes in your project's files, including the following:
- images or other assets changed, removed, or added
- content changed, removed, or added
- code changes in your project files
- internal docs for your project, including agent skill files
If your project is connected to a GitHub repository, then you can optionally open up a pull request or update an existing pull request with your updates from your agent run.
5. Ship your agent run updates
Section titled “5. Ship your agent run updates”To ship your agent run updates, you have two options:
- For projects using Git & GitHub: Open a pull request or update an existing pull request with your updates from your agent run. When you merge your pull request into your production branch, Netlify publishes your changes to your production site for you.
- For projects without Git: If you have publishing permission, you’ll find a Publish button on your Netlify project’s Agent Runs dashboard. Select Publish to make your agent run updates go live in the latest production version of your project.
Statuses for agent runs
Section titled “Statuses for agent runs”To help you understand and manage your agent runs, here is a summary of agent run statuses.
| Status | Description |
|---|---|
| Active | An active agent run means that your agent run is in progress and has not yet completed. Your active agent run may also appear with a Waiting for answers badge if your agent pauses to ask you follow-up questions before resuming its work. |
| Cancelled | A cancelled agent run means that your agent run has stopped because someone manually stopped an agent run (perhaps to take a different approach) or your team is low on available credits to continue the agent run. For new projects, instead of stalling out before you get a preview of your project, your agent run can give you a smaller scope of updates with a plan for next steps. If you have a paid plan, you can add more credits through buying a one-time credit pack or setting up auto recharge. |
| Done | A done agent run means that your agent run is no longer active and it has completed. From here, you can prompt a new task or start a whole new agent run series of tasks. |
| Published | When changes from an agent run are published from the Netlify dashboard, they appear in your agent runs list with the published badge. If your project is connected to a GitHub repository, then changes are published through pull requests so agent runs published will show up in your agent runs list with PR Merged instead. |
| PR Open | The changes proposed in the agent run have been pushed to a pull request which is still open. |
| PR Merged | The changes proposed in the agent run have been pushed to a pull request and merged. |
| PR Closed | The changes proposed in the agent run were pushed to a pull request that has since been closed |
Stop an agent run
Section titled “Stop an agent run”You can stop an agent run that’s still in progress.
Stop a run when any of the following applies:
- you change your mind about the prompt you sent
- you want to take a different approach
- your team has hit the limit for how many agent runs can be active at once and you want to start a new agent run or continue a different one
To stop an agent run:
- From your Netlify project dashboard, go to your project’s Agent runsAgent runsA single task or batch of tasks you or a team member prompted an AI agent to complete. page.
- Choose the active agent run you want to stop. Agent runs labeled In progress or New are still active.
- In the prompt box, choose Stop to immediately stop the agent run.

While a run is in progress, Stop replaces the Run task button in the prompt box on the run detail page.
What happens when you stop a run
Section titled “What happens when you stop a run”A stopped run moves to the Cancelled state and shows a Cancelled badge in the runs list and in the run detail header.
The run, its logs, its sessions, and any file changes the agent already made all remain available to you. A cancelled run can’t be published or used to open or update a pull request, since the Publish to production, Create pull request, and Update pull request or Update existing branch actions are offered for runs that finished as Done or Failed.
You can continue with another follow-up prompt in the same agent run. That starts a new session on the run, and the publish and pull request actions are available again once the new session completes.
Stop an agent run with the Netlify CLI
Section titled “Stop an agent run with the Netlify CLI”You can also stop a run with the Netlify CLI. To find the ID of a run that’s still active:
netlify agents:list --status runningThen stop that run by ID:
netlify agents:stop <run-id>The run moves to the cancelled state, the same as stopping it from the dashboard.
Why you may not be able to start a new run
Section titled “Why you may not be able to start a new run”Netlify limits how many agent runs your team can have active at the same time, across all of your team’s projects.
The limit depends on your plan:
| Plan | Concurrent agent runs |
|---|---|
| Free | 1 |
| Personal | 3 |
| Pro | 10 |
| Enterprise | 50 |
When you try to start a run beyond your limit, Netlify shows an error on the prompt box:
Concurrent agent limit (1) reached. To start a new task, wait for one to finish or stop one.
The number in parentheses is your plan’s limit. You get this same error whether you start a run on an existing project or in the flow to create a new project with an AI agent.
To free up a slot, you can do one of the following:
- Wait for the active run to finish.
- Open the active run and choose Stop.
Find active agent runs
Section titled “Find active agent runs”A run started by any team member on any project counts toward the same team limit for active agent runs, so check both of the following:
- the Agent runs tab for the project you’re working on
- your team’s Agent runs page, which lists runs across all of your team’s projects
Runs labeled In progress or New are active and hold a slot. Runs labeled Done, Failed, Cancelled, or Archived don’t. With the CLI, netlify agents:list --status running lists the active runs for a project.
Running out of credits during an agent run
Section titled “Running out of credits during an agent run”If your team runs out of credits, active agent runs are cancelled. A cancelled run will show a Cancelled (out of credits) status.
Once your team has more credits, you can continue your cancelled agent run. You’ll find a Continue option on the cancelled agent run that will resume your agent run’s task.
When you stop an agent run yourself, you won’t find a Continue option. Instead, send a new prompt in the same agent run to pick the work back up, as described in What happens when you stop a run.
When your team has no credits available you will not be able to start a new run. To learn more, see how agent runs consume credits.
Did you find this doc useful?
Your feedback helps us improve our docs.