For the complete Netlify documentation index, see llms.txt. Markdown versions of this page are available by appending .md to the URL. Turn Netlify’s AI features on or off for all projects in your Netlify team account.
By default, Netlify’s AI features are enabled for the following Credit-based plans:
- Free
- Personal
- Pro
By default, Netlify’s AI features are disabled for Enterprise plans.
AI feature enablement
Section titled “AI feature enablement”When you enable Netlify's AI features from your Netlify team dashboard, you enable the following for your team:
- Agent Runners: Prompt AI agents to fix, update, and ship code using your unique project context directly from your Netlify dashboard.
- AI Gateway: Use popular AI models within your project code and connect them seamlessly without managing API keys.
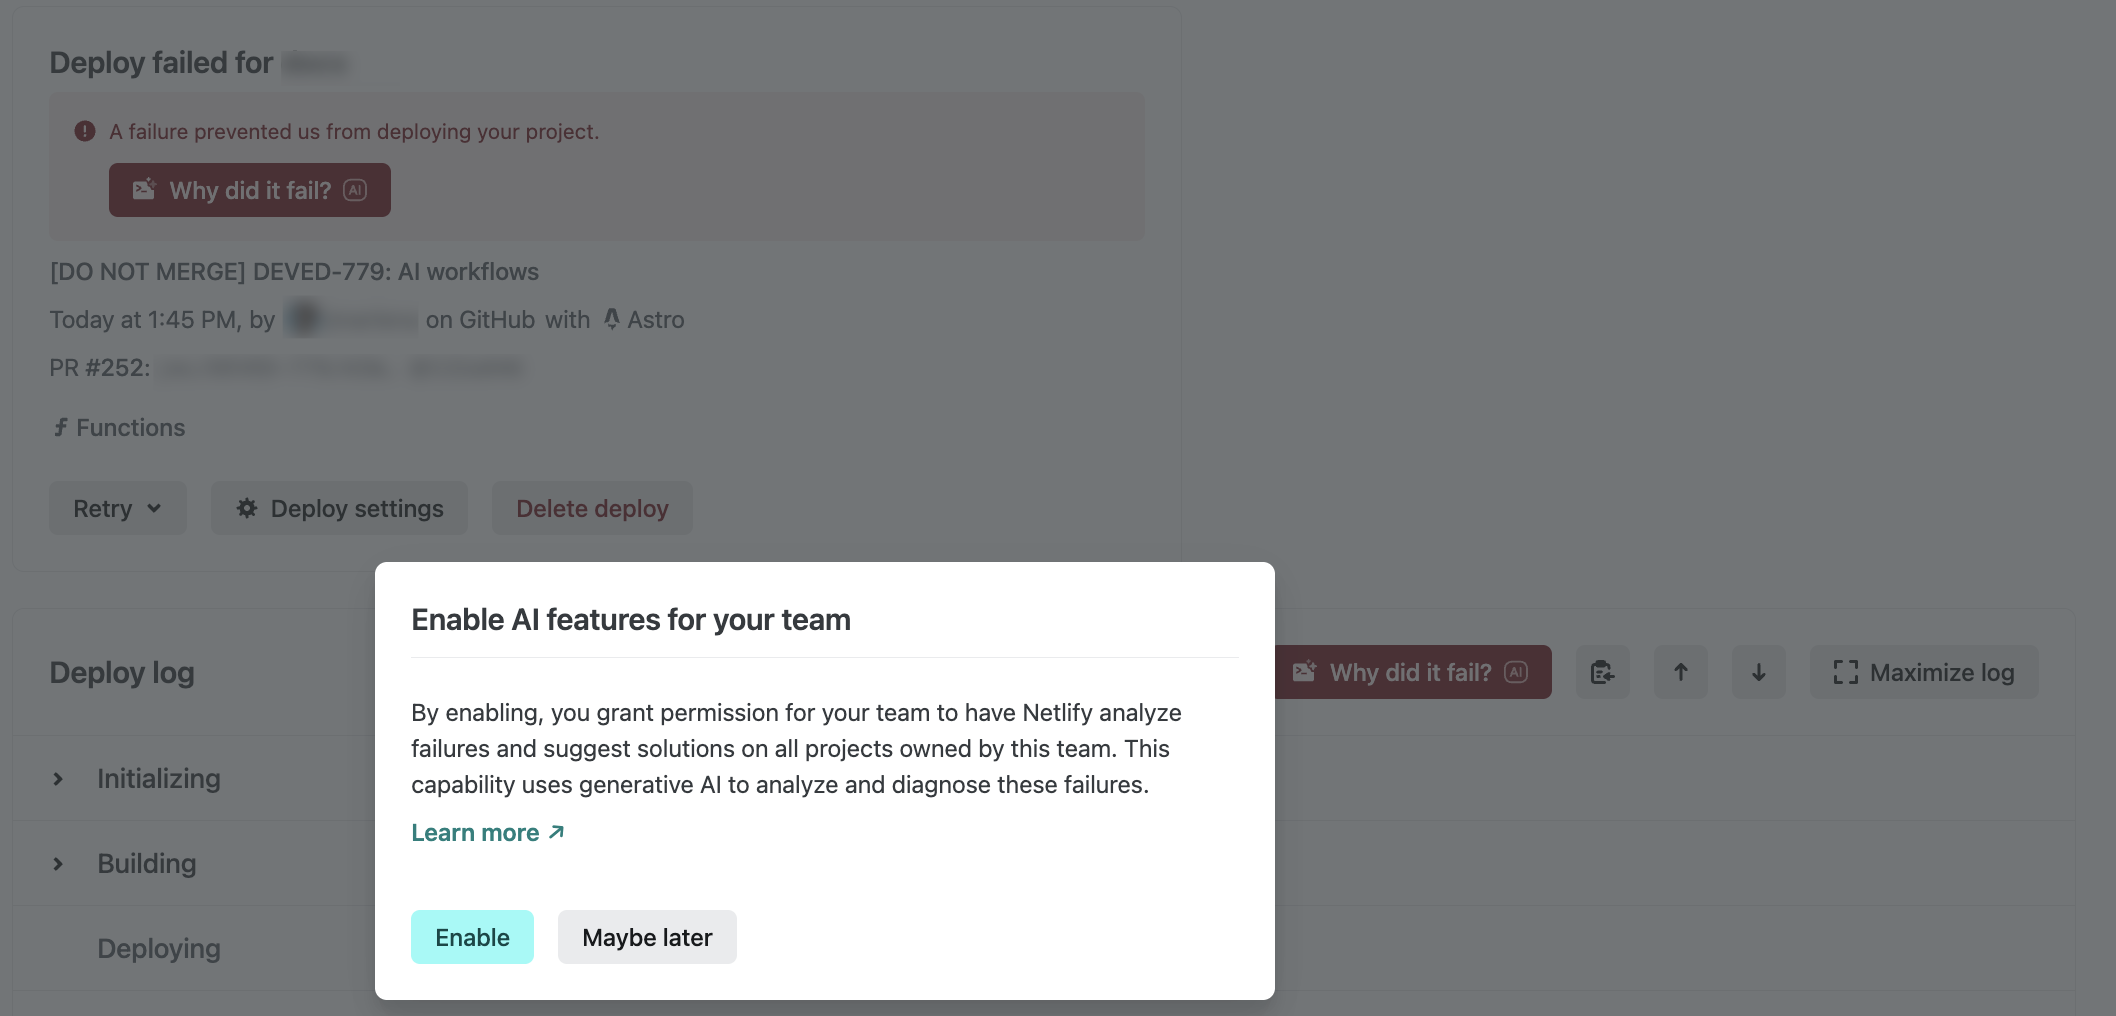
- Troubleshoot and fix failed deploys: Select the "Why did it fail?" button in the Netlify dashboard to diagnose failed deploys and then use Agent Runners to start your fixes.
Note that anyone in the following Netlify team roles can use these features:
To learn more about how AI features work with data and storage, check out our Security and privacy for AI features docs.
Ask Netlify AI is enabled by default for all site visitors to docs.netlify.com and is available in-app for all users of Netlify.
If your deploy fails and AI features are disabled, depending on your role, you may find a prompt to enable AI features in the Netlify dashboard.
Enable AI features
Section titled “Enable AI features”To enable AI features, you must be a Team Owner.
As a Team Owner, to enable AI features for all projects in your Netlify team account:
- Go to your Netlify Team dashboard.
- From your project dashboard, in the top left, choose Projects next to your project name.
- From your project dashboard, in the top left, choose Projects next to your project name.
-
Next, go to Team settings AI enablement.
-
Select Configure to turn AI features on.
Disable AI features
Section titled “Disable AI features”To disable AI features, you must be a Team Owner.
As a Team Owner, to disable AI features for all projects in your Netlify team account:
- Go to your Netlify Team dashboard.
- From your project dashboard, in the top left, choose Projects next to your project name.
- From your project dashboard, in the top left, choose Projects next to your project name.
-
Next, go to Team settings AI enablement.
-
Select Configure to turn AI features off.
Limit AI feature usage
Section titled “Limit AI feature usage”To help control costs, you can limit AI feature usage in two ways:
- Team AI inference credit limit: cap how many AI inference credits your whole team can use across both Agent Runners and AI Gateway.
- Member Agent Runner credit limits: cap how many Agent Runner credits each individual team member can use, and optionally override that limit for specific members.
To help control costs from using Agent Runners and AI Gateway, you can set up an AI inference usage credit limit. When your Netlify team reaches the limit you set, agent runs and AI Gateway usage are paused.
The credit limit you set is based on the AI inference meter, which tracks AI model usage costs across Agent Runners and AI Gateway.
| Agent Runners | AI Gateway | |----|---| | Run AI agents in agent runs to build and update your Netlify web project | Adds popular AI model functionality to your web project, such as an AI chatbot or interactive web experiences |
Once your team’s AI inference credit usage reaches the limit you set, the following happens:
- Active agent runs stop
- Your team can no longer start new agent runs
- AI Gateway usage is paused
Example scenario
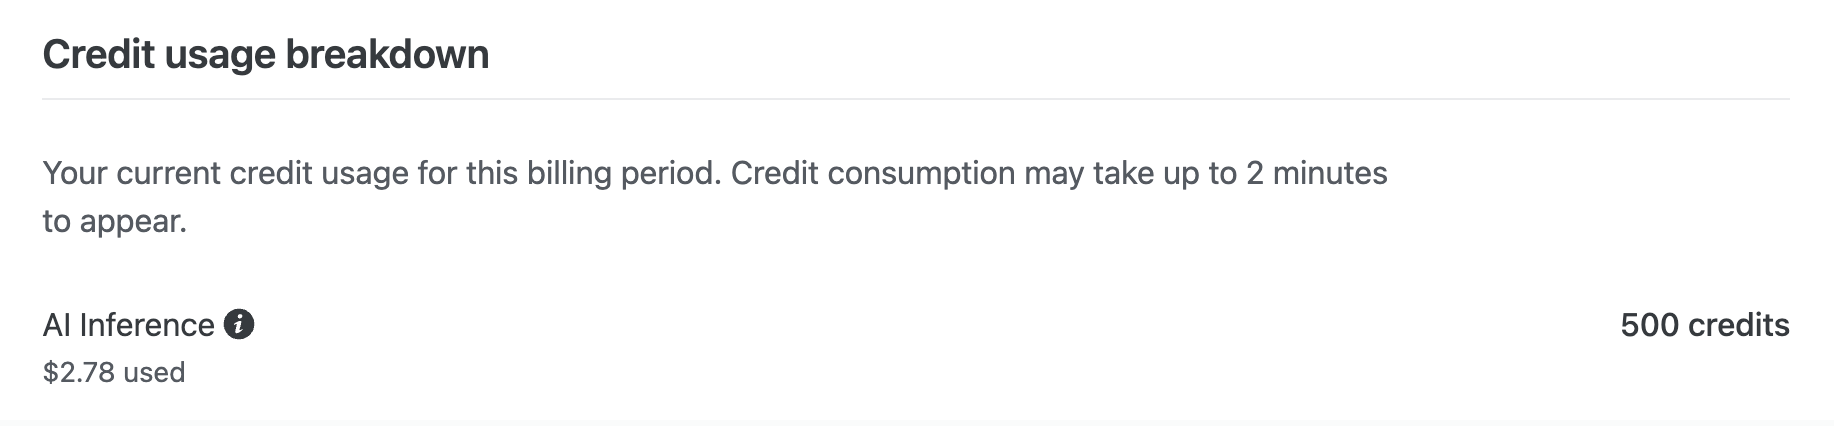
Section titled “Example scenario”For example, if you have the Personal plan with 1,000 monthly credits and you set an AI inference credit limit of 500 credits, once your AI inference meter reaches 500 credits, your credit usage breakdown dashboard will appear like this:
Resuming AI feature usage
Section titled “Resuming AI feature usage”When your AI inference credit limit is reached, AI Gateway functionality is paused, all active agent runs stop, and your team cannot start new agent runs until one of the following happens:
- Your credit balance resets at the start of the next billing cycle
- You upgrade your plan, which also resets your credit balance
- You disable or increase the AI inference credit limit
Set an AI inference credit limit
Section titled “Set an AI inference credit limit”As a Team Owner, to set an AI inference credit limit:
- Go to your Netlify Team dashboard.
- From your project dashboard, in the top left, choose Projects next to your project name.
- From your project dashboard, in the top left, choose Projects next to your project name.
-
Next, go to Team settings AI enablement.
-
Under AI usage limits, choose Configure, then select Enforce credit limit and enter the limit you want to set on AI inference credit usage. Note that setting a credit limit below your current usage will pause agent runs and AI Gateway usage and will interrupt active agent runs.
-
Confirm your changes.
Your updates apply immediately for all projects in your Netlify team.
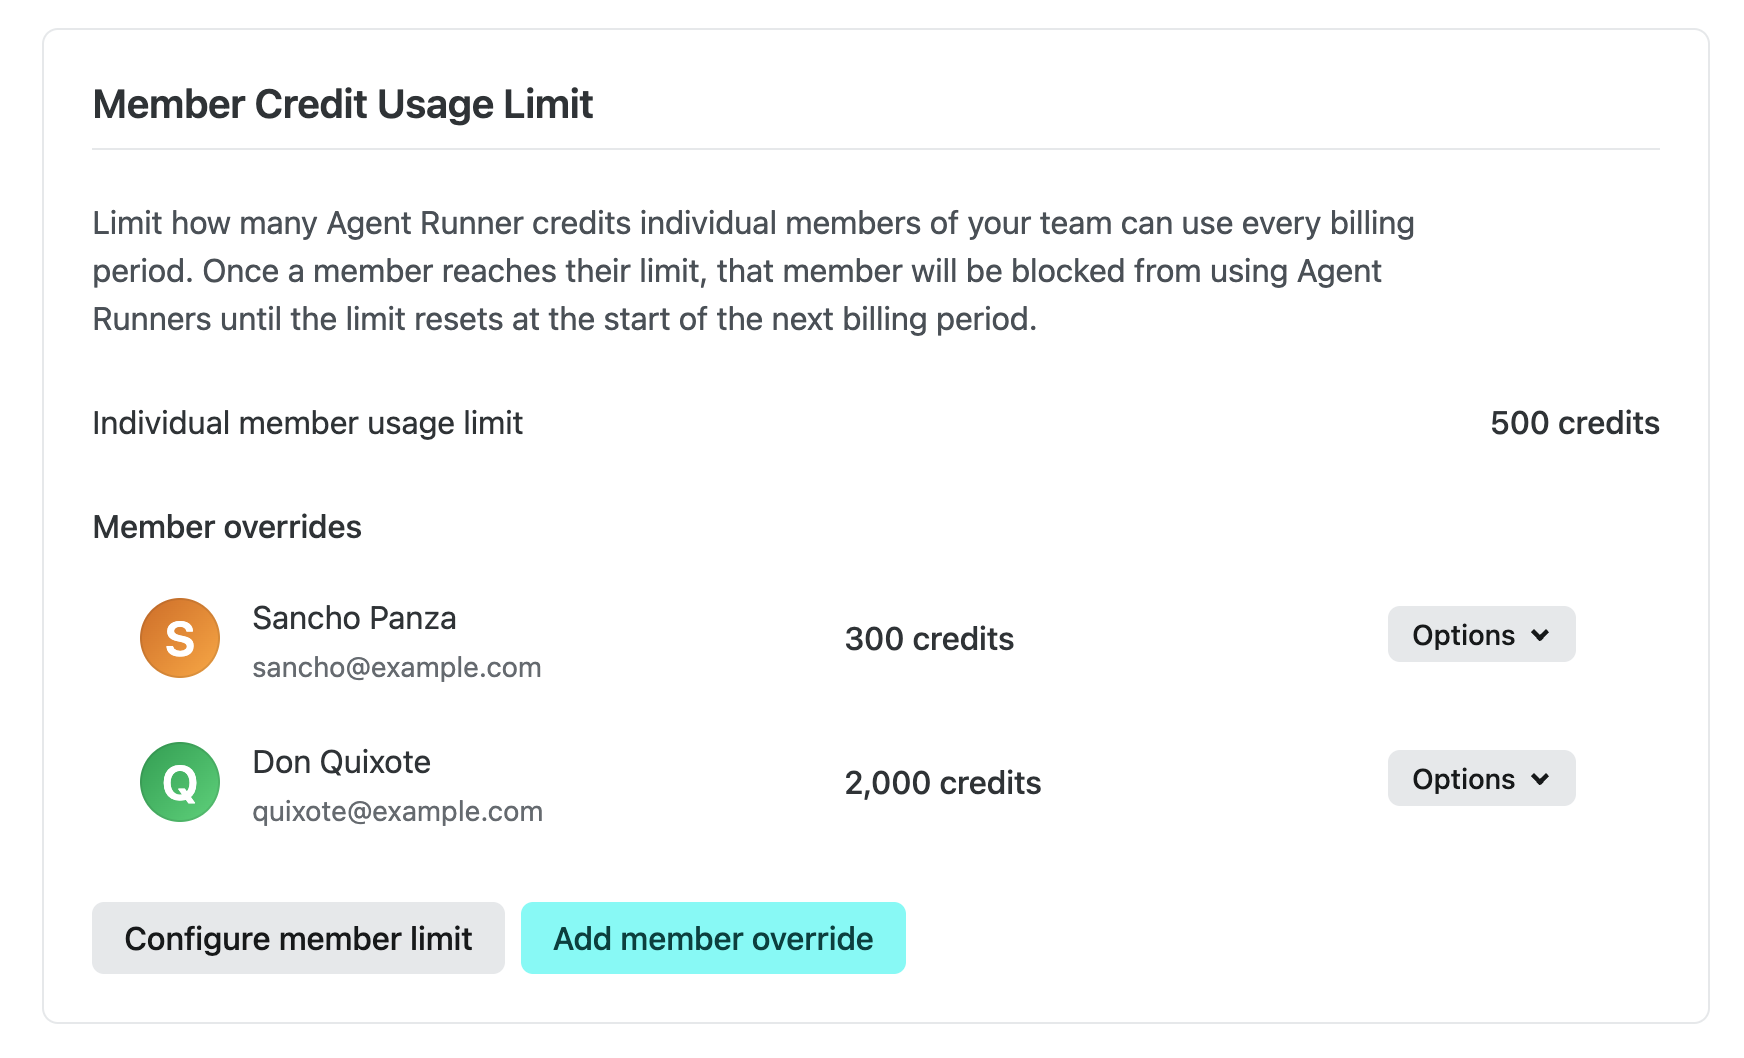
Limit member Agent Runner usage
Section titled “Limit member Agent Runner usage”In addition to the team-wide AI inference credit limit, you can limit how many Agent Runner credits each individual member of your team can use per billing period. Unlike the team AI inference credit limit, this per-member limit applies only to Agent Runners — it does not affect AI Gateway usage.
When a member reaches their limit, that member is blocked from starting new agent runs until the limit resets at the start of the next billing period. Other members can continue to use Agent Runners up to their own limits.
Team Owners on credit-based team plans can set credit limits for individual members.
Set a member credit usage limit
Section titled “Set a member credit usage limit”The member credit usage limit applies the same per-member Agent Runner credit limit to every member of your team.
As a Team Owner, to set a member credit usage limit:
- Go to your Netlify Team dashboard.
- From your project dashboard, in the top left, choose Projects next to your project name.
- From your project dashboard, in the top left, choose Projects next to your project name.
-
Next, go to Team settings AI enablement.
-
In the Member Credit Usage Limit section, select Configure member limit.
-
Select Enforce member usage limit, then enter the maximum number of Agent Runner credits each member can use per billing period. Setting the limit to
0 creditsdisables Agent Runners for all members. -
Confirm your changes.
Override the credit limit for a specific member
Section titled “Override the credit limit for a specific member”You can override the standard credit usage limit for an individual member. For example, to give a power user a higher credit limit or to block a specific member from using Agent Runners.
When you add an override for a member:
- A positive value sets a custom Agent Runner credit limit for that member each billing period.
- A value of
0 creditsblocks that member from using Agent Runners entirely. - Removing the override reverts that member to the standard member credit usage limit.
As a Team Owner, to add an override for a specific member:
- Go to your Netlify Team dashboard.
- From your project dashboard, in the top left, choose Projects next to your project name.
- From your project dashboard, in the top left, choose Projects next to your project name.
-
Next, go to Team settings AI enablement.
-
In the Member Credit Usage Limit section, select Add member override.
-
Select the member you want to configure, enter the custom credit limit (or
0 creditsto disable Agent Runners for the member), then save.
Member overrides appear in the Member overrides list within the Member Credit Usage Limit section. To change an existing override, choose Edit custom limit from that member's options menu; to remove it, choose Delete custom limit.
Did you find this doc useful?
Your feedback helps us improve our docs.